- Battle of Delville Wood
-
Battle of Delville Wood Part of the Battle of the Somme in the First World War 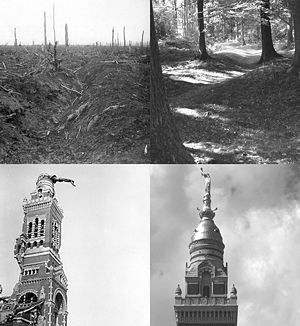
Delville Wood in 1916 (left) and in 2009 (right)
The leaning statue of the Virgin Mary on the Basilica of Notre Dame de Brebieres in Albert (1916 and 2009)Date 14 July – 15 September 1916 Location Delville Wood, Longueval, The Somme, France
50°01′N 2°48′E / 50.017°N 2.8°ECoordinates: 50°01′N 2°48′E / 50.017°N 2.8°EResult Tactical Allied victory Belligerents  United Kingdom
 South Africa
 German Empire
Commanders and leaders General Sir Henry Rawlinson[1] General–Major Fritz von Below[2] 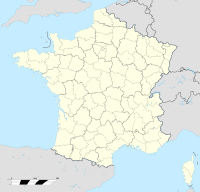
 Location of Delville Wood in the French department of the Somme
Main battles in small caps and other engagements below:
Albert – Bazentin Ridge – Delville Wood – Pozières Ridge – Guillemont – Ginchy – Flers-Courcelette – Morval – Thiepval Ridge – Transloy Ridges – Ancre Heights – Ancre
Montauban – Mametz – Fricourt – Contalmaison – la Boiselle – Gommecourt – Longueval – Trônes Wood – Ovillers – Fromelles – High Wood – Mouquet Farm – Martinpuich – Combles– Lesboeufs – Gueudecourt – Eaucourt l'Abbaye – le Sars – Butte de Warlencourt– Schwaben – Stuff Redoubts – Regina Trench – Beaumont Hamel
Order of BattleMain article: Battle of the SommeThe Battle of Delville Wood was one of the early engagements in the 1916 Battle of the Somme in the First World War. It took place between 14 July and 3 September, between the armies of the German Empire and allied British and South African forces. Delville Wood[Note 1] is located to the north east of the town of Longueval in the département of the Somme in northern France. After the two weeks of carnage from the commencement of the Somme Offensive, it became evident that a breakthrough of either the Allied or German line was most unlikely and the offensive had evolved to the capture of small prominent towns, woods or features which offered either side even the slightest tactical advantage from which to direct artillery fire or to launch further attacks.
Delville Wood was one such feature, making it a critical objective to both German and Allied forces. As part of a large offensive starting on 14 July, General Douglas Haig, Commander of the Allied Armies intended to secure the British right flank, while the centre advanced to capture the higher lying areas of High Wood in the centre of his line. Delville Wood was a battle to secure this right flank. The battle achieved this objective and is considered a tactical Allied victory. However, it was one of the bloodiest confrontations of the Somme, with both sides incurring large casualties. This tactical victory needs to be measured against the losses sustained as well as the fact that the British advance to the north had made only marginal gains by the end of the battle.
The battle is of particular importance to South Africa, as it was the first major engagement entered into by the South African 1st Infantry Brigade on the Western Front. The casualties sustained by this Brigade were of catastrophic proportions, equal to—or worse than those encountered by Allied battalions on the first day of the Somme. On the Western Front, units were normally considered to be incapable of combat if their casualty levels had reached 30% and they were withdrawn once this level had been attained. The South African Brigade suffered losses of 80%, yet they managed to hold the Wood as ordered. This feat has been described as "..the bloodiest battle of hell of 1916."[3]
Today, Delville Wood is known for the well preserved wood with the still visible remains of the original trenches, a museum and monument to the fallen South Africans.
Contents
Background
The Battle of the Somme had started on 1 July 1916 and by this time, the Allies had learned the lessons of the futile offensives of 1915 and of the meat-grinder type losses sustained at Verdun.[4] The Allied objective was no longer to try to break the German Front in a sudden, surprise attack—as the depth of German defences had proven this to be impossible. These lessons had reshaped earlier tactics and attacks were now independent attrition actions, conducted over a wide front and each one preceded by artillery "preparation" and the use of fresh troops.[5] It was to be attrition on a campaign scale, the "crumbling" of defences. The offensive was split between British and Dominion forces in the north (from Gommecourt to Maricourt) and the French in the south (from the River Somme to the village of Frey).[6]
 Commanders
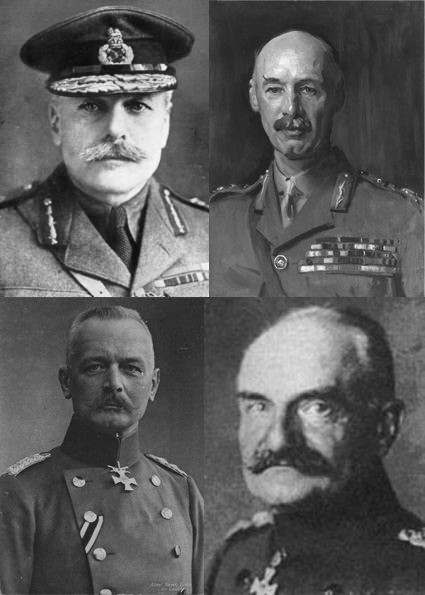
(Top Left clockwise) General Alexander Haig, Commander of the BEF on the Somme, General Rawlinson, Commander British 4th Army
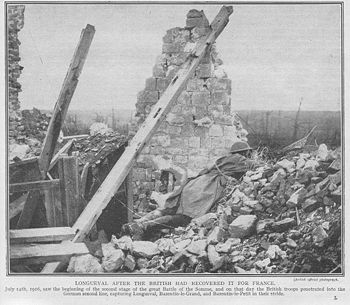
General von Below, Commander of the German 2nd Army on the Somme; General von Falkenhayn: Commander of German forces on the Western FrontAfter two weeks of battle, the German defenders were holding firm in the north and centre of the British sector—here the advance had stopped, except for two battles raging for the control of Ovillers and Contalmaison. However, there had been a number of Allied gains from the Ancre River southwards. In the area of Lt–Gen Sir Walter Congreve's XIII Corps, the German first line of defences had been breached in the areas of Montauban and Bernafay Wood. Trônes Wood proved more difficult and was captured by the British and then re-taken by the Germans.[7] By 13 July, although under constant artillery bombardment, German forces were still persevering in Trônes Wood and firmly held the town of Longueval to the west of Delville Wood.[7]
The Allied line was now split into two distinct sections by a right angle at Longueval / Delville Wood. On the left the Allied front faced north and to the right they faced east. This meant that an advance on a wide front would result in the attacking forces diverging from one–another as they advanced.[8] In order to "straighten the line," General Sir Douglas Haig had decided to exploit the advances which had been made in the south by taking and holding Longueval. Being on fairly high ground and providing good spotting opportunities for artillery fire, an occupied Longueval would protect the right flank and allow the Allies to advance in the north and align their left with that of Congreve's XIII Corps on the right.[7] General Alexander Haig had promised French President Poincaré significant gains to mark the French National Day, with attacks planned all along the Somme line for 14 July.[9]
Prelude
Orders
In executing General Haig's intentions, General Sir Henry Rawlinson, commander of the Fourth Army[1] ordered Congreve to use his XIII Corps to capture Longueval,[7] while XV Corps under command of Lieutenant General Henry Horn was instructed to provide flanking cover to the left of Congreve's XIII Corps attack.[10] In addition, Rawlinson recommended that the advance be done at night and the attack launched at first light with a very short, but intense artillery bombardment. The plan was to maximise surprise, which had been sadly missing in the previous actions in the war thus far.[10] Haig strongly opposed the plan, in that it made use of inexperienced New Army Divisions and was to be launched at night. Rawlinson's view eventually prevailed but this debate consumed one day and where the Trônes Wood attack was initially planned to precede the Longueval attack, it was now postponed by one day to 14 July—the same day as the attack on Longueval; with grave consequences.[10]
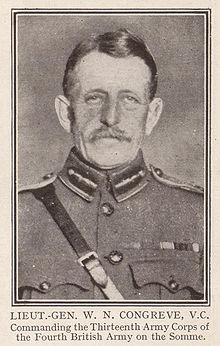
Lt-Gen W.N. Congreve VC An appreciation of the terrain shows that to capture Longueval, Congreve would first have to clear Trônes Wood of the German elements, as they would present a danger to his right flank as he approached Longueval from the south. This would ease the capture of Longueval, but once the town had been captured it could not be held unless Delville Wood, bordering the north eastern edge of the town, was also captured. If left in German hands, Delville Wood would permit unhindered shelling of the town and would provide ideal cover for the assembly of German reinforcements for a counter attack on Longueval.[7]
Congreve assigned the 9th Scottish Division to attack Longueval and the 18th Eastern Division under Major General Ivor Maxse on their right, to clear Trônes Wood. The attack presented some formidable challenges: Firstly, Longueval was heavily fortified with trenches, tunnels and concrete bunkers and firmly occupied by elements of the IV Magdeburg Corps and Generalmajor von Lindquest and his 3rd Guards Infantry Division.[11] Also, the two attacking divisions were advancing into a salient covered from the north west by the Thüringisches Infanterie–Regiment Nr. 72, to the north the Magdeburg Corps and in and around Delville Wood, the Infanterie–Regiment Fürst Leopold von Anhalt–Dessau (1. Magdeburgisches) Nr.26, Thüringisches Infanterie–Regiment Nr. 153 and 107th Regiments.[12] Secondly, the divisions would be advancing uphill from Bernafay and Trônes Wood towards Longueval– not only did the terrain slope uphill, but was funnel shaped, broad in the south and narrowing towards Longueval. The German defensive line left no other approach towards Longueval.[7] It is also now evident that General Sixt von Armin, commander of the German IV Corps opposing Congreve, suspected an imminent attack on 13 or 14 July.[13]
The Division Commander of the 9th Scottish Division, Major-General W.T. Furse,[1] ordered that the Longueval attack be led by the 26th Brigade. The 8th Black Watch and the 10th Argyll & Sutherland Highlanders, would lead, side-by-side. The 9th Seaforth Highlanders, would provide support and the 5th Cameron Highlanders, would be in reserve. The 27th Brigade would follow behind, mopping up any bypassed German elements and providing support for the intense fighting which was expected once the leading battalions had entered the fortified town. Once the town had been secured, the 27th Brigade was to pass through the 26th to take Delville Wood. The 1st South African Brigade was to be kept in reserve.[7]
Battle
Progress in Longueval
Battle for Longueval The advance started at 0325 on 14 July across a 4 miles (6 km) front. This time, there was no week long artillery bombardment, but a five minute barrage just before dawn. The result was that the attack started with complete surprise. However, it was one thing to penetrate the German second line by a sudden blow on a limited front, but another to consolidate and extend the breach in the face of the now fully alerted German divisions. The attack on Longueval met with initial success as the thin German advance screen was rapidly overwhelmed. Then resistance stiffened. Knowing the importance of the position, the German theatre commander, General der Infanterie Erich von Falkenhayn had ordered that "...the enemy will not advance, except over corpses!"[14]
By mid morning, house–to–house fighting had developed; the artillery bombardment had been ineffective and German resistance was increasing as reserves were brought forward and as artillery and machine–gun fire from Delville Wood and positions in the town raked the advancing Highlanders.[7] By afternoon, only the western and south western part of the town was in Allied hands[7] and the 27th Brigade which was intended for the attack on Delville Wood, had been committed in support of the 26th. It now became obvious to Major-General Furse of the 9th Division, that to secure all of Longueval, Delville Wood had to be taken first. He thus had no option but to commit his last reserve—the 1st South African Brigade.[15] At 1300 Furse ordered Brigadier General Henry Lukin to deploy his 1st South African Brigade to advance and to capture Delville Wood.[7]
Fighting for the wood
Break–in and initial occupation: 14 July
As part of the southern assault, the South African Brigade was to attack the German forces in Delville Wood, except for the 1st Battalion which had been deployed earlier to fill a gap between the 26th and 27th Brigades in Longueval.[16]

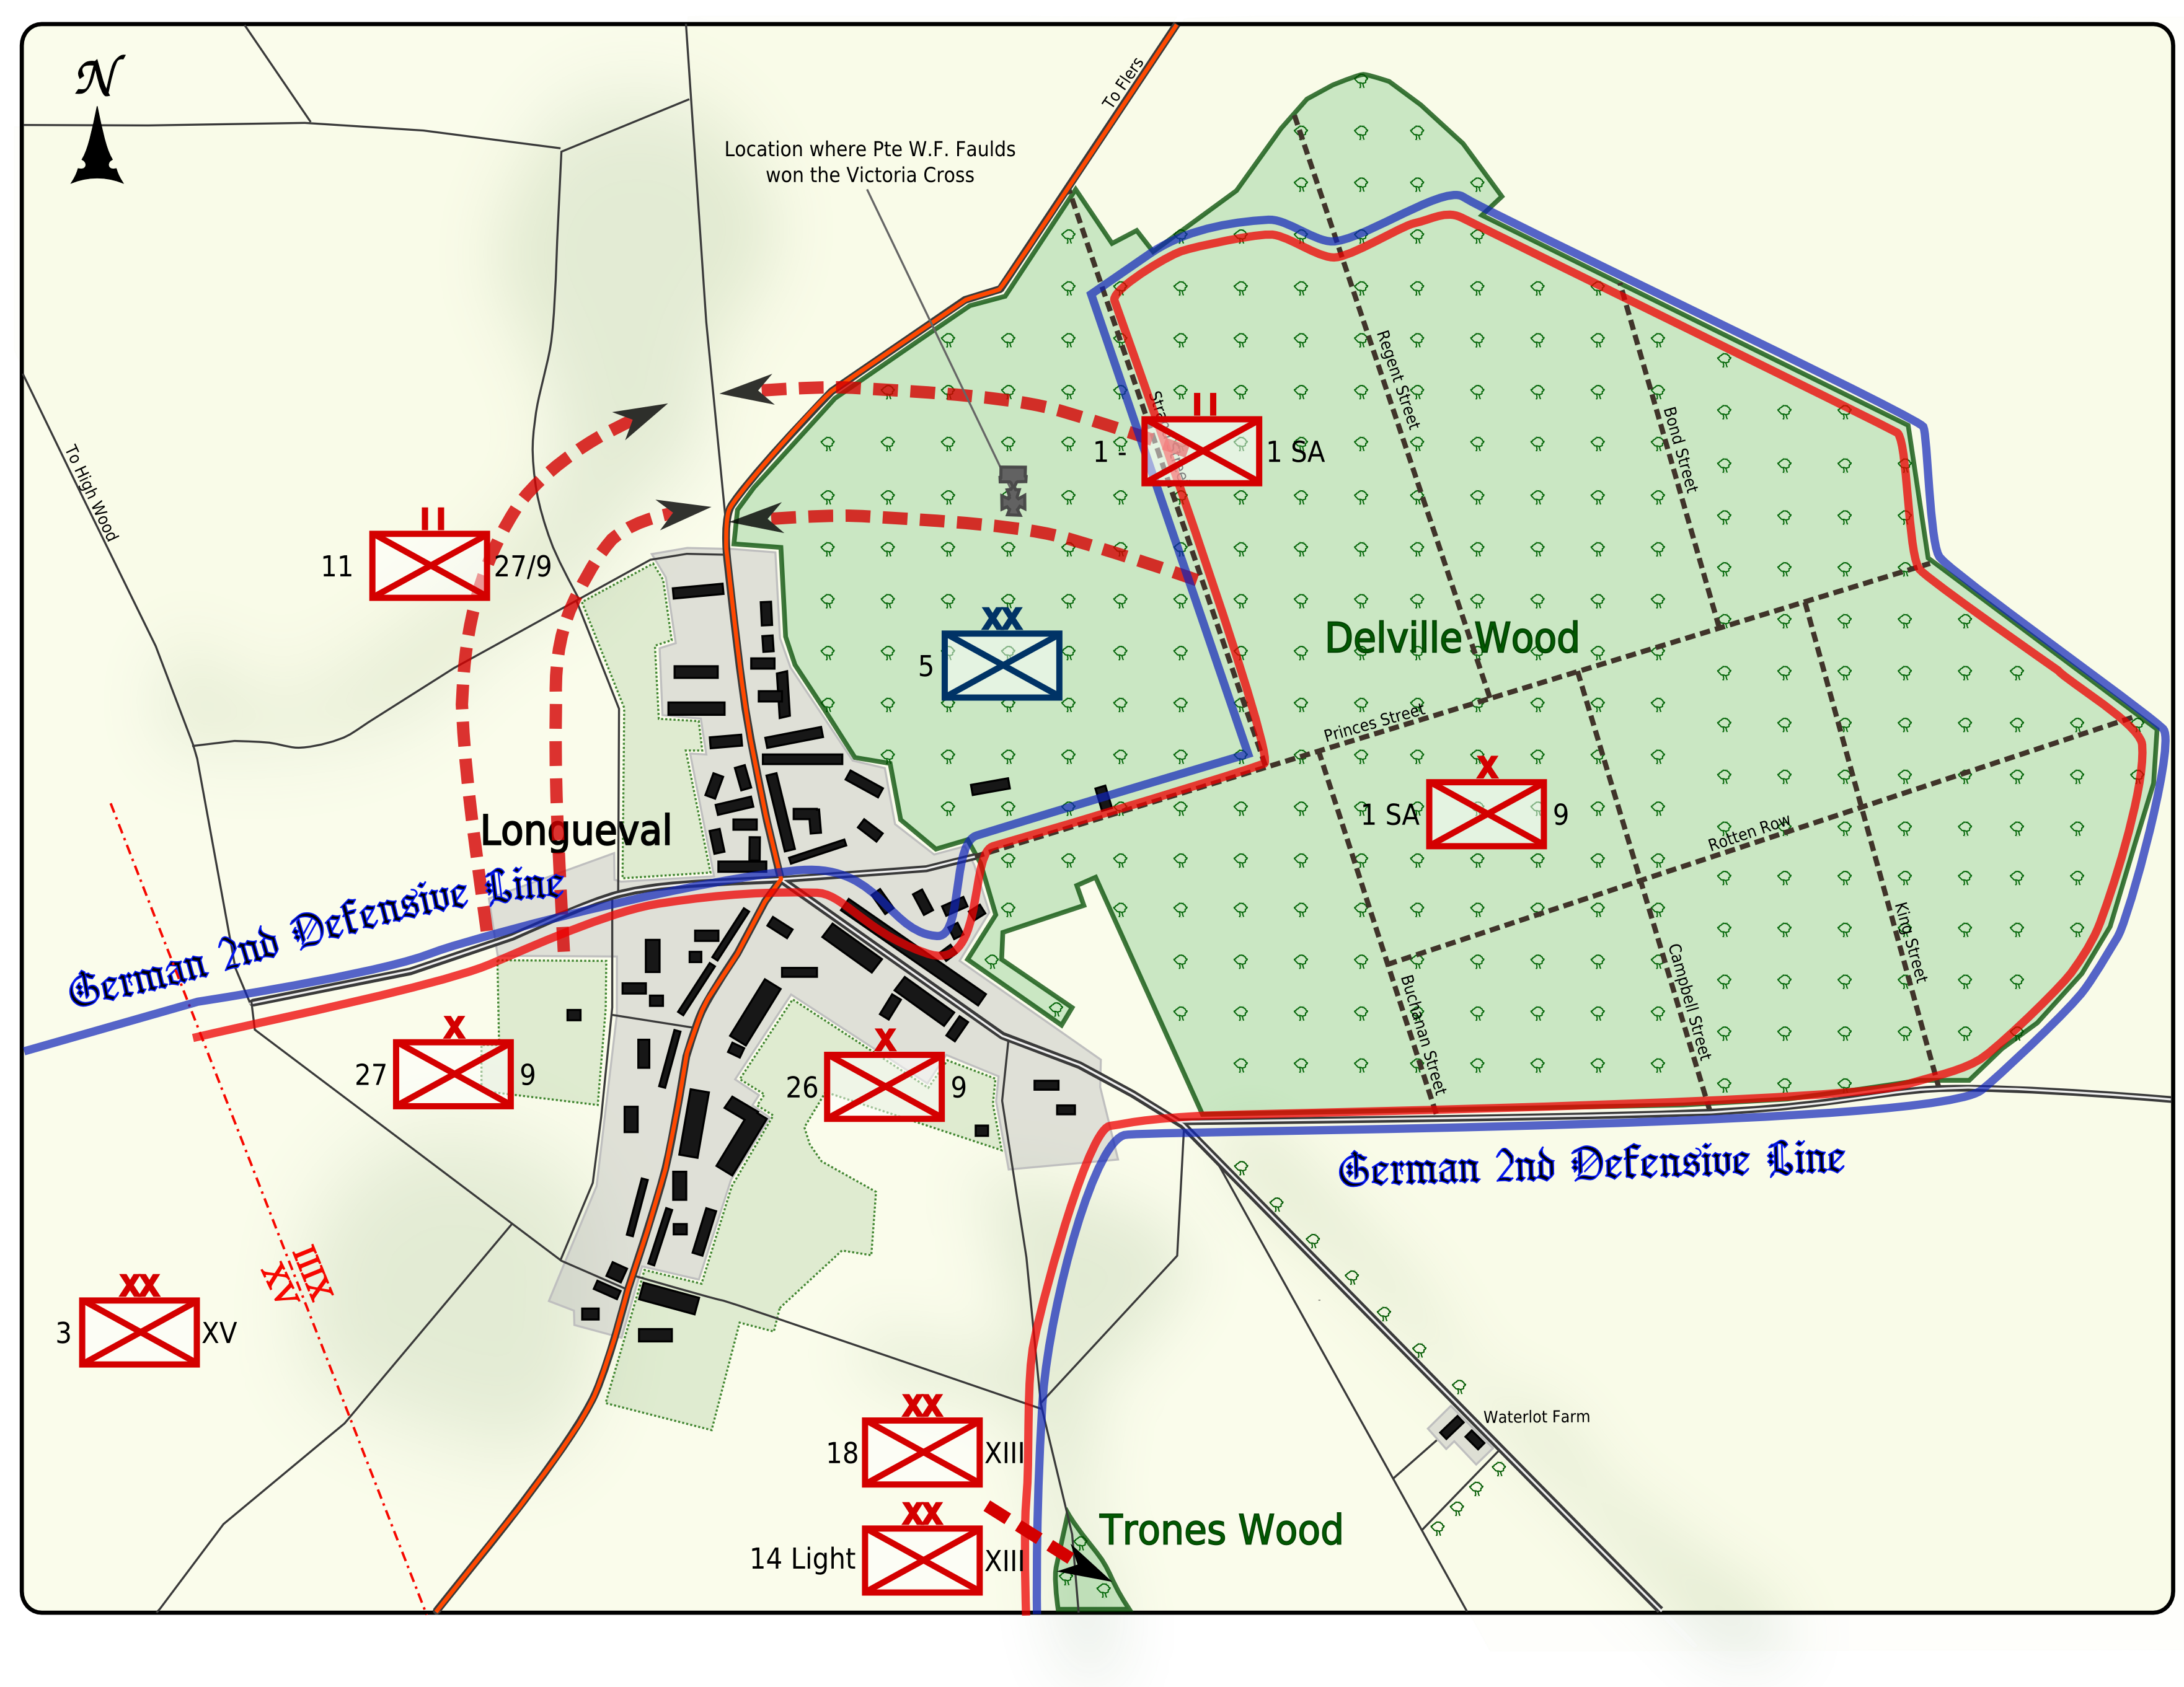
Map 1: Positions on 14 July 1916 The attack was planned for 1700 but this was later changed to 1900 and later again suspended to 0500 the next morning due to the limited progress being made in Longueval. Lukin was ordered to take the wood at all costs and instructed that his advance was to proceed even if the 26th and 27th Brigades had not captured the northern part of the town.[17] Lukin ordered his battalion commanders to attack and break into the wood from the south western corner on a one–battalion front. 2nd Battalion would lead, the 3rd Battalion in direct support and the 4th in reserve. The three battalions moved out from Mountbatan before first light under command of Lieutenant–Colonel Tanner of the 2nd Battalion who was appointed as commander for the attack. On the advance march, Tanner received instructions to detach two further companies in support of the 26th Brigade still in Longueval. "B" and "C" Companies of the 4th Battalion were despatched to Longueval.[18] The 2nd Battalion had reached a trench occupied by the 5th Cameron's which ran parallel to the wood and using this as his start–line (Refer Map 1), Tanner instructed them to leave the trench and advance into the wood at 0600 on 15 July.[17]
The first attack progressed smoothly, and by 0700 the South Africans had secured the southern half of the wood, south of "Princes Street" (refer Map 2).[Note 2] Tanner then deployed two companies further north to secure the northern perimeter of the wood. Later during the morning, the 3rd Battalion progressed well towards the east and north east of the wood and by 1440 Tanner reported to Lukin that he had secured the whole wood,[19] with the exception of a strong German position in the north west adjoining Longueval. Tanner had spread his troops along the entire perimeter in groups forming strong–points supported by machine–guns.[17] Rather than having "secured" the wood, the brigade was now in a trap, occupying a salient with only the south western base being in contact with the 26th Brigade in Longueval.[20] All troops were equipped with spades, but digging within the perimeter of the wood was made difficult by roots and remnants of tree trunks from the previous day's artillery fire, making the preparation of proper trenches impossible, with the South Africans having to make do with shallow shell scrapes.[21] With unprepared trenches, a narrow base to their salient and facing over 7,000 German troops, holding the wood was going to be extremely difficult![20]
German counter attack: 15 July 1916

Map 2: Positions at 1440 on 15 July 1916 At 1500 the Bayerische 6. Reserve–Infanterie–Regiment of the 10th Bavarian Division attacked in force from the east but were partially driven back by rifle and machine–gun fire. At 1640 Tanner reported to Lukin that German forces were observed massing to the north of the wood and he called for reinforcements as the South Africans had already lost one complete company from the 2nd (Natal and Free State) Battalion. Tanner had already received one company from the 4th (Scottish) Battalion from Longueval and Lukin sent a second company forward to reinforce the 3rd (Transvaal & Rhodesia) Battalion. In addition, Lukin sent forward messages urging Tanner and the battalion commanders to dig in regardless of fatigue, as heavy artillery fire was expected during the night or early the next morning.[17] As it got darker, German high explosive and gas shells increased in intensity[22] and later the night fire from the four accurately ranged Feldartillerie–Brigades reached 400 shells per minute into the wood.[17]
First attempt at clearing the wood: 16 July
During the previous day, the 14th and 18th Divisions had cleared Trônes wood and established a line up to Maltzhorn Farm,[Note 3] joining up with the 9th Scottish Division who were holding the southern half of Longueval.[23] At 0035, Lukin received orders that in the coming day, the South Africans were to block German access to the north western sector of the Wood at all costs—to allow the 9th Division to complete their intended capture the northern part of the town.[21]

Map 3: Plan for the attack on the northern corner on 16 July 1916 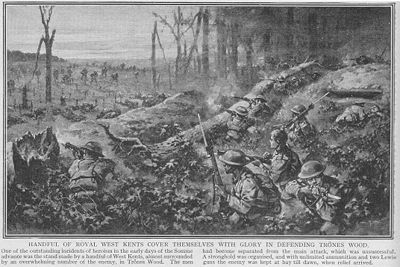
Battles in Trônes Wood The instructions were for the South Africans to clear the north–western sector of the wood and then to advance westwards until they joined up with the 27th Brigade, fighting their way north and north–eastwards through Longueval. The advance started at 1000 on Sunday 16 July and failed totally—German opposition was simply too strong for the reduced strength regiment of South Africans and similarly, the 11th Royal Scots leading the 27th Brigade advance were pinned down in the town by machine gun fire from an orchard in the northern part of Longueval.[23] It was during this action in the wood that Private W.F. Faulds of the 1st Battalion won the Victoria Cross (See Map 3). Following this failure, the remaining troops fell back to their trenches midway in the wood and were subjected to artillery fire for the rest of the day, to which they had no means of replying. By now, the situation had become desperate, compounded by an attack by the Thüringisches Infanterie-Regiment Nr. 153[24]—Longueval and Delville Wood had proven to be far too strongly held for a one division assault by the 9th Scottish Division. It was a vicious circle, Longueval could not be captured without Delville Wood and Delville Wood could not be cleared of German forces without full control over Longueval.[23]
Second attempt: 17 July
A second action was initiated before dawn on 17 July. The evening before, the South Africans had withdrawn south of Princes Street and east of Strand Street to permit a preparatory barrage to be fired at the north west corner of the wood the night preceding the attack. The same applied to the northern part of Longueval. Again, the Royal Scots of the 27th Brigade attacked north in Longueval and the 2nd South African Battalion plus two companies of the 1st Battalion attacked west to try to clear the wood. Again, German resistance was too great and machine–gun fire forced the South Africans to fall back to their original positions, suffering a large number of casualties in the process.[23] By afternoon, there was no change, save for increased German artillery fire. That evening Tanner was wounded in the thigh and was replaced by Lt–Col Thackeray, (Commander of the 3rd Battalion) as commander of the troops in the Wood. The same evening, news was received that the 9th Division was to draw in its left flank and that the 3rd Division under command of Major-General Aylmar Haldane was to attack Longueval from the west during the course of the night.
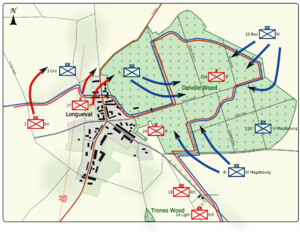
Map 4: Dispositions evening of 17 July Artillery fire continued to pour into the wood and by late evening, Lukin instructed all possible men to be pushed into the north western sector to support the attack on Longueval planned for 0345 that morning. However, during the night, under an advancing barrage of 116 field guns and over 70 medium guns,[25] the German Guards Division advanced as far as Buchanan Street and Princes Street, driving the South Africans back from their forward trenches, again inflicting large casualties.[23]
The Germans had spotted the forming up of the regiments in the wood and had retaliated with a bombardment of unprecedented fury—every part of the area was searched and smothered by shells.[26] During this barrage, German troops began attacking and infiltrating the South African left flank from their strong positions in the north–west corner of the wood (See Map 4). By 1400 the South African position was critical with attacks from the north–western corner, from the north and from the east. And, the second attempt to clear the north–western corner had again failed. At 1815 news was received that the South African Brigade was to be relieved by the 26th Brigade.[26]
The 3rd Division attack on Longueval had been a success and gains had been made in the northern sector of the town. However, General von Armin had reinforced the German forces by the deployment of the 8th Division from the IV Magdeburg Corps against the Buchanan Street line from the south east, forcing Thackeray to cling to the south western corner of the wood for two days and nights, as that was his lifeline to the rest of the 9th Division (See Map 4).[26]
Further German counter attacks: 18 to 20 July
On the morning of 18th, the South Africans received support from the relatively fresh 76th Brigade of the 3rd Division who attacked through Longueval and across the south western part of the woods to join up with A Company of the 2nd South African Battalion. This union did not last long, as the 76th were forced to withdraw again under severe German fire. In the south, the South Africans had succeeded in recovering some of the lost territory; not because of attacks by their reduced numbers, but because the Germans had withdrawn in preparation for orchestrated counter attacks in other areas.[27] A German bombardment commenced at sunrise and was to continue the whole day[11] while the German 8th Division was pushing snipers and grenadiers / bombers forward into the wood and then followed them up with massed infantry assaults. In addition, these types of attacks were being repeated simultaneously from the north, north east and north west.[28]
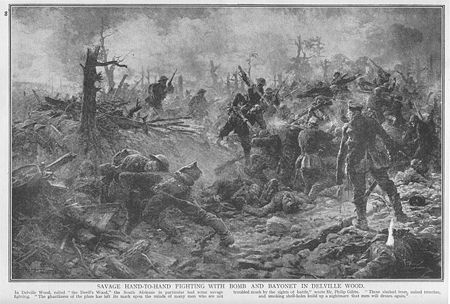
Fighting in Delville Wood By afternoon, the north perimeter had been pushed further south by German attacks. By now, hand–to–hand fighting had broken out all over the wood, as the South Africans could no longer hold a consolidated and continuous line, many of them being split into small groups without mutual support.[11] By the afternoon of the 18th, the fresh Branderberger regiment had also joined the fray. A German officer commented on this part of the battle that:
“ ...Delville Wood had disintegrated into a shattered wasteland of shattered trees, charred and burning stumps, craters thick with mud and blood, and corpses, corpses everywhere. In places they were piled four deep. Worst of all was the lowing of the wounded. It sounded like a cattle ring at the spring fair....
Uys (1983) p.205” By the 19th, the few South Africans who were left were subjected to further shelling and sniping, the sniping now being from extremely close ranges.[26] They had been in the wood and the raging battle for five days. Early morning the 153rd Reserve Infantry Regiment and two companies of the 52nd Infantry Regiment entered the wood from the north and wheeled to attack the remaining men of the 3rd South African Battalion from behind, capturing six officers and 185 men from the Transvaal Battalion. The rest were killed.[29] Later, by mid morning, in an attempt to reinforce the tottering South Africans, Black Watch, Seaforth and Cameron Highlander elements attempted to charge forward into the Wood to assist from Longueval, only to be once again blocked by Germans firing south from the north west corner of the wood.[30] The Brigade was critically short of water, without food and unable to evacuate any wounded. Many groups that were now totally isolated and out of ammunition had no alternative but to surrender.[31]

Map 5: Situation from 18 to 20 July In the afternoon of the 19th, the 53rd Brigade was pressed forward, through the base of the salient to attempt to reach Thackeray's headquarters. They succeeded in reinforcing the base of the salient, but were unable to provide any meaningful support to the forward elements of the South African brigade.[31] This situation prevailed through the night of 19 and into 20 July.
Relief
On the 20th, the 76th Brigade of the 3rd Division was again pushed forward to attempt to relieve the 1st Brigade. The Royal Welsh Fusiliers fought to engineer the break–through to link up with the South Africans. In this action, two fusiliers (Cpl. Joseph Davies and Pte. Albert Hill) were awarded the Victoria Cross.[32] By 1300 Thackeray sent a note to Lukin stating that his men were exhausted and could not repel any further attacks, pleading for water too.[32] Leading elements of the Suffolk's and 6th Royal Berkshires were the first relieving troops to break through, meeting up with the remaining South African elements and then being led into the segment of the wood still under South African control.[26]
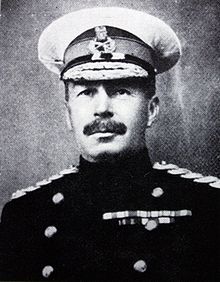 Henry Lukin, who was a Brigadier-General commanding 1st South African Brigade
Thackeray marched out of the wood to the pipes[Note 4] of the Black Watch[33] leading two officers (both of whom were wounded) and 140 other ranks, they being the entire remnant of the South African Brigade. They spent the night at Talus Boise and the next day, these remaining forces withdrew to Happy Valley south of Longueval.[34]
Eventual capture
The 52nd and 76th Brigades faced sniping and heavy shelling in the Wood until 26 July. At 0700 on 27 July, 22nd and 23rd Royal Fusiliers (99 Bde, 2 Div), the 1st Royal Berkshires and the 1st Kings Royal Rifle Corps attacked the wood and cleared a large area of the southern part of the wood.[35] During this action, Sgt. Albert Gill of Kings Royal Rifle Corps was killed, his actions earning him the Victoria Cross. The 2nd Division held the wood until 4 August when they were relieved by the 17th Northern Division who were in turn relieved by the 14th Light Division and 61st Brigade of the 20th Light Division on 11 August.[35]
On 27 August, the Germans re–entered from the north–east side of the wood. By now there was not a tree left in the wood, rain had turned the shell holes into pools of water and mud, many containing already decaying German and Allied corpses.[35] Fighting resumed in all earnest, and on 30 August the 72nd and 73rd Brigade of the 24th Division were sent in as reinforcements. The final German forces were driven from the wood on 3 September 1916.[36]
Second battle: 1918
However, the wood was not to remain quiet—as the Allies held the Wood until April 1918 when it was again re–captured by German forces and held by them until 28 August 1918. On this day the 38th (Welsh) Infantry Division recaptured the wood for the second and last time. The war ended three months later.[36]
Aftermath
Outcome
The Allies had won a tactical victory and had secured Longueval and Delville Wood for the time required to permit the formations to their north to advance and capture High Wood and then the strategic Thiepval Ridge. Over the southern front, twenty three thousand men had been expended in these efforts, to gain a small "tongue" of ground a few miles deep.[37] Both the Allies and Germans had suffered appalling casualties, caused largely by both sides continually committing new forces in piecemeal attacks against one another,[Note 5][38] as was similarly the case first in Trônes Wood and thereafter, in the same manner in Longueval and Delville Wood.[39]
Tactical consequences
The Battle for Longueval and Delville Wood had started with a charge by the 2nd Indian Cavalry Division between Longueval and High Wood and ironically, two weeks after Delville Wood having finally been cleared, tanks were introduced for the first time in the Battle of the Somme. The Battle was to be one of the last of truly static, hand–to–hand close quarter infantry fighting on the Western Front. After this, tanks had replaced cavalry and concentrated artillery fire predominated over small unit infantry fighting.[36]
A number of important tactical lessons were learned from the combat in Longueval and Delville Wood:
- The principle of assembling and advancing during the night to launch the attack at dawn with a short, concentrated artillery barrage in the interests of surprise was to be re–used in many subsequent battles;[40]
- In future, the defensive line was to be constructed on the outer perimeter of wooded areas, rather than within the falsely perceived cover of the wood. The trees (roots) prevented the digging of deep, secure trenches. Further, their effect on shell fuzes caused frequent air–burst detonations, with fatal consequences to the poorly entrenched troops;[41]
- It became policy that troops should be relieved after a maximum of two days of intense fighting. Delville Wood proved that troops required to fight through longer periods of combat became so exhausted and fatigued, compounded by them having consumed their personal supply of ammunition, bombs and rations that after this period of time, their combat value was negligible and they were simply destroyed.[42]
Losses
Both the Allies and German forces sustained extremely heavy losses, the 9th Division had lost 314 officers and 7,203 other ranks between 1 and 20 July.[43] Details of the German losses are scarce, especially those of the Prussian divisions which played an important role in the battle, due to the loss of archive documents caused by the Allied strategic bombing campaign of World War II—particularly the raids on Potsdam in 1945.[44] The German 26th Regiment (the equivalent of an Allied Brigade) which had been at a war establishment strength on 13 July had only 10 officers and 250 other ranks after the battle.[45]
The question has frequently been asked as to why the South Africans remained in the wood only to be slaughtered by artillery fire.[28] This was not the intention of the commanders: Brigadier-General Lukin’s post battle report stated that "My intention was to thin out the troops in the Wood as soon as the perimeter was seized, leaving the machine-guns with small detachments of infantry to hold it. The enemy, by launching counter-attacks at once, prevented this intention being carried out and Lieut-Col Tanner reported that he required all the men under his command to hold off the enemy.[46]
Losses sustained by the South African Brigade have frequently been over-stated.[47] When considering the claimed South African total casualties, a number of factors need to be considered:
- Casualties which had been sustained by the South African Brigade at Bernafay Wood and Maricourt before 14 July (the date of entering Delville Wood) are frequently, erroneously added to the Delville Wood casualties;[48]
- Casualties sustained by the 1st and 4th Battalions in Longueval on 14 July are also incorrectly added to the Delville Wood totals;[49]
- Of the three officers and 140 men who left Delville Wood on 20 July, less than half had entered the wood on 14 / 15 July, and were replacement troops which had been sent in between 16 and 20 July. According to Col. Thackeray, a total of 199 reinforcements had been received in the wood.[50]
- The Brigade headquarters and staff had not deployed to the wood, and as such the total brigade staff at the start of the battle were not necessarily all in the wood.
- Additional troops (in addition to the 3 officers and 140 men who had withdrawn on 20 July) reported to Happy Valley for the muster parade of 21 July. So did the Brigade and Machine Gun Company staff.
The following table is based on South African Defence Force unit service cards as well as archive sources, which indicate the losses to be as follows:[51]
1st South African Brigade: Casualties sustained during the Battle of Delville Wood[51] Brigade / Unit Unit strength at
start of Battle
14 July 1916Killed Wounded Missing / POW Additional
wounded who
died of wounds
up to October 1916Total Casualties Effective unit
Strength after
Battle
20 July 1916Off* Other
RanksTotal Off* Other
RanksTotal Off* Other
RanksTotal Off* Other
RanksTotal Off* Other
RanksTotal Off* Other
RanksTotal Off* Other
RanksTotal 1st Battalion 31 748 779 7 108 115 17 346 363 2 73 75 1 29 30 27 556 583 4 192 196 2nd Battalion 28 669 697 11 95 106 12 373 385 0 92 92 3 25 28 26 585 611 2 84 86 3rd Battalion 29 847 876 8 120 128 15 403 418 6 225 231 0 30 30 29 778 807 0 69 69 4th Battalion 27 672 699 4 104 108 15 293 308 1 84 85 0 32 32 20 513 533 7 159 166 Other 8 96 104 0 0 0 2 0 2 0 0 0 0 0 0 2 0 2 6 96 102 Total 123 3,032 3,155 30 427 457 61 1,415 1,476 9 474 483 4 116 120 104 2,432 2,536 19 600 619 Note: * : Officers
Awards for gallantry
Four Victoria Crosses were awarded over the course of the Battle of Delville Wood:
- Private William Frederick Faulds on 18 July: 1st Battalion, 1st South African Brigade, 9th Scottish Division.[52]
- Corporal Joseph John Davies on 20 July: 10th Battalion Royal Welsh Fusiliers, 76th Brigade, 3rd Division[53]
- Private Albert Hill on 20 July: 10th Battalion Royal Welsh Fusiliers, 76th Brigade, 3rd Division.[54]
- Sergeant Albert Gill on 27 July: 1st Battalion King's Royal Rifle Corps, 99th Brigade, 2nd Division.[55]
During the First World War 5,200,000 Iron Crosses of the lower grade (Eisernes Kreuz 2. Klasse) were awarded, as well as 288,000 of the higher grade (Eisernes Kreuz 1. Klasse).[56] The high numbers awarded as well as the destruction of records[44] preclude the listing of German awards for gallantry forthcoming from this battle.
Orders of Battle
British and Dominion forces
Note: Only Brigades and Battalions that actually participated in the actions are shown in the below order of battle. For details on the full organisation, see the Order of Battle for the Somme.
Click on show to view order of battle for actions associated with the capture of Trônes Wood: 14–15 July 1916. 14th (Light) Division 14–15 July 1916Commander: Infantry: 41st Brigade 7th Battalion, King's Royal Rifle Corps 8th Battalion, King's Royal Rifle Corps 7th Battalion, Rifle Brigade 8th Battalion, Rifle Brigade 42nd Brigade 5th Battalion, Oxfordshire and Buckinghamshire Light Infantry 5th Battalion, King's Shropshire Light Infantry 9th Battalion, King's Royal Rifle Corps 9th Battalion, Rifle Brigade 43rd Brigade 6th Battalion, Somerset Light Infantry Regiment 6th Battalion, Duke of Cornwall's Light Infantry 6th Battalion, King's Own Yorkshire Light Infantry 10th Battalion, Durham Light Infantry Regiment Engineers
and Support:11th Battalion, King's Regiment (Pioneers) 18th (Eastern) Division 14–15 July 1916Commander: Major General Ivor Maxse[57] Infantry: 53rd Brigade 8th Battalion, Norfolk Regiment 8th Battalion, Suffolk Regiment 10th Battalion, Essex Regiment 6th Battalion, Royal Berkshire Regiment 54th Brigade 11th Battalion, Royal Fusiliers 7th Battalion, Bedfordshire Regiment 8th Battalion, Northamptonshire Regiment 12th Battalion, Middlesex Regiment 55th Brigade 7th Battalion, Queen's Regiment 7th Battalion, Buffs (Royal East Kent Regiment) 8th Battalion, East Surrey Regiment 7th Battalion, Royal West Kent Regiment Engineers
and Support:8th Battalion, Royal Sussex Regiment Click on show to view order of battle for actions associated with the capture of Longueval: 14–17 July 1916. 3rd Division [58]Commander: Major-General J.A. Haldane then Major-General C.J. Deverell[1] Infantry: 8th Brigade 2nd Battalion, Royal Scots 8th Battalion, East Yorkshire Regiment 7th Battalion, King's Shropshire Light Infantry 1st Battalion, Royal Scots Fusiliers 9th Brigade 1st Battalion, Northumberland Fusiliers 4th Battalion, Royal Fusiliers 13th Battalion, King’s Regiment 12th Battalion, West Yorkshire Regiment 76th Brigade 8th Battalion, The King's Own (Royal Lancaster Regiment) 2nd Battalion, Suffolk Regiment 10th Battalion, Royal Welsh Regiment 1st Battalion, Gordon Highlanders Engineers
and Support:20th Battalion, King's Royal Rifle Corps 9th (Scottish) Division[58] Commander: Major-General W.T. Furse[1] Infantry: 26th Brigade8th Battalion, Black Watch 7th Battalion, Seaforth Highlanders 5th Battalion, Queen's Own Cameron Highlanders 10th Battalion, Argyll & Sutherland Highlanders 27th Brigade11th Battalion, Royal Scots 12th Battalion, Royal Scots 6th Battalion, King's Own Scottish Borderers 9th Battalion, Cameronians (Scottish Rifles) South African Brigade
Major-General Sir Henry Timson Lukin KCB CMG DSO1st South African Battalion (Cape) 4th South African Battalion (Scottish) Engineers
and Support:9th Battalion, Seaforth Highlanders (Pioneers) Click on show to view order of battle for actions associated with the first capture of Delville Wood: 14 July – 3 September 1916 2nd Division[58] 27 July – 4 August 1916Commander: Major General Charles Monro Infantry: 99th Brigade 22nd Battalion, Royal Fusiliers 23rd Battalion, Royal Fusiliers 1st Battalion, Royal Berkshire Regiment 1st Battalion, King's Royal Rifle Corps Engineers
and Support:10th Battalion, Duke of Cornwall's Light Infantry (Pioneers) 3rd Division [58] 17–22 July 1916Commander: Major-General J.A. Haldane then Major-General C.J. Deverell[1] Infantry: 76th Brigade 8th Battalion, The King's Own (Royal Lancaster Regiment) 2nd Battalion, Suffolk Regiment 10th Battalion, Royal Welsh Regiment 1st Battalion, Gordon Highlanders Engineers
and Support:20th Battalion, King's Royal Rifle Corps 9th (Scottish) Division[58] 14–22 July 1916 Commander: Major-General W.T. Furse[1] Infantry: 26th Brigade8th Battalion, Black Watch 7th Battalion, Seaforth Highlanders 5th Battalion, Queens Own Cameron Highlanders 10th Battalion, Argyll & Sutherland Highlanders 27th Brigade11th Battalion, Royal Scots 12th Battalion, Royal Scots 6th Battalion, King's Own Scottish Borderers 9th Battalion, Cameronians (Scottish Rifles) South African Brigade
Major-General Sir Henry Timson Lukin KCB CMG DSO1st South African Battalion (Cape) 2nd South African Battalion (Natal & OFS) 3rd South African Battalion (Transvaal & Rhodesia) 4th South African Battalion (Scottish) Engineers
and Support:9th Battalion, Seaforth Highlanders (Pioneers) 17th (Northern) Division[10] 4–11 August 1916Commander: Infantry: 50th Brigade 10th Battalion, West Yorkshire Regiment 7th Battalion, East Yorkshire Regiment 7th Battalion, Green Howards Regiment 6th Battalion, Dorset Regiment 51st Brigade 7th Battalion, Royal Lincolnshire Regiment 7th Battalion, Border Regiment 8th Battalion, South Staffordshire Regiment 10th Battalion, Sherwood Foresters Regiment 52nd Brigade 9th Battalion, Northumberland Fusiliers 10th Battalion, Lancashire Fusiliers 9th Battalion, Duke of Wellington's Regiment 12th Battalion, Manchester Regiment Engineers
and Support:7th Battalion, York and Lancaster Regiment 20th (Light) Division 11 August – 3 September 1916Commander: Infantry: 61st Brigade 7th Battalion, Somerset Light Infantry Regiment 7th Battalion, Duke of Cornwall's Light Infantry Regiment 7th Battalion, King's Own Yorkshire Light Infantry 12th Battalion, King's Regiment Engineers
and Support:11th Battalion, Durham Light Infantry Regiment 24th Division[58] 30 August – 3 September 1916Commander: Infantry: 72nd Brigade 8th Battalion, Queen's Regiment 9th Battalion, East Surrey Regiment 8th Battalion, Royal West Kent Regiment 1st Battalion, North Staffordshire Regiment 73rd Brigade 9th Battalion, Royal Sussex Regiment 7th Battalion, Northamptonshire Regiment 13th Battalion, Middlesex Regiment 2nd Battalion, Leinster Regiment Engineers
and Support:12th Battalion, Sherwood Foresters Regiment Click on show to view order of battle for actions associated with holding Delville Wood: 4 September 1916 – April 1917 14th (Light) Division[58]Commander: Infantry: 41st Brigade 7th Battalion, King's Royal Rifle Corps 8th Battalion, King's Royal Rifle Corps 7th Battalion, Rifle Brigade 8th Battalion, Rifle Brigade 42nd Brigade 5th Battalion, Oxfordshire and Buckinghamshire Light Infantry 5th Battalion, King's Shropshire Light Infantry 9th Battalion, King's Royal Rifle Corps 9th Battalion, Rifle Brigade 43rd Brigade 6th Battalion, Somerset Light Infantry Regiment 6th Battalion, Duke of Cornwall's Light Infantry 6th Battalion, King's Own Yorkshire Light Infantry 10th Battalion, Durham Light Infantry Regiment Engineers
and Support:11th Battalion, King's Regiment (Pioneers) Click on show to view order of battle for actions associated with the second capture of Delville Wood: 1 – 28 August 1918 38th (Welsh) DivisionCommander: Infantry: 113th Brigade 13th Bn, (1st North Wales), Royal Welsh Fusiliers 14th Bn, Royal Welsh Fusiliers 15th Bn, (1st London Welsh), Royal Welsh Fusiliers 16th Bn, Royal Welsh Fusiliers 114th Brigade 10th Battalion (1st Rhondda), Royal Welsh Regiment 13th Battalion (2nd Rhondda), Royal Welsh Regiment 15th Battalion (Carmarthenshire), Royal Welsh Regiment 14th Battalion (Swansea), Royal Welsh Regiment 115th Brigade 17th Bn, (2nd North Wales), Royal Welsh Fusiliers 10th Bn, (1st Gwent), South Wales Borderers 11th Bn, (2nd Gwent), South Wales Borderers 16th Bn, (Cardiff City), Royal Welsh Regiment Engineers
and Support:19th Battalion (Glamorgan Pioneers), Royal Welsh Regiment German Forces
Click on show to view order of battle for forces of the German Empire for actions in Trônes Wood, Longueval and Delville Wood: 14 July – 3 September 1916 3rd Guards Infantry Division [59]Commander: Generalmajor von Lindequest[60] Infantry: Garde–Infanterie–Brigade Nr. 6 Garde–Füsilier–Regiment Lehr-Infanterie-Regiment Colbergsches-Grenadier-Regiment Graf Gneisenau Nr. 9 Cavalry: Garde Reserve Ulanen Regiment Artillery: Garde–Artillerie–Brigade Nr. 63 Garde–Feldartillerie–Regiment Nr. 5 II.Bataillon/Reserve–Fußartillerie–Regiment Nr. 6 Engineers
and Support:1. Kompanie/Pionier–Bataillon Nr. 28 Pionier–Kompanie Nr. 274 Garde–Minenwerfer–Kompanie Nr. 3 3rd Guards Telephone Detachment 5th Royal (Brandenburg) Division [59]Commander: Generalleutnant Wichura[60] Infantry: Infanterie–Brigade (Brandenburgisches) Nr. 10 Grenadier–Regiment Nr. 8 Infanterie–Regiment von Alvensleben (6. Brandenburgisches) Nr. 52 Grenadier–Regiment Prinz Karl von Preußen (2. Brandenburgisches) Nr. 12 Field Machine Gun Company Cavalry: 1/2" Husaren–Regiment von Zieten (Brandenburgisches) Nr. 3 Artillery: 5.Feldartillerie–Brigade (Brandenburgisches) Feldartillerie–Regiment General–Feldzeugmeister (2. Brandenburgisches) Nr. 18 Neumärkisches Feldartillerie–Regiment Nr. 54 Engineers
and Support:1./Pionier–Bataillon von Rauch (1. Brandenb.) Nr. 3 3./Pionier–Bataillon von Rauch (1. Brandenburgisches) Nr. 3 Minenwerfer–Kompanie (Brandenburg) Nr. 5 5th Brandenburg Telephone Detachment 5th (Bavarian) Division [59]Commander: Generalleutnant Endres[61] Infantry: 9. bayerische Infanterie–Brigade Kgl. Bayerisches 14. Infanterie–Regiment Hartmann Kgl. Bayerisches 21. Infanterie–Regiment Großherzog von Mecklenburg–Schwerin 10. bayerische Infanterie–Brigade Kgl. Bayerisches 7. Infanterie–Regiment Prinz Leopold ment Kgl. Bayerisches 19. Infanterie–Regiment König Viktor Emanuel III. von Italien Cavalry: Kgl. Bayerisches 2. Chevaulegers–Regiment (2 Sqn's) Artillery: 5. bayerische Feldartillerie–Brigade Kgl. Bayerisches 6. Feldartillerie–Regiment Prinz Ferdinand von Bourbon, Herzog von Calab Kgl. Bayerisches 10. Feldartillerie–Regiment Flugabwehrkanone–Abteilung (Anti–Aircraft section) Engineers
and Support:Minenwerfer–Kompanie (Bayerisches) Nr. 5 1 & 4.Kompanie/Kgl. Bayerisches 3. Pionier–Bataillon 5th Bavarian Pont. Engineers 5th Bavarian Telephone Detachment 84th Labour Battalion 1st Bavarian Balloon Squadron 7th Infantry Division [59]Commander: Generalleutnant Riedel[60] Infantry: 13. Infanterie–Brigade Infanterie–Regiment Fürst Leopold von Anhalt–Dessau (1. Magdeburgisches) Nr.26 Cavalry: 2.Eskadron/Magdeburgisches Husaren–Regiment Nr. 10 Artillery: Artillerie–Kommandeur 7 Feldartillerie–Regiment Prinz–Regent Luitpold von Bayern (Magdeburgisches) Nr. 4 Altmärkisches Feldartillerie–Regiment Nr. 40 Engineers
and Support:1./Magdeburgisches Pionier–Bataillon Nr. 4. 7 Pont Engineers 7th Telephone Detachment 8th Infantry Division [59]Commander: General der Infanterie Ernst II. Herzog von Sachsen–Altenburg[60] Infantry: 15. Infanterie–Brigade Altenburger Regiment 8. Thüringisches Infanterie–Regiment Nr. 93 16. Infanterie–Brigade Thüringische Infanterie–Regiment Nr.72 Thüringisches Infanterie–Regiment Nr. 153 Cavalry: "1/2" Magdeburgisches Husaren–Regiment Nr. 10 Artillery: 8. Feldartillerie–Brigade Torgauer Feldartillerie–Regiment Nr.74 Mansfelder Feldartillerie–Regiment Nr.75 Engineers
and Support:Minenwerfer–Kompanie Nr. 8 2./Magdeburgisches Pionier–Bataillon Nr. 4 3./Magdeburgisches Pionier–Bataillon Nr. 4 8th Telephone Detachment 10th Bavarian Infantry Division [59]Commander: Generalmajor Brukhardt[60] Infantry: 20. bayerische Infanterie–Brigade Königlich Bayerische 16. Infanterie–Regiment Grossherzog Ferdinand von Toskana Bayerische 6. Reserve–Infanterie–Regiment Bayerische 8. Reserve–Infanterie–Regiment Cavalry: Bayerische 5. Kavallerie–Regiment Artillery: 10. bayerische Feldartillerie–Brigade Bayerisches 19. Feldartillerie–Regiment Bayerisches 20. Feldartillerie–Regiment Engineers
and Support:Minenwerfer–Kompanie (Bayerisches) Nr. 10 20 Kompanie Nr. 4 (Bayerisches) Pionier–Bataillon 10th Pont. Engineers 10th Telephone Detachment 12th Reserve Division [59]Commander: Generalmajor von Kehler[60] Infantry: 22. Reserve–Infanterie–Brigade Remains of the Infanterie–Regiment von Winterfeldt (2. Oberschlesisches) Nr.23 Fusilier–Regiment Feldmarschall Graf Moltke (1.Schlesisches) Nr.38 (Ehrenstein–Riebel Bn) Cavalry: Reserve–Ulanen–Regiment Nr. 4 Artillery: Reserve–Feldartillerie–Regiment Nr. 12 7. & 32. Flugabwehrkanone–Abteilung (Anti–Aircraft sections) Engineers
and Support:Reserve Minenwerfer–Kompanie Nr. 212 1.Reserve–Kompanie/Pionier–Bataillon Nr. 6 2.Reserve–Kompanie/Pionier–Bataillon Nr. 6 12th Reserve Telephone Detachment 8. bayerische Arbeit–Bataillon 17th Reserve Division [59]Commander: Generalmajor von Zieten[60] Infantry: 33rd Reserve Brigade Reserve Infanterie Regiment Nr.75 Schleswig–Holsteinisches Infanterie Regiment Nr. 163 Cavalry: Reserve Hussar Regiment Nr. 4 Artillery: 17th Reserve Feldartillerie–Regiment (10 Bty's) Engineers
and Support:4 Field Co 2.Pion Bn Nr. 9 Pionier Kompanie Nr. 340 Minenwerfer–Kompanie Nr.217 17 Res Pont Engineers 24th Königlich Sächsische Reserve Division [59]Commander: Generalmajor Morgenstern–Doring[60] Infantry: Königlich Sächsische Reserve Infanterie Regiment Nr. 104 Königlich Sächsische Reserve Infanterie Regiment Nr. 107 Königlich Sächsische Reserve Infanterie Regiment Nr. 133 Cavalry: Kgl. Sächs. Reserve-Ulanen-Regiment (3x Sqn) Artillery: 24th Reserve Feldartillerie–Regiment (6 Bty's) 40th Reserve Feldartillerie–Regiment (6 Bty's) Engineers
and Support:3 Res Co 12.Pion Bn Reseve Pionier Kompanie Nr.4 Pionier Battalion Nr. 12 Minenwerfer–Kompanie Nr.224 24 Res Pont Engineers 24 Res Tele Detach 26th Infanterie Division [59]Commander: Generalleutenant Herzog Wilhelm von Urach[61] Infantry: Grenadier–Regiment Königin Olga (1. Württembergisches) Nr.119 Infanterie Regiment Kaiser Friedrich, König von Preußen (7. Württembergisches) Nr.125 Infanterie Regiment Alt–Württemberg (3. Württembergisches) Nr.121 Cavalry: Uhlan Regiment Nr.20 (3 x Sqn) Artillery: Feldartillerie–Regiment Nr.29 Feldartillerie–Regiment Nr.65 Engineers
and Support:Feldt–Pionier Kompanie Nr.1 and 5 Feldt–PionierBattalion Nr. 13 Minenwerfer–Kompanie Nr.26 26 Pont Engineers 26 Tele Detach 56th Infantry DivisionCommander: Generalmajor von Wichmann[61] Infantry: Fusilier–Regiment Prinz Heinrich von Preußen (1. Brandenburgisches) Nr.35 2. Nassauisches Infanterie–Regiment Nr.88 Infanterie Regiment Prinz Carl (4.Großherzoglich Hessisches) Nr. 118 Cavalry: Uhlan Regiment Nr.17 (1 x Sqn) Artillery: 56. Feldartillerie–Brigade Feldartillerie–Regiment Nr.111 Feldartillerie–Regiment Nr.112 Engineers
and Support:Feldt–Pionier Kompanie Nr.111 Feldt–Pionier Kompanie Nr.112 Feldt–Pionier Kompanie Nr.6 PionsierBattalion Nr. 26 Minenwerfer–Kompanie Nr.56 See also
 Media related to Battle of Delville Wood at Wikimedia Commons
- South African Military History Society:[62]
- Official website of the South African National Memorial:[63]
- Delville Wood 360° panoramic:[64]
- World War I Battlefields.[65]
- Delville Wood Commonwealth War Graves Commission Cemetery
- Delville Wood South African National Memorial
Notes
- Footnotes
- ^ Delville Wood (in French, Bois d'Elville) is described as consisting of a thick tangle of trees, chiefly oak and birch, with dense hazel thickets intersected by grassy rides. Ref: Miles (1992) p.91
- ^ The South African forces had inherited the English place names given to the locations in Delville Wood for the purposes of easy reference, as they were more meaningful than any French terms which had previously have been applied. Ref: Uys. I. SAMH (1986) p. 49
- ^ Known as Maltzhorn Farm to the Germans and locals, but listed on the British 1:10,000 map for Longueval (Ed 2.E 15 August 1916) as Warterlot Farm. The farm contained a large sugar mill which provided good cover for sniping and artillery observation and was thus considered to be of tactical importance Ref: Hart (2006) p. 284
- ^ The Black Watch piper was Piper Sandy Grieve who had fought against the South African Boers as part of the Highland Brigade at the Battle of Magersfontein in 1899, where he was wounded through the cheeks. Ref South African Military History Society: Newsletter 356, July 2008. [1]
- ^ The German forces fed in a total of 42 additional divisions on the Somme front as from 1 July 1916. Over the whole front, by 31 July the Germans had suffered 160,000 losses and the Allies (including the French) a total in excess of 200,000 men. Ref: Keegan p.319
- Citations
- ^ a b c d e f g "The Western Front Association (WFA)". pp. Order of Battle for The Somme July – November 1916. http://www.westernfrontassociation.com/great-war-on-land/43-britain-allies/318-order-somme-1916.html.
- ^ Sheldon (2007) pg. 115
- ^ Liddell-Hart (1970) p.324
- ^ Beckett (2007) p.190
- ^ Buchan (1969) p. 82
- ^ Buchan (1992) p. 49
- ^ a b c d e f g h i j Buchan (1992) pp.52–58
- ^ Prior & Wilson (2005) p.141
- ^ Philpott (2009) p.241
- ^ a b c d Liddell-Hart (1970) pp.322–324
- ^ a b c Nasson (2007) p.133
- ^ Uys (1991) p.96
- ^ Miles (1992) p.89
- ^ Digby (1993) p.121
- ^ Digby (1993) p.123
- ^ Miles (1992) p.83
- ^ a b c d e Buchan (1992) pp.59–63
- ^ Uys (1983) p.71
- ^ Uys (1983) p.72
- ^ a b Nasson (2007) p.131
- ^ a b Uys (1983) p.103
- ^ Nasson (2007) p.132
- ^ a b c d e Buchan (1992) pp.64–69
- ^ Uys (1983) p.104
- ^ Uys (1983) p.135
- ^ a b c d e Buchan (1992) pp.70–75
- ^ Uys (1983) p.204
- ^ a b Uys, Ian. "The Lessons of Delville Wood". Military History Journal - Vol 6 No 1. South African Military History Society. http://samilitaryhistory.org/vol061iu.html. Retrieved 2009-10-21.
- ^ Uys, (1991) p.102
- ^ Nasson (2007) p.134
- ^ a b Nasson (2007) p.135
- ^ a b Uys, (1991) p.113
- ^ Uys (1991) p.117
- ^ Buchan (1992) p.72
- ^ a b c Uys (1991) p.121
- ^ a b c Uys (1991) p.122
- ^ Liddell-Hart (1970) p.326
- ^ Keegan (1998) p.319
- ^ Hart (2006) p.294
- ^ Buchan (1992)
- ^ Uys (1991) p.159
- ^ Uys (1991) p.165
- ^ Miles (1992) p.108
- ^ a b Sheldon (2007) Appendix III pg. 407
- ^ Miles (1992) p.109
- ^ SADF Archives, 1st S.A.I. Brigade War Diary, Report on Delville Wood by H.T. Lukin
- ^ Uys (1983) p. 274
- ^ Uys (1991) p.192
- ^ Uys (1991) p.194
- ^ Uys (1991) p.187
- ^ a b Uys (1991) pp.194–198
- ^ Faulds, William Frederick. "National Archives: Victoria Cross Register". WO 98/8. Awarded for action at Delville Wood. http://www.nationalarchives.gov.uk/documentsonline/details-result.asp?Edoc_Id=7499776&queryType=1&resultcount=2. Retrieved 2009-10-23.
- ^ Davies, Joseph. "National Archives: Victoria Cross Register". WO 98/8. Awarded for action at Delville Wood. http://www.nationalarchives.gov.uk/documentsonline/details-result.asp?Edoc_Id=7499798&queryType=1&resultcount=1. Retrieved 2009-10-23.
- ^ Hill, Albert. "National Archives: Victoria Cross Register". WO 98/8. Awarded for action at Delville Wood. http://www.nationalarchives.gov.uk/documentsonline/details-result.asp?Edoc_Id=7499801&queryType=1&resultcount=1. Retrieved 2009-10-23.
- ^ Gill, Albert. "National Archives: Victoria Cross Register". WO 98/8. Awarded for action at Delville Wood. http://www.nationalarchives.gov.uk/documentsonline/details-result.asp?Edoc_Id=7499811&queryType=1&resultcount=1. Retrieved 2009-10-23.
- ^ Thomas (2004) p. 43
- ^ Buchan (1992) p. 56
- ^ a b c d e f g Liddle (2001) pp. 180-187
- ^ a b c d e f g h i j Histories of Two Hundred and Fifty One Divisions of the German Army (1919) p. 72, 105, 130, 142, 179, 200
- ^ a b c d e f g h Sheldon (2007) Appendix IV pg. 408
- ^ a b c Sheldon (2007) Appendix IV pg. 409
- ^ http://samilitaryhistory.org/vol085dw.html
- ^ http://delvillewood.com
- ^ http://www.terresdememoire.com/FR/sites/longueval.html
- ^ http://www.ww1battlefields.co.uk/somme/delville.html
References
- Beckett, Ian F. W. (2007). The Great War, 1914–1918 (2nd ed.). Harlow: Pearson Education Ltd. ISBN 9781405812528.
- Buchan, John (1969). Homilies and recreations (Litho reprint of 1926 ed.). Freeport: Books for Libraries Press. ISBN 0836911725.
- Buchan, John (1992). The history of the South African forces in France (Litho reprint of 1920 ed.). London: Imperial War Museum & Battery Press. ISBN 0-901-627-89-5.
- Digby, Peter. K. (1993). Pyramids and Poppies: The 1st SA Infantry Brigade in Libya, France and Flanders: 1915–1919. Rivonia: Ashanti. ISBN 1874800537.
- Hart, Peter (2006). The Somme. London: Cassell. ISBN 9780304367351.
- Keegan, John (1998). The First World War. London: Random House. ISBN 0091801788.
- Liddle, Peter, H. (2001). The 1916 Battle of the Somme: A Reappraisal. Hertfordshire: Wordsworth. ISBN 1840222409.
- Liddell-Hart, Basil, H. (1970). History of the First World War (3rd (1973) ed.). Trowbridge: Redwood Burn Ltd..
- Miles, Captain Wilfred (1992). History of the Great War: Military Operations in France and Belgium. 2 July to the end of the Battles of the Somme (2nd (Litho reprint of 1938 original) ed.). London: Imperial War Museum. ISBN 0-89839-169-5.
- Nasson, Bill (2007). Springboks on the Somme (1st ed.). Rosebank: Penguin Books. ISBN 978 0 143 02535 1.
- Philpott, William (2009). Bloody Victory: The sacrifice on the Somme and the making of the Twentieth Century (1st ed.). London: Little, Brown. ISBN 978-1-4087-0108-9.
- Prior, Robin and; Wilson, Trevor (2005). The Somme (1st ed.). New Haven: Yale University Press. ISBN 0-300-10694-7.
- Sheldon, Jack (2007). The German Army on the Somme: 1914–1916. Barnsley: Pen and Sword Books Ltd.. ISBN 1-84415-513-2.
- Thomas, Nigel (2004). The German Army in World War I (3) 1917–1918 (Men at Arms Series, 1st ed.). Oxford: Osprey Publishing. ISBN 1 84176 567 8.
- Uys, Ian (1983). Delville Wood. Johannesburg: Uys Publishers. ISBN 0-620-06611-3.
- Uys, Ian (1991). Rollcall: the Delville Wood story. Germiston: Uys Publishers. ISBN 0-9583173-1-3.
- Uys, Ian (December 1986). "South Africans at Delville Wood". South African Military History Journal (SAMHJ) (South African Military History Society) 7 (2).
- General Staff: American Expeditionary Force, ed (1919). Histories of Two Hundred and Fifty One Divisions of the German Army which participated in the War (1914–1918). Chaumont, France. http://www.vlib.us/wwi/resources/germanarmywwi.html.
Categories:- Conflicts in 1916
- 1916 in France
- Battles of the Western Front (World War I)
- Battles of World War I involving the United Kingdom
- Battles of World War I involving Germany
- Battles of World War I involving South Africa
- Battle of the Somme
- Somme


Wikimedia Foundation. 2010.