- Yoshizawa-Randlett system
-
 The origami crane diagram, using the Yoshizawa-Randlett system
The Yoshizawa-Randlett system is a diagramming system used to describe the folds of origami models. Many origami books begin with a description of basic origami techniques which are used to construct the models. There are also a number of standard bases which are commonly used as a first step in construction. Models are typically classified as requiring low, intermediate or high skill depending on the complexity of the techniques involved in the construction.
Contents
History
The concept of diagramming originated in the 1797 book “Senbazuru Orikata”, the first origami book ever published. The diagrams in this book were very unclear, and often only showed the end result of the folding process, leaving the folder unsure how the model was created.
Later books began to devise a system of showing precisely how a model was folded. These ranged from an unwieldy set of symbols to a photograph or sketch of each step attempting to show the motion of a fold. None of these systems were sufficient to diagram all models, and so none were widely adopted.
In the 1950's and 60’s, Akira Yoshizawa proposed a system of diagramming. He introduced for the first time its diagramming notation in his first published monograph, Atarashi Origami Geijutsu (New Origami Art) in 1954. He employed dotted and dashed lines to represent mountain and valley folds, and a few other symbols such as the “inflate” and “round” symbols. This system caught the attention of Samuel Randlett and Robert Harbin, who added a few symbols such as “rotate” and “zoom in”, and then adopted it as the standard. The Yoshizawa-Randlett system was first described in Samuel Randlett's Art of Origami in 1961.[1]. It was then accepted as the default throughout the international origami community, and is still in general use today.
Origami symbols
There are two main types of origami symbol, lines and arrows.[2] The arrows show how the paper is bent or moved. Lines show various types of edges:
- A thick line for the edge of the paper
- A dashed line for a valley fold
- A dashed and dotted line for mountain folds (there may be one or two dots per dash depending on the author)
- A thin line for a previous fold
- A dotted line for a previous fold that's hidden, or sometimes a fold that's not yet made.
Origami symbols 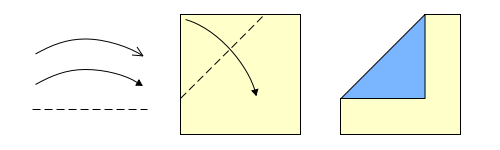 Valley fold
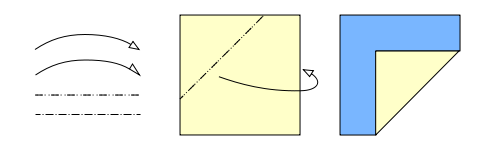 Mountain fold.
 Fold and unfold valley.
 Fold and unfold mountain.
 Pleat fold.
 Turn over and invisible line.
 Rotate.
 Pull.
Pull. Inside crimp fold.
 Outside crimp fold.
 Open.
Open. Inside reverse fold.
 Outside reverse fold.
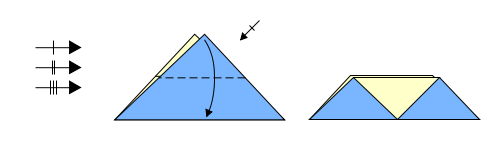 Repeat action.
Basic skills
Pureland origami is a style of origami that is done by creating only one fold at a time. Because of these restrictions, proponents of the theory have devised alternate methods of folding more complicated steps that have very similar results.
- A valley fold is the first basic fold, in which the paper is folded in front of itself.
- A mountain fold is the second basic fold, in which the paper is folded behind itself. An easier way to do this is to turn the paper over first and then do a valley fold and turn the paper back over again.
- A pleat fold is several evenly-spaced parallel mountain and valley folds. It is also called an "accordion fold."
- A radial pleat fold is an angled pleat fold, usually with a focus point on an edge or corner.
- A blintz fold is made by folding the corners of a square into the center. This can be achieved with higher accuracy by folding and unfolding two reference creases through the center.
-

Valley fold
-
Mountain fold
-

Accordion or pleat fold
-

Blintz fold
Simple compound folds
- An outside reverse fold consists of two radial valley folds extending from a single point on a central fold and a reversal of the center fold on the affected end, all done simultaneously.
- An inside reverse fold consists of two radial mountain folds extending from a single point on a central fold, and a reversal of the central fold on the affected end, all done simultaneously.
-

Inside reverse fold
-

Outside reverse fold
Low-intermediate skills
- A squash fold starts with a flap with at least two layers (for example, one flap of a waterbomb base). Make a radial fold from the closed point down the center of this flap. Open the flap and refold downward to make two adjacent flaps.
- A rabbit ear fold starts with a reference crease down a diagonal. Fold two radial folds from opposite corners along the same side of the reference crease; the resulting flap should be folded downwards so that the previous edges are aligned.
- A petal fold starts with two connected flaps, each of which has at least two layers. (For example, two flaps of a preliminary base). The two flaps are attached to each other along a reference crease. Make two radial folds from the open point, so that the open edges lie along the reference crease. Unfold these two radial folds. Make another fold across the top connecting the ends of the creases to create a triangle of creases. Unfold this fold as well. Fold one layer of the open point upward and flatten it using the existing creases. A petal fold is equivalent to two side-by-side rabbit ears, which are connected along the reference crease.
- The simplest crimp fold consists of two reverse folds performed in succession so that the edges are still parallel. The crimp can be varied so that the edges are not parallel.
-

Squash fold applied to one flap of a waterbomb base
-

Rabbit ear fold
-

Petal fold on one half of a preliminary fold
Origami bases
In origami, there is a series of several bases that many models are created with. In general, "base" refers to any folded paper that immediately precedes final folding and shaping of the model-to-be. The ones listed below are generally accepted as the traditional origami bases.
- The kite base is merely two valley folds that bring two adjacent edges of the square together to lie on the square's diagonal.
- The fish base consists of two radial folds against a diagonal reference crease on each of two opposite corners. The flaps that result on the other two corners are carefully folded downwards in the same direction. In other words, it consists of two side-by-side rabbit ears.
- The waterbomb base consists of two perpendicular valley folds down the diagonals of the square and two perpendicular mountain folds down the center of the square. This crease pattern is then compressed to form the waterbomb base, which is an isosceles-right triangle with four isosceles-right triangular flaps. The waterbomb base is an inside-out preliminary fold.
- The preliminary fold consists of two perpendicular diagonal mountain folds that bisect the corners of the square and two perpendicular valley folds that bisect the edges of the square. The paper is then collapsed to form a square shape with four isosceles-right triangular flaps. It is sometimes called the Square Base
- The bird base, or crane base, consists of a preliminary fold with both the front and the back sides petal folded upward.
- The frog base starts with a waterbomb base or preliminary fold. All four flaps are squash-folded (the result is the same in either case), and then the corners are petal folded upward.
If a square is blintz folded, then a kite/fish/bird/frog base is folded, and the blintzed edges teased out and collapsed n a certain fashion, this is called a blintzed kite/fish/bird/frog/base, which doubles the complexity and adds more points and edges to the original kite/fish/bird/frog base, for a more complex model that requires more points. It's possible to double blintz for a double blintzed kite/fish/bird/frog base if needed. Theoretically an infinite number of blintzes could be performed to yield an infinitely complex multipointed base, but paper thickness restricts this to generally two blintzes.
-

Water bomb base before flattening
-

Preliminary fold or Square Base
-

Fish base
Mid-intermediate skills
- The Swivel fold is difficult to describe as the term is loosely defined and there are so many different versions that could be called "swivel folds". However, generally swivel folds involve a flap of paper "swivelling" at a certain point or vertex and another flap or edge of paper, connected to the first, dragged around that point or vertex.
- Pentagon. Although most origami models start with a square or rectangular sheet of paper, a few start with a triangle, pentagon, hexagon, circle, or other convex sheet of paper. A pentagon can be traced (from a template) onto a square sheet of paper, or it can be folded from a square sheet of paper. One technique for folding a pentagon uses folds to calculate the golden ratio: (1+sqrt(5))/2. Another technique for folding a pentagon uses folds to divide a 180 degree angle into five (almost exactly) equal angles. The excess paper is often trimmed, before starting to fold the desired model. Pentagons are used in five-sided flowers, such as the cherry blossom and Marie's Rose.
High-intermediate skills
- Most of the creases in a stretched bird base are present in the regular bird base. When forming this bird base, make sure to crease the triangle at the center corner through all layers. (If you unfold completely, you will see a small square at the center of the paper.) After forming the bird base, either partially unfold the paper, and/or "stretch" two opposite corners of the bird base. These two corners, their associated flaps, and the central square will all lie flat. The other two flaps will form a pyramid. Rabbit ear each flap that is in the pyramid, so that the model lies flat. All of the raw edges will lie along the centerline of the model. The stretched bird base is used in Lang's Bald Eagle, Greenberg's Eeyore, and some other high-intermediate and complex models.
- The open sink usually involves opening out the paper, and reversing creases to make a waterbomb base in the middle of the model.
- The open double sink is equivalent to making an open sink, and then open-sinking the point in the opposite direction. It is a sinked analog of the crimp fold. When made in a single step (after pre-creasing), it can be easier to make than a single open sink, because it does not require neatly reversing the point. The open double sink is used in many box-pleated models.
- The spread squash can similarly be considered the sinked analog of the squash fold. It is used to flatten a closed flap or twist fold (see below). Instead of creating a long point to one side of the flap's base, the spread squash creates a wide splat around the flap's base. The spread squash is used in the eyes of Engel's Octopus, in Marie's Rose, and in some other intermediate and complex models.
- The closed sink simultaneously makes a locking flap inside of a sink. It is difficult because the paper cannot be opened out further than a triangle. This technique is illustrated in the Origami Forum's thread #462. The closed sink appears in some high-intermediate and complex models.
- The twist fold involves, as the name implies, twisting a section of the paper with respect to its original position. The section twisted will be a polygon; the numerous required support creases include pleat folds radiating from its corners. Marie's Rose demonstrates this on a pentagon.
- It is also possible to twist a single conical point indefinitely, collapsing the sides in a waterbomb-base-like fashion as one goes. (If this is tried with a non-conical point, such as the waterbomb base itself, eventually the fold will terminate in a spread squash.) This variant is used in many of Tomoko Fuse's modular boxes.
Complex skills
- Unsink, or sometimes open unsink, makes a concave pocket convex without fully unfolding the paper, or the opposite of an open sink. It is more difficult than the closed unsink below because there is no internal flap to grab onto to help unsink the paper, so the paper must be opened out and the area to be unsunk is pushed out (to be convex) from inside the model and from behind. It is a common fold in Lang's insects.
- The closed unsink inverts a closed sink without completely opening out the affected paper. In theory, it is "just" the opposite of a closed sink. In practice, it is very difficult, because the paper being "popped" into place usually must be pulled (not pushed), and because it involves simultaneously folding over a locking flap that is hidden inside the sink. However, it is easier to manipulate than an open unsink as there is an internal flap to pull to pop the unsink in place; in an open unsink there is nothing to hold. The closed unsink appears in some complex models, such as a few of Lang's insects.
References
Further reading
Almost every origami book has basic instructions and a set of folding symbols. These are books that happen to have detailed explanations of these techniques, and how the techniques are related to each other.
- David Lister. "The Origin of Origami Symbols". British Origami Society. http://www.britishorigami.info/academic/lister/origin_of_symbols.php.
- Robert J. Lang. The Complete Book of Origami: step-by-step instructions in over 1000 diagrams. Dover Publications, Mineola, NY. Copyright 1988 by Robert J. Lang. ISBN 0-486-25837-8 (pbk.)
- Pages 1–30 are an excellent introduction to most of these skills. Each of these 13 models is designed to let you practice one skill several times. Unfortunately, the remaining 24 models leave out lots of pre-creases.
- Peter Engel. Origami from Angelfish to Zen. Dover Publications, Mineola, NY. Copyright 1989 by Peter Engel. ISBN 0-486-28138-8 (pbk.)
- Pages 1–88 explain how the crease patterns of the classic bases are related to each other, how they are examples of fractal design, and how it is possible to generate arbitrarily complex origami designs.
- Robert J. Lang. Origami Design Secrets: mathematical methods for an ancient art. A K Peters, Natick, MA. Copyright 2003 by A K Peters. ISBN 1-56881-194-2 (pbk)
- This book shows how crease patterns and folding techniques are related to the large-scale structure of a model. It also shows how closed-unsinking was derived, using Lang's TreeMaker software for prototyping arbitrarily complex origami designs.
- Tomoko Fuse. Unit Origami: multidimensional transformations. Japan Publications, inc. Tokyo. Copyright 1990 by Tomoko Fuse. ISBN 0-87040-852-6
- This is an excellent book about modular origami, and serves as a great introduction to geometric models and designs.
External links
- OrigamiTube.com YouTube styled website with user submitted content (videos) on origami.
- www.folds.net/tutorial Folds.net Guide to paperfolding - Instructions on the Web is laid out in a similar order to this tech tree. It has pictures of simple models at the start, and pictures of complicated models at the end.
- An article on "Origami Diagramming Conventions by Robert J. Lang.
- HappyFolding.com Site featuring instructional origami videos, an origami dictionary, etc.
Categories:


Wikimedia Foundation. 2010.