- No. 71 Wing RAAF
-
No. 71 Wing RAAF 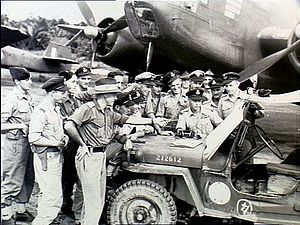
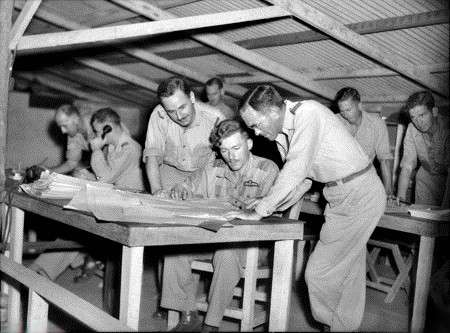
Tactical Reconnaissance crews of No. 71 Wing being briefed at Tadji Airstrip in New Guinea, June 1945Active 1943–1946 Country  Australia
Branch  Royal Australian Air Force
Role Attack Size 4–5 flying squadrons Part of No. 9 Group (1943–44)
No. 10 Group (1944)
Northern Command (1945)Engagements World War II Commanders Notable
commandersIan McLachlan (1943)
Blake Pelly (1943)
Colin Hannah (1944)
Val Hancock (1945)Aircraft flown Attack Beaufort; Beaufighter Fighter P-40 Kittyhawk No. 71 Wing was a Royal Australian Air Force (RAAF) wing of World War II. It was formed in February 1943 at Milne Bay, Papua New Guinea, as part of No. 9 Operational Group. The wing initially comprised two squadrons of P-40 Kittyhawks, one of Lockheed Hudsons, and one of Bristol Beauforts. The wing's mainstay soon became the Beaufort, however, eventually equipping five squadrons attached to the formation. No. 71 Wing took part in the New Guinea campaign under the auspices of No. 9 Group, before transferring to No. 10 Operational Group for the Western New Guinea campaign during 1944. It then returned to the control of Northern Command (formerly No. 9 Group) to support Australian ground forces in the Aitape–Wewak campaign, and completed its final combat mission only hours before the Japanese surrender in August 1945. Following the war No. 71 Wing was disbanded in early 1946.
Contents
History
New Guinea campaign
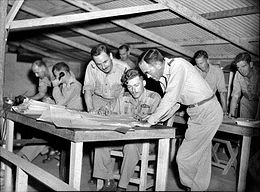 Fighter Sector Operations Room of No. 71 Wing on Goodenough Island, Papua, October 1943
No. 71 Wing was formed in February 1943, consisting of No. 6 Squadron (flying Lockheed Hudsons), No. 75 Squadron (P-40 Kittyhawks), No. 77 Squadron (P-40 Kittyhawks), and No. 100 Squadron (Bristol Beauforts). Based at Milne Bay, Papua New Guinea, the wing was led by Wing Commander Ian McLachlan, and came under the aegis of No. 9 Operational Group, the RAAF's "premier fighting unit" in the South West Pacific Area (SWPA), whose purpose was to act as a mobile strike force in support of advancing Allied troops.[1][2][3] In March the Beauforts took part in the Battle of the Bismarck Sea, "the decisive aerial engagement" in the SWPA according to General Douglas MacArthur, but was unable to score any hits against Japanese ships.[4][5]
Between July and October 1943, No. 71 Wing's squadrons carried out operations against enemy bases, shipping and lines of communication along the coast of New Britain. In August, it was given responsibility for Goodenough Island, where it was joined the following month by No. 8 Squadron, flying Beauforts. No. 6 Squadron had meanwhile converted to Beauforts from Hudsons; it remained at Milne Bay along with No. 100 Squadron, until both transferred to Goodenough in November.[6][7] Between October 1943 and February 1944, the three Beaufort squadrons took part in a series of major attacks on Rabaul, bombing and strafing airfields, infrastructure and shipping; the Japanese withdrew their aircraft from Rabaul the following month.[8][9] The wing's commanders during this period included Wing Commander Blake Pelly in 1943,[10] and Group Captain Colin Hannah, former leader of No. 6 Squadron, in early 1944, before he was repatriated to Australia due to illness.[11]
Western New Guinea campaign
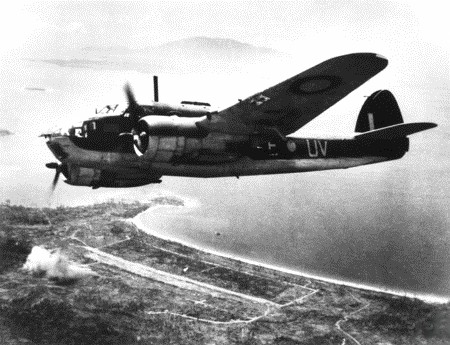
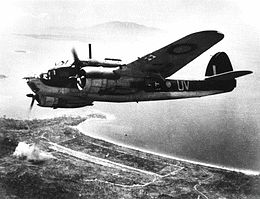 No. 8 Squadron Beaufort over New Guinea, 1944
By early 1944, No. 9 Operational Group had become a static garrison force for the New Guinea area, and was renamed Northern Command in April to better reflect its new role.[12][13] The following month No. 71 Wing, now led by Wing Commander Ralph Moran, advanced to Nadzab, where it came under the auspices of No. 10 Operational Group (later the Australian First Tactical Air Force). There Nos. 8 and 100 Squadrons engaged in attacks on Japanese positions in Wewak, each flying over 140 sorties during the month.[14]
In June, the wing went forward to Aitape, where its Beaufort complement was augmented by No. 30 Squadron flying Bristol Beaufighters, and No. 110 Squadron USAAF flying P-39 Airacobras. These four squadrons undertook 1,510 sorties during the Battle of Aitape in July, delivering 670 tons of bombs. On 7 August, No. 8 Squadron flew 64 missions, a record for a Beaufort unit. US General Charles P. Hall praised the wing for contributing "in a large measure ... to the success of the operation by continuous interruption of enemy lines of communication and bombing and strafing of enemy concentrations and supplies".[14] Commodore John Collins, who during the battle led a Royal Australian Navy task force that included the cruisers HMAS Australia and HMAS Shropshire, also paid tribute: "The accuracy of these bombardments was ensured by excellent air spotting. Beauforts of 71 Wing RAAF gave this spotting and deserve much credit for the efficient manner in which it was undertaken, particularly since the airmen were not trained spotters and a Beaufort is hardly a suitable plane for the work."[15]
Aitape–Wewak campaign
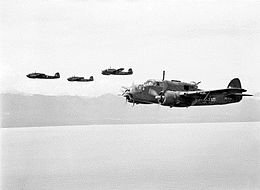 Beauforts of No. 100 Squadron near Wewak, January 1945
With the decision in September 1944 that No. 71 Wing would not advance to Morotai with No. 10 Operational Group, but rather support the Australian 6th Division in the Aitape–Wewak campaign, overall control of the wing returned to Northern Command. The same month, the first Beauforts of No. 7 Squadron arrived in Aitape to augment Nos. 8 and 100 Squadrons; the wing was further strengthened in November with a flight of CAC Boomerangs from No. 4 (Army Cooperation) Squadron.[16] Wing Commander Eric Cooper, previously in charge of No. 7 Squadron, became No. 71 Wing's new Officer Commanding in October.[17] The Beaufort units flew around 500 sorties per month from November 1944 to January 1945, but thereafter had to reduce their rate of effort due to aircrew, ordnance and fuel shortages. During a three-day period in March, two Beauforts blew up in mid-air while releasing their bombs; the aircraft were pulled from strike missions for ten days until the problem was traced to a faulty tail unit in the 100-pound (45 kg) bombs.[16]
Cooper handed over to Group Captain Val Hancock, former commander of No. 100 Squadron, in April 1945.[18][19] To maximize support to Australian ground troops in the lead-up to the final assault on Wewak, No. 71 Wing's three extant Beaufort squadrons were joined by two more, Nos. 6 and 15. Approximately sixty Beauforts and Boomerangs struck Japanese positions behind Dove Bay prior to amphibious landings on 11 May to cut off retreating enemy troops. Over the entire month, the wing dropped more than 1,200 tons of bombs and flew in excess of 1,400 sorties. By mid-year, however, the wing was again acutely short of fuel and ordnance, so much so that the squadrons took to arming their Beauforts with captured Japanese bombs.[19] On 9 July, enough supplies arrived to enable the wing to continue operating at nominal strength.[20] No. 71 Wing was active to the very last day of the Pacific War, flying its final combat mission involving thirty Beauforts only hours before news arrived of victory on 15 August 1945. Thereafter its squadrons dropped leaflets to remaining pockets of Japanese resistance, making them aware of the surrender.[19] The last entry in No. 71 Wing's operations book was made on 21 January 1946.[21]
Notes
- ^ Odgers, Air War Against Japan, pp.23–24,35
- ^ Stephens, The Royal Australian Air Force, pp.122–123
- ^ No. 71 Wing, p.1
- ^ Stephens, The Royal Australian Air Force, pp.160–165
- ^ Gillison, Royal Australian Air Force, pp.690–692
- ^ Odgers, Air War Against Japan, pp.69–85
- ^ Odgers, Air War Against Japan, pp.123–124
- ^ Odgers, Air War Against Japan, pp.93–96
- ^ Odgers, Air War Against Japan, pp.125–133
- ^ Group Captain Blake Raymond Pelly at Australian War Memorial. Retrieved on 22 November 2010.
- ^ Hannah, Sir Colin Thomas (1914 – 1978) at Australian Dictionary of Biography. Retrieved on 22 November 2010.
- ^ Stephens, The Royal Australian Air Force, pp.168–170
- ^ Odgers, Air War Against Japan, pp.182–183,198–200
- ^ a b Odgers, Air War Against Japan, pp.250–255
- ^ Gill, Royal Australian Navy, pp.462–463
- ^ a b Odgers, Air War Against Japan, pp.337–342
- ^ Wing Commander Eric William Cooper at Australian War Memorial. Retrieved on 22 November 2010.
- ^ Gillison, Royal Australian Air Force, p.95
- ^ a b c Odgers, Air War Against Japan, pp.342–348
- ^ Long, The Final Campaigns, p.360
- ^ No. 71 Wing, p.182
References
- No. 71 Wing (February 1943 – January 1946). "Operations Record Book". Canberra: National Archives of Australia. http://recordsearch.naa.gov.au/scripts/Imagine.asp?B=1360007. Retrieved 6 December 2010.
- Gill, George Hermon (1968). Australia in the War of 1939–1945: Series Two (Navy) Volume II – Royal Australian Navy, 1942–1945. Canberra: Australian War Memorial. OCLC 65475. http://www.awm.gov.au/histories/second_world_war/volume.asp?levelID=67911.
- Gillison, Douglas (1962). Australia in the War of 1939–1945: Series Three (Air) Volume I – Royal Australian Air Force, 1939–1942. Canberra: Australian War Memorial. OCLC 2000369. http://www.awm.gov.au/histories/second_world_war/volume.asp?levelID=67912.
- Long, Gavin (1963). Australia in the War of 1939–1945: Series One (Army) Volume VII – The Final Campaigns. Canberra: Australian War Memorial. OCLC 1297619. http://www.awm.gov.au/histories/second_world_war/volume.asp?levelID=67909.
- Odgers, George (1968) [1957]. Australia in the War of 1939–1945: Series Three (Air) Volume II – Air War Against Japan, 1943–1945. Canberra: Australian War Memorial. OCLC 11218821. http://www.awm.gov.au/histories/second_world_war/volume.asp?levelID=67913.
- Stephens, Alan (2006) [2001]. The Royal Australian Air Force: A History. London: Oxford University Press. ISBN 0195555414.
Further reading
- Odgers, George (1984). The Royal Australian Air Force: An Illustrated History. Brookvale: Child & Henry. ISBN 0867773685.
Categories:- RAAF wings
- Military units and formations established in 1943
- Military units and formations disestablished in 1946


Wikimedia Foundation. 2010.