- Lead came and copper foil glasswork
-
This article is on the techniques of lead came and copper foil glasswork. For a general overview of stained glass art, see stained glass.
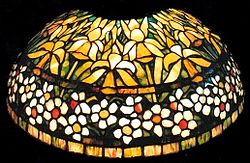 A typical copper foil Tiffany lamp, with a jonquil daffodil design
Lead came and copper foil glasswork are the arts and crafts of cutting colored glass and joining the pieces into picturesque designs.
The traditional method uses lead came. This is the method used for centuries in Europe, mainly in religious buildings such as cathedrals, churches and monasteries, and including wealthy or aristocratic homes.
An alternative method, replacing the lead came with copper foil, was invented in the 19th century, enabling creation of three-dimensional works, in addition to two-dimensional ones to which the lead came method is limited. The copper foil artwork is commonly called Tiffany stained glass, even though there is a debate about whether John La Farge or Louis Comfort Tiffany invented this alternative to lead came glasswork.
Contents
Overview
In both lead came and copper foil glasswork, cut pieces of stained glass are joined together in a framework of soldered metal.
In the lead came method the pieces of glass are embedded into the channels of the came, and the joints between the came strips soldered together.
In the copper foil method, the edges of the glass pieces are wrapped with adhesive copper tape, and soldered together along the adjacent copper strips.
The process
 The steps in creation of Lead Came and Copper Foil Glasswork
Design
The first step for both techniques is to create a design on paper. This draft must consider constraints such as reduction of buckling risk, overall structural integrity, limiting the convergence of lead lines, and cuttability of each piece of glass within.
The next step is to make a template copy of the design for cutting the glass. The width of the lead came or the copper foil that separates the pieces of glass may be compensated for with double blade pattern shears that remove a thin strip of material on the template copy.
For large designs, a scale model may be made, which is digitally photographed and further modified with AutoCAD. After measurements and other notations are applied, the full pattern is printed on a large-format printer.
Transferring the design to glass
Four methods may be employed.
- The cut paper may be glued to the glass before cutting it
- The cut paper to may be pressed against the glass and its outline traced on the glass with a marker.
- The pattern may be affixed to a light box or light source. Sheet glass is placed over the pattern, and traced with a marker.
- The edge of the pattern piece may be followed with the cutter.
Cutting the glass
The glass is scored using a steel or carbide wheel glass cutter lubricated with cutting oil. Glass is broken at the score using breaker-grozier pliers, running pliers or built in groziers on a traditional glass cutter. This works because glass breaks along its weakest point when it bends.
The ball end on many glass cutters is used to break complicated cuts in a piece of glass. Tapping the ball end along the score on the opposite side of the glass sends a vibration through the glass that helps it break along the score. Also, the notches in most basic glass cutters can be used to grab small bits of glass for breaking.
Grinding the cut glass
At this stage, the cut glass pieces have sharp edges and inaccuracies in their shape. The glazier can use an electric glass grinder with a diamond-coated grinding wheel to smooth the glass pieces, or a carborundum stone.
Glass saws
An alternative to the cutting and grinding steps is the use of a ring saw or bandsaw. Such saws permit the cutting of shapes impossible with a wheel cutter.
This is where the processes for each of the two methods split. The next section describes the steps for the lead came method. The equivalent copper foil steps are described in the copper foiling section below.
Lead came technique
 A 16th century lead came glass window, church Notre Dame, Les Andelys, Normandy, France
The lead came has channels into which the glass pieces are inserted. There are two types of lead came: for the circumference of the design, came with a U-shaped cross section may be used, as it takes glass only on one of its sides. For the middle of the design, came with an H-shaped cross-section is used, taking glass on both its sides. The channel or "heart" height of lead came is available in different thickness to allow for thicker or thinner glass as well as the "face" (profile) in various sizes for design options and construction.
Preparation of lead for assembly
Traditionally, lead came strips are stretched for straightening and stiffening using a lead vice attached at the edge of a work bench. The need for this is controversial. On one side there is a view that stiffening of the lead is crucial to achieve maximum lateral tensile strength to limit bowing of the window in the future and that the integrity of the lead is not compromised. However, it is the opinion of some practitioners that stretching is an undesirable practice as it might weaken, rather than strengthen, the lead [1].
Lead came is available in 5–6 foot pieces and on dispensing rolls for smaller gauge lead. Lead came is commonly cut with lead dikes or glazing knife. Table top chop saws are also used where repetitive sized pieces are needed or when working with a zinc based lead or zinc came. Cut lead came is also done in angles to allow for proper mitering where the stained glass design requires it.
Assembling the lead and glass
 Schematic cross-section drawing of two glass pieces embedded in three lead came pieces: 1 - U-shaped came; 2 - H-shaped came; 3 - glass
Each piece of glass is set in place upon a glazing drawing, with came shaped around it to make a matrix. Horseshoe nails and scraps of lead are used to hold the already-assembled pieces to the work surface. Horseshoe nails are used, because the steel is not tempered, and therefore has less chance of breaking the edge of a piece of glass. Sometimes on a delicate piece, a scrap of lead will cushion the glass from the nail. The glass and lead are assembled gradually, beginning from one corner of the work, and building-up away from it. The ends of the came are tucked under the ears of the other lead it meets.
Soldering the lead joints
The lead came is soldered at the joints between strips with lead/tin solder. This is in contrast to the copper foil method described below, where the whole length of the copper strip is soldered. 50/50 gives you a flat bead, great for tight lead joints and a base for copperfoil work. 60/40 gives you a high bead, perfect for copperfoil work, can be use on came but not recommended.
Flux a few joints at a time, and use a little bit of solder at a time. Move the iron in a circular pattern about a 1/2 inch. Always test the Iron's temp by testing it on a scrap piece lead!
Cementing the lead and glass panel
The final step is applying a waterproofing putty made of linseed oil and calcium carbonate (commercial whiting). The glazing compound is worked into the space between the glass and lead, to strengthen and waterproof the work. Lastly, the ears are pressed down against the glass, securing the piece and further waterproofing the panel. Whiting is reapplied to window sparingly for cleaning and removing excess oils left from cementing. Do not rush this step, always read and follow the directions. Most products must sit for a few days.
Adding reinforcement bars
Lead's malleability and ease of soldering make it perfect for the stained glass art. However, lead is one of the heaviest metals, so stained glass panels can be very heavy. Windows from Zettler Studio of Munich, Bavaria were made in 1928 for a church in Philadelphia. One of these sections alone can easily weigh 80 lbs and use a matrix of 7 bars in some examples. Because of this, the original installer included copper wires soldered onto the window to be twisted around bars set into the frame. These round bars and wires help carry the weight and prevent buckling, a potentially fatal problem for stained glass windows. The copper wire method is obsolete now, though still used in historical preservation. A modern technique involves soldering a flat bar perpendicular to the window. The ends of this bar are set into the frame and prevent deflection.
-

A lead came window that buckled because of lack of reinforcement bars
-

Front view of the buckled window shown on the left
Copper foil technique
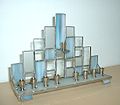
Copper-foil glasswork connects pre-cut pieces of glass by wrapping their edges with adhesive copper tape, then soldering the copper-wrapped edges together. It is commonly called the "Tiffany" stained glass method. One of the advantages of copper-foil glasswork over lead-strip glasswork is that you can assemble the glass pieces in three-dimensional shapes when soldering them together. Lead-strip enables the creation of only two-dimensional panes. The three photos below show the use of this technique for fixing a glass jar of a candy vending machine.
The steps of the copper foil process are depicted in the images below.
- Tip: Before you wrap, Wipe the glass with Rubbing Alcohol. This will remove excess oils and allow the adhesive to adhere better.
- The edges of the glass pieces are wrapped in copper foil. This is similar to the lead came method, where the edges are inserted into the came channels. The foil is then burnished onto all three glass surfaces using a burnishing tool, such as a fid or basic, to ensure there are no gaps between the foil and the glass.
- Flux is applied to all visible copper sparingly.
- The copper-wrapped glass pieces are soldered together. A bead of solder is run across every spot of visible copper foil, in contrast with the lead came method, where only the came edges called "joints" are soldered together.
- A finishing patina is applied to emphasize details or to quickly achieve the natural black patina that all lead develops with age.
-

Glass pieces wrapped with copper foil, before soldering
-

Soldering the copper foil wrapped pieces
-

The finished work, after tinting with dark patina
-

The partly assembled jar; some of the broken pieces are still separate, wrapped with the copper-foil.
-

The fully soldered jar.
-

The jar back in the vending machine, with the solder give an "antique black" finish or "patina".
-
Copper foil glasswork Hanukkah menora
Tools and materials
General
- Safety glasses
- Sheet glass
- Pattern shears (make sure they are for the method being attempted)
- Adhesive or paint pen oil-based
- Glass cutter
- Cutting oil
- Glass pliers
- Electric glass grinder with diamond-coated grinding wheel
- Soldering iron
- Solder 50/50
- Flux (tallow is usually used with lead) and applicator brush
- Patina
For lead came work
- Lead came
- Lead knife
- Lead nippers
- Glazing hammer
- Fids (tapering pins)
- Cement for lead came glass (glazing compound)
For copper foil work
- Copper foil tape/sheets
- Burnisher
- rubbing alcohol and cloth
- Solder 60/40 tin lead
Categories:


Wikimedia Foundation. 2010.