- Battle of Passchendaele
-
For other uses, see Passchendaele (disambiguation).
Battle of Passchendaele
Third Battle of YpresPart of the Western Front of the First World War 
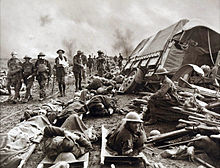
Australian gunners on a duckboard track in Château Wood near Hooge, 29 October 1917. Photo by Frank Hurley.Date 31 July – 6 November 1917 Location 50°54′1″N 3°1′16″E / 50.90028°N 3.02111°ECoordinates: 50°54′1″N 3°1′16″E / 50.90028°N 3.02111°E
Passendale, BelgiumResult Tactical Allied victory
Operational Allied failure
Strategically inconclusiveBelligerents  United Kingdom
 German Empire
Commanders and leaders Douglas Haig
Hubert Gough
Herbert Plumer
 Arthur Currie
 John Monash
 François Anthoine Crown Prince Rupprecht of Bavaria
Friedrich Sixt von Armin
Erich LudendorffCasualties and losses Disputed
200,000 – 448,614Disputed
260,400 – 400,000Battle of Passchendaele- Messines
- Pilckem Ridge
- Langemarck
- Menin Road
- Polygon Wood
- Broodseinde
- Poelcappelle
- 1st Passchendaele
- 2nd Passchendaele
The Battle of Passchendaele[Note 1] was one of the major battles of the First World War, taking place between July and November 1917. In a series of operations, Entente troops under British command attacked the Imperial German Army.[Note 2] The battle was fought for control of the ridge and village of Passchendaele (modern Passendale) near the town of Ypres in West Flanders, Belgium. The objectives of the offensive were, 'wearing out the enemy' and 'securing the Belgian coast and connecting with the Dutch frontier'. The British commander Sir Douglas Haig anticipated three phases: the capture of Passchendaele Ridge, an advance on Roulers and Operation Hush, an amphibious landing combined with an attack along the coast from Nieuport.[1] The offensive also served to distract the German army from the French on the Aisne, who were suffering from widespread mutiny in the aftermath of the Nivelle Offensive.
Contents
Background
The British launched several massive attacks, heavily supported by artillery, aircraft and often tanks. The British did not attain a decisive strategic success against a resolutely defended, extensive and sophisticated German defence. The British and French armies eventually obtained a tactical superiority and came close to an operational victory late in the year,
- No great victory had been won; it was - to use a German distinction - an ordinary, not an annhilating victory....(British Official Historian)[2]
the battle caused
- ... the gradual disappearance of infantry equal in quality to that of their opponents, and the tragic feeling of inferiority to the artillery and air forces of their opponents. (H. Bath)[3]
The battle consisted of 'bite-and-hold' attacks to capture tactically valuable ground and hold it against German attempts to take it back, thus wearing down the German army and attacks and counter-attacks by the German army to repulse the Allied attacks and to recapture ground, lasting until the Canadian Corps took Passchendaele on 6 November 1917, the battle ending on 10 November, apart from minor operations. Inflicting irreplaceable casualties on the Germans, the Allies had captured 5 miles (8 km) of some of the most heavily defended territory in the world at a cost of 140,000 dead, a ratio of roughly 2 inches (5 cm) gained per dead soldier. The Germans reoccupied the lost ground without resistance when the line was shortened five months later, during the Battle of the Lys,[4] losing it for good 28 September 1918.
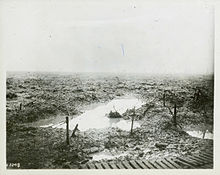
Passchendaele has become synonymous with the misery of grinding attrition warfare often fought in thick mud. The land between Dixmude and the river Lys was criss-crossed by streams and drainage ditches, most of which flowed west towards the Ypres—Commines canal which ran north—south. The land was flat and swampy but for good drainage. August 1917 was unusually cold and wet and huge artillery bombardments destroyed the ground surface. There were dry periods, particularly in September but mud was a feature of parts of the battlefield; tanks bogged down and some soldiers and horses drowned in it. As a German soldier recorded:
- A machine-gunner fell in the stream, complete with his load, and it was not possible to save him. (Hauptmann Biermann, Commander 11th Company)[5]
Ridges ran in curves from south of Ypres, east then north to Passchendaele and Staden, rising to a maximum of sixty metres above sea level. This high ground had been bitterly contested since 1914.[6]
The battle is a subject of debate among historians, particularly in Britain. The volume of the British Official History of the War that covered Passchendaele was the last to be published and there are claims that it was biased to reflect well on Field Marshal Douglas Haig[7] and badly on General Hubert Gough, the commander of the Fifth Army; this reading has been challenged by Andrew Green[8] who points out that the published fourth draft is far less favourable to Haig than the first draft but does not hold Gough responsible for every failure. The heavy casualties the British Army suffered in return for slender territorial gains have led many historians to follow the example of David Lloyd George, the Prime Minister of the time and use it as an example of senseless waste and poor generalship. Lloyd George, almost certainly influenced by Basil Liddell Hart, devoted a hundred pages of his memoirs (three times as many as he devoted to the British victories from August 1918 onwards) to a critique of British generalship at Third Ypres.[9]
There is also a revisionist school of thought which seeks to emphasize the achievement of the British Army in the battle in inflicting great damage on the German Army, relieving pressure on the French and developing offensive tactics capable of overcoming German defensive positions, leaving the Germans desperate for the winter weather to arrive
- It was with a feeling of absolute longing that we waited for the beginning of the wet season. (Hindenburg)[10]
and which were significant in winning the war in 1918.[11][12]
Casualty figures for the battle are still a matter of controversy. Some accounts suggest that the Allies suffered significantly heavier losses than the Germans, while others offer more even figures. However, no one disputes that hundreds of thousands of soldiers on both sides became casualties.[13] The last survivor of the battle (and the last survivor of the Western Front in the United Kingdom) Private Harry Patch, died on 25 July 2009.[14]
Prelude
The idea of a Flanders offensive had been in the mind of British commander Sir Douglas Haig for some time before the Battle of Passchendaele began. In January 1916, he had ordered plans to be drawn up for an attack in the area.[15] Planning continued but the Battle of Verdun beginning in March 1916 and the demands of the Somme front later in the year absorbed the BEF's offensive capacity.[16] In December 1916, at the conclusion of the Battle of the Somme, Haig identified Flanders as the most promising theatre for a British offensive in 1917. On 1 May 1917, Haig made a diary note of a letter to the War Cabinet,
- The enemy has already been weakened appreciably, but time is required to wear down his great numbers of troops. The situation is not yet ripe for the decisive blow. We must therefore continue to wear down the enemy until his power of resistance has been further reduced.
- The cause of Gen. Nivelle's comparative failure appears primarily to have been a miscalculation in this respect, and the remedy now is to return to wearing-down methods for a further period, the duration of which cannot yet be calculated. I recommend that the pause which is forced upon us in vigorous offensive operations is utilised to complete measures for clearing the coast this summer. Success seems reasonably possible. [17]
by 21 June 1917 the principle of a Flanders offensive had met with the grudging approval of Lloyd George[18] and the approval of the British Cabinet.[19][20]
Strategic background
In late 1916 and early 1917, military leaders in Britain and France were optimistic that the massive casualties they had inflicted on the German army at Verdun and on the Somme meant that the German army was near to exhaustion. At the same time, the civilian political leaders of both nations were growing wary of the immense cost to their countries. At a conference in Chantilly in November 1916 and a series of subsequent meetings, the Entente agreed on an offensive strategy where they would overwhelm the Central Powers by means of attacks on the Western, Eastern and Italian Fronts.[21] The British Prime Minister, David Lloyd George, sought to find ways of avoiding a repeat of the British casualties involved in the Battle of the Somme and proposed an alternative strategy at a conference in Rome, which would involve an offensive on the Italian front. British and French artillery would be transferred to Italy to add weight to the offensive.[22][23][24] This suggestion was opposed by the French and Italian delegations, as well as (at least covertly) the British officers present and was discarded.[25] The new French Commander-in-Chief, Robert Nivelle, believed that a concentrated attack by French forces on the Western Front in Spring 1917 could break the German front and lead to a decisive victory. Nivelle's plan was welcomed by the British; while many were sceptical that the French would deliver a breakthrough, a French attack would nonetheless mean less of the burden of the war in 1917 falling on the British.[26] Haig was ordered to co-operate with Nivelle's planned attack but secured Nivelle's agreement that in the event the French offensive failed, the British would attack in Flanders.[27]
Geography
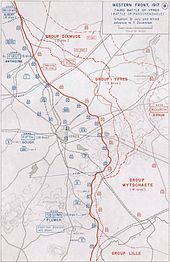 The progression of the battle and the general disposition of troops
The front line around Ypres had changed relatively little since the end of the First Battle of Ypres in October 1914. The British held the town of Ypres, while the Germans held the high ground of the Messines-Wytschaete ridge to the south of the town, the lower ridges to the east and the flat ground to the north.[28] [Note 3] Ypres was therefore in a salient sticking out into German positions and overlooked by German artillery on the higher ground. It was difficult for the British forces to gain ground observation of the German rear areas east of the ridges.[30] The high ground would, indeed, prove crucial to the British offensive.
Ypres was the only Belgian city not in German hands and had become an important political symbol; if the Germans captured Ypres, they would be able to threaten the Channel ports and thus British supply lines.[31] Driving the Germans away from Ypres would be a valuable objective. Roughly one-third of the U-boats which had recently begun unrestricted submarine warfare against Britain were based in occupied Belgian ports.[32] The U-boat bases assumed great importance in spring 1917 as shipping losses mounted.[31][33] Taking Passchendaele and then Roulers beyond, would threaten the Belgian ports. If the attack went very well it would be possible to outflank the German position in Belgium and threaten the German industrial heartland on the Ruhr, which might win the war quickly.[34] For the British generals, it was also considered advantageous that the German Army would fight hard to retain its positions in Flanders.[31][35] The strategic importance of Flanders meant German High Command would be loath to allow a general withdrawal. Haig was optimistic that the German Army would soon run out of manpower because of the heavy losses suffered on the Somme and at Verdun.[31]
The Germans were aware that an attack in the Flanders sector was likely and had prepared extensive defences. German experience during 1916 indicated that it was relatively easy for a British assault to take over the first line of defence supported by heavy artillery. Furthermore, the terrain in some of the salient was muddy and not good for digging trenches. Therefore, the Germans controlled the forward area with mutually supporting positions, generally based on concrete pillboxes or blockhouses protected by barbed wire, making use of existing buildings and vegetation. To the rear of this zone were five reserve lines of defence.[36]
A feature of the Ypres salient was mud. Apart from the 'ridges', the battlefield was low-lying, Ypres was on the 20-metre contour, Gheluvelt Plateau at 55 to 60 metres.[37] Naturally swampy, farming in this area was possible only because of an extensive drainage system.[38] After several years of fighting in the area the drainage system was largely destroyed, although some parts had been restored by Land Drainage Companies brought from England. On the whole the area was considered by the British to be drier than Loos, Givenchy and Ploegsteert Wood further south.[39] 1917 turned out to be a year of particularly foul weather, with a very late spring and not much summer to speak of.[40] There were thunderstorms in July and August and while September was dry, October and onwards were wet. The mud was to become one of the defining features of the battle for soldiers on both sides and did a great deal to hamper operations. Haig was certainly aware of the nature of the ground he was launching his attack over[41] and closely monitored the weather conditions faced by his troops.[42] What Haig knew about the likely weather conditions is one of the many controversies about the battle.[Note 4] Sheffield says that the 'predictable' rain in August '... has no foundation in fact. The rain in Flanders during the battle was abnormally heavy.' [47]
Planning the offensive
Several plans for the Ypres offensive were produced between November 1916 and May 1917. Haig first ordered General Sir Hubert Plumer, the commander of the British Second Army which occupied the Ypres salient, to produce an attack plan. Haig was dissatisfied with the limited scope of Plumer's plan for the capture Messines Ridge and Pilckem Ridge. Plumer produced a revised plan, in which the first stage of the operation would capture Messines and Pilckem while also pushing some distance across the Gheluvelt Plateau. Shortly afterwards, this would be followed by an attack across the Gheluvelt Plateau, pushing on to Passchendaele and then further on. Plumer reckoned that a force of 42 divisions and 5,000 guns would be necessary for this to work and the BEF had nowhere near 5,000 artillery pieces. Haig also asked for an assessment from Colonel Macmullen on from his staff, who proposed that the Gheluvelt Plateau be taken by a massed tank attack, reducing the need for artillery; tank experts rejected this idea as utterly impractical. Plumer then produced a second revision of his plan; Messines Ridge would be attacked first along with the western part of Gheluvelt and Pilckem Ridge attacked a short while later. The involvement of Henry Rawlinson produced yet another iteration of the plan; Messines alone should be the first target and Gheluvelt and Pilckem Ridge within 47–72 hours.[48]
In April 1917, the French Nivelle Offensive took place, with the main effort by the French on the Aisne, while British and Empire forces undertook a preliminary attack at Arras. The French attack gained ground but at the cost of great casualties and failed to obtain the breakthrough Nivelle had promised; Nivelle was relieved and replaced by Philippe Petain. Over the summer it became clear that the failure of the offensive had caused a collapse in morale amongst French troops.[49] The failure of the French attack meant that any offensive on the Western front would be a largely British affair, as the French were exhausted. Lloyd George, while still attempting to promote his favoured Italian campaign, had little option but to support Haig's Flanders offensive.[50][51] On 7 May, Haig set the timetable for his Flanders offensive, with 7 June the date for a preliminary attack on the Messines Ridge. A week after Messines ridge was captured Haig gave his objectives to his Army commanders, which were 'wearing out the enemy' and 'securing the Belgian coast and connecting with the Dutch frontier' by the capture of Passchendaele Ridge, an advance on Roulers and Operation Hush an attack along the coast with an amphibious landing[52]
- If effectives, or guns inadequate it may be necessary to call a halt after No1 is gained.'(Haig: Diary 14 June 1917)[53]
also putting his views to the War Cabinet in a memorandum of 12 June where he wrote
- With the drafts and guns already promised, however, I consider, on present indications, that it will be possible to carry through at least a portion of the operations intended....[54]
and that the extent of the success to be gained was dependent on War Cabinet priorities, the state of Russia and German staying power.
Battle
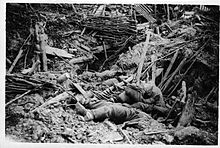
German defences
 The German defensive lines near the town of Poelcappelle in late 1917
The six week pause after the Battle of Messines allowed both sides time to prepare. There was some debate among German commanders about how to meet the looming British offensive,
- ... to decide whether or not to learn from experience and avoid the first blows of the forthcoming offensive in Flanders by conducting a planned withdrawal.... it would have been necessary to withdraw to the great Flandern Stellung [giving] up the entire depth of the current defensive system. In addition the Flandern Stellung was still not ready.[55]
In the event the Germans decided to stand their ground.
The Germans transferred defensive expert Colonel Fritz von Lossberg to the German 4th Army as Chief of Staff on 13 June who went to work improving the defences in the area and training infantry in the methods of 'elastic defence', using assault squad tactics to fight an aggressive, mobile battle in their area. Four lines of defence existed before the attack; the German first, second and third lines, plus Flandern I the strategic defence line begun in February 1917. The Germans began two more strategic defensive lines, Flandern II behind the recently lost territory to the south of Ypres and Flandern III along the reverse slope of Passchendaele Ridge. There was a forward zone, battle zone and rear zone, each 2,000–3,000 yards deep, backing on to the second (Albrecht) line, third (Wilhelm) line and Flanders I.[56]
Numerous concrete machine gun emplacements were constructed between the German first line of defence, through to the Flandern I strategic defensive line. The purpose of these machine gun posts was to disrupt, confuse and slow an allied attack, allowing the German Eingreif divisions time to attack 'den sofortigen Gegenstoss' (the instant-immediate counterthrust)[57] before the Allied troops had re-organised themselves after breaching the main defensive lines. In addition to this, the number of German troops defending the front zone had been reduced (both to man the machine gun emplacements between the defensive lines, as well to reduce the number of soldiers vulnerable to Allied artillery fire). Into these defences, the Germans had put 13 divisions (5 in the front zone, 4 in close reserve and another 4 in strategic reserve) with 1,150 pieces of artillery.
Messines Ridge: 7–17 June
Main article: Battle of MessinesThe first stage in the British plan was a preparatory attack on the German positions south of Ypres at Messines Ridge. These German positions dominated Ypres and unless neutralised, would be able to enfilade any British attack eastwards from the salient.[58] Messines and Wytschaete were powerful positions but exposed to attack and their defence was a preoccupation of the German troops in the sector.[58][59] Both villages had been extensively fortified and the area was littered with pillboxes, blockhouses and dugouts. In accordance with the German Army's new defensive methods, the forward area was lightly held, with counter-attack formations held in reserve.[60]
The attack on Messines was the responsibility of General Sir Herbert Plumer and the British Second Army. Plumer's planned for nine infantry divisions from X, IX and II Anzac Corps to advance 1,500 yards and take the first line of German defences on the front line of the ridge. This plan was extended by Haig to require the capture of the second line of defences on the rear edge of the ridge including Wytschaete and to move down the reverse side of the slope to take a further line of defences, an advance of about 3,000 yards.[61] A preparatory bombardment for the attack began on 21 May; Plumer deployed a total of 2,266 artillery pieces, of which 757 were heavy.[62] An important part of the bombardment was counter-battery fire against German artillery positions. In spite of the Germans bringing 630 guns to bear, this was largely successful.[62]
 German trench destroyed by a mine explosion.
The British advance began on 7 June and was preceded by a unique display of military pyrotechnics. Since mid-1915, the British had been covertly digging mines under the German positions on the Messines Ridge. By June 1917 21 mines had been dug, filled with nearly 1,000,000 lb (450,000 kg) of explosives between them.[63] The Germans were aware of British mining efforts and had taken some countermeasures but the scale of the mining came as a surprise to them.[64] Two of the British mines failed to detonate but the remaining 19 were fired simultaneously at 03.10 GMT.[60] The effect of the mine explosions was immense, destroying a large part of the German front line and support positions.
As soon as the mines exploded, the British guns recommenced firing, providing a heavy creeping barrage which was closely followed by assaulting infantry and tanks.[65][66] Messines was taken at around 05.00. The second phase of the attack began at 07.00 and by 09.00 the British had taken Wytschaete. German resistance was scant and German positions were overwhelmed. At 15.10 the attack was renewed as fresh troops supported by tanks, pressed down the ridge to the final objectives, which were largely gained before dark on the 7th.[66][67] British losses in the morning were light, although the plan had expected casualties of up to 50% in the initial attack. As the advance continued over the ridge, British supporting artillery was less able to provide supporting fire, while giving easier opportunities to German artillery fire.[67] Fighting continued around Messines Ridge until 12 June.[68]
The attack was generally considered a success. It demonstrated that by bringing overwhelming fire power to bear and resisting the temptation to set over-ambitious goals, it was possible for the attacking side to prevail even against fortified positions. Over 7,000 German prisoners and 48 artillery pieces were taken.[69][70] The attack also succeeded in its objective of preparing the way for the main attack later in the summer.
Gough's command: July–August 1917
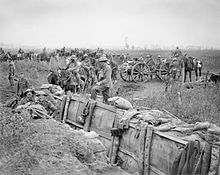 British 18 pounder battery taking up new positions near Boesinghe, 31 July
On 1 June 1917, General Sir Hubert Gough assumed command of Fifth Army, which was now responsible for the Ypres salient north of the Messines Ridge. Haig had selected Gough to command the offensive on 30 April but Gough was commanding British forces south of Arras at the time and delayed his arrival in Ypres until the conclusion of the Second Battle of Bullecourt.[71] Gough immediately set about planning the attack. Vth Brigade HQ RFC moved with 5th Army HQ and by 31 July the Allied air concentration from the Lys to the sea consisted of 840 aircraft, 330 being fighters. By 31 July the German Fourth Army had about 600 aircraft, 200 being single seat fighters[72]
Air Operations
The intended slow build-up of Allied air activity over the Fifth and Second armies was changed on 8 July to an immediate maximum effort due to the German air service making a similar effort of air and artillery spotting and attacking British Corps aircraft (conducting operations over the front line, while Army aircraft went further afield).[73] Poor weather stopped this until the 11th July. The Germans had been sending larger formations into action and on 12 July the greatest amount of air activity since the war began took place. Late on about thirty German fighters engaged British and French fighters in a dogfight lasting for an hour. Nine RFC (Royal Flying Corps) aircraft were lost for a claim of fourteen German aircraft for the day.[74] Until the end of July the British and French air effort by night as well as day was resisted by the Germans until they were worn down. The Germans continued periodically to assemble bigger formations and on 26 July near Polygon Wood fifty Albatros scouts were engaged by thirty-seven British fighters. During the melee four German reconnaissance aircraft were able to slip over the line and make observations around Ypres. Next evening eight British aircraft over Menin lured about 20 Albatros scouts to Polygon Wood, where 59 British fighters were waiting. Allied and German aircraft in the vicinity joined in the dogfight and after an hour the surviving German aircraft withdrew. The British decoys shot down six German aircraft and the ambushers another three for a loss of two British aircraft.[75]
On 27 July a RFC reconnaissance aircraft detected a German tactical withdrawal, which enabled XIV Corps to occupy 3,000 yards of the German front line. Next day the fine weather allowed the RFC to conduct a large amount of observation for counter-battery fire and to detect numerous German batteries which had been moved. Operations to deprive the Germans of air observation over the attack front were curtailed by poor weather on 29 and 30 July. On the commencement of the ground offensive on 31 July, low cloud returned and stopped the air operation in its support. Small numbers of aircraft were sent out to seek targets of opportunity and some contact patrolling was managed at very low level, giving good information about the progress of the ground battle and leaving thirty British aircraft damaged by bullets and shells.[76]
Attack plan for 31 July
Gough's plan involved a preparatory bombardment starting on 16 July and initially scheduled to finish on 25 July. On the 25th, the Second Army would create the impression of a more ambitious attack on Messines Ridge by capturing outposts in the Warneton Line, east of the ridge.[77] Fifth Army would attack along a front of about 14,000 yards together with the French First Army on its northern flank, running from Houthoulst Forest in the north to Kleine Zillebecke in the South. Their objective on the first day would be an advance of 3,000–3,500 yards to the 'Green Line' for consolidation with a possible further advance to the 'Red Line' a total of 4,000–5,000 yards by advanced guards, as far as Polygon Wood, Broodseinde and Langemarck, depending on German resistance to the principal advance. The decision to attempt this was left to the discretion of the division commanders.[78][79] An attack of this nature was not a breakthrough operation; the German defensive position known as Flandern I lay 10,000–12,000 yards behind the front and would not be captured on the first day,[80] nonetheless it was more ambitious than Plumer's earlier plan, which had involved an advance of 1,000–1,750 yards. Major-General John Davidson (Director of Operations at GHQ) wrote a memorandum due to his concern that there was 'ambiguity as to what was meant by a step-by-step attack with limited objectives' [81] and suggested reverting to the idea of a 1,750 yard advance, to increase the concentration of British artillery. Gough replied to the memo stressing the need to plan for opportunities to take ground left temporarily undefended, before the Germans could recover and that these opportunities were more likely in the first attack which had had long preparation:
It is important to recognise that the results to be looked for from a well-organised attack which has taken weeks and months to prepare are great, much ground can be gained and prisoners and guns captured during the first day or two.[82]
I think we should certainly aim at the definite capture of the Green Line, and that, should the situation admit of our infantry advancing without much opposition to the Red Line, it would be of the greatest advantage to us to do so.[83]
Haig arranged a meeting with Davidson, Gough and Plumer on 28 June (the day after increasing the size of II Corps with 24th division and the artillery of 23rd and 24th divisions (plus another 25 heavy and 13 medium batteries).[84] Plumer supported Gough's plan and Haig let it stand.[85]
Gough intended to use nine divisions of infantry, making about 100,000 men. Fifth Army had 752 heavy guns and 1,442 field guns, while they could also count on support from 300 heavy guns and 240 field guns belonging to the French First Army to the north and 112 heavy guns and 210 field guns assigned to Second Army to the south. Gough also intended to use 120 Mark IV tanks to support the attack, with another 48 held in reserve. While Gough had five divisions of cavalry at his disposal, only one brigade was planned to be deployed and that only in the event that the northernmost corps of infantry reached its objectives.[86]
During the preliminary bombardment, the artillery were expected to destroy German strongpoints and trenches, engage in counter-battery fire to suppress German artillery and cut barbed wire entanglements around German positions. On the day of the attack, the first wave of infantry would advance under a creeping barrage advancing 100 yards every 4 minutes.[87] They would be followed up by more infantry advancing in columns or flexible 'artillery formation'. To prepare for the attack, the infantry trained on a full-scale replica of the German trench system, which had been pieced together from aerial reconnaissance photographs and trench raids. Specialist platoons were given additional training on methods to destroy German pillboxes and blockhouses.[88]
The attack was delayed at Anthoine's request on 1 July as his First Army needed more time to prepare artillery emplacements and then Gough asked on 7 July for a delay of five days.[89] Some of Gough's heavy artillery had been lost to the German counter-bombardment, some delayed in arriving and bad weather was hampering the programme of counter-battery fire.[90] Haig agreed to delay until the 28th. Anthoine then requested another delay because of the poor weather slowing his artillery preparation and after Gough supported this, Haig reluctantly agreed to 31 July, even though this meant postponing the coast operation from 7–8 August to the next period of high tides.[91]
Battle of Pilckem Ridge
The assault began at 3.50 am on 31 July,
- ... a hurricane of fire, completely beyond anyone's experience, broke out. The entire earth of Flanders rocked and seemed to be on fire. This was not just drum fire; it was as though Hell itself had slipped its bonds. What were the terrors of Verdun and the Somme compared to this grotesquely huge outpouring of raw power?[92]
The attack was meant to commence at dawn but low cloud meant that it was still dark.[93] The attack had most success on the left (north), in front of XIV Corps and the French First Army. In this section of the front, the Entente forces advanced 2,500–3000 yards, up to the line of the Steenbeck river.[94] In the centre of the British attack, XVIII and XIX Corps pushed forward to the line of the Steenbeck to consolidate and sent advanced guards towards the Red Line, an advance of some 4,000 yards.[95] In these areas of the front, the preliminary bombardment had succeeded in destroying the front line of the German position and the creeping barrage was effective in supporting the infantry attack at least as far as the first objective.[94] This meant that the infantry, some with tanks had the strength to deal with German strongpoints encountered after the first line and 'vorfeldzone' had been penetrated and was able to push on towards its further objectives.[96]
- Once more some of the enemy engaged us in a fire fight, as soon as they realised that they were under fire from a flank. Already we had dead and wounded and our numbers kept reducing. Others attempted to encircle us and cut us off from the rear.... 'They are on the roof!'.... Finally we were completely cut off. The British approached to within fifty metres, despite our counter-fire. I gave the order to case fire and waved a towel as a sign of surrender. There were only about eight of us still able to fight.[97]
The attack by II Corps across the Ghelveult Plateau to the south, was less successful. 8th Division advanced towards Westhoek and took the Blue and Black lines 'without a hitch.... the advance of the 25th Infantry Brigade over the Black line towards the Green Line was splendid and was going strong. It was then that our southern flank became exposed to the concentrated fire of enemy machine guns' [98] from Nonne Boschen and Glencorse Wood. These obstacles had been objectives for 30th Division, on 8th Division's right. 30th Division and 24th Division failed to advance far over boggy ground and because much of the German machine gun defence on this section of the front remained intact.[99] This wasn't known to 8th Division until just before the 25th Brigade was due to advance over Westhoek Ridge. Brigadier General Coffin decided that it was too late to stop the attack and sent a company of the reserve battalion to fill the gap to the south. It was not enough so the Brigade consolidated on the reverse slope and held the crest with Lewis gun posts. Small pockets of ground lost to German counter-attacks were regained by British counter-attacks.[100] The right (17th) Brigade of 24th Division reached its objective 1,000 yards east of Klein Zillebeke. The centre Brigade (73rd) was stopped by German pillboxes at Lower Star Post and 72nd Brigade reached the Bassevillebeek but then had to withdraw to a line south from Bodmin Copse a few hundred yards short of the Blue Line. 30th Division had to advance across the Gheluvelt Plateau. the hardest job of all so was reinforced by a Brigade of 18th Division.[101] The 21st Brigade on the right lost the barrage crossing the wreckage of Sanctuary Wood and took until 6 a.m. to capture Stirling Castle Ridge. Attempts to advance further were stopped by German machine-gun fire.
- We found the fire of the tanks very unpleasant indeed. At about 2.00pm the enemy renewed the assault against our forward strong point, attacking Konigin Olga-Weg simultaneously from a flank. Two new tanks headed in the direction of Herenthage Wood, making use of the low ground to its front. Fresh assault troops, for whom they were intended to provide cover, advanced behind the tanks, but these attacks too were halted by a combination of small arms and artillery fire. The last of the tanks turned to escape and unfortunately they got away.[102]
90th Brigade to the left was also stopped on the first objective. German artillery fire fell on Sanctuary Wood and Chateau Wood from 5 a.m. and succeeded in stopping the advance of the 30th Division, except for a short move forward of about 300 yards south of Westhoek. The British artillery barrages made it impossible for German infantry to counter-attack in this area.[103]
The success of the British advance in the centre of the front caused great concern to the German commanders. While the defensive system was designed to deal with some penetration, it was meant to prevent the 4,000-yard advance that XVIII and XIX Corps had achieved. German reserves from the vicinity of Passchendaele were able to launch a counterattack, starting at 11.00 to 11.30 am. The advanced guards facing the counter-attack were dispersed and disorganized after dealing with German strongpoints earlier in the morning and could not communicate with their artillery. The German counterattack was able to drive the advanced guards back to the 'Green Line' where the counter-attack was destroyed by artillery and machine gun fire.[104]
The British Official History[105] gives Fifth Army casualties for 31 July to 3 August as 27,001; 3,697 of them killed. Second Army casualties 31 July to 2nd August are 4,819; 769 killed. German Fourth Army casualties for 21 – 31 July are '30,000 in round numbers'[106] excluding 'wounded whose recovery was to be expected in a reasonable time'. The British Official Historian added another 10,000 for this category. The accuracy of casualty statistics of the war has been questioned ever since.
II Corps preliminary operation, 10 August
Intended for 9 August to prepare the way for the general offensive due on 13 August but delayed for 24 hours by a thunderstorm on the 8th (with 10mm of rain, after the 25mm which fell between 1 and 4 August),[107] II Corps attacked on the 10th to capture the Gheluvelt Plateau. British artillery fire was distributed across the battlefront for the general attack (eventually made on the 16th) while the Germans concentrated on II and XIX Corps. British counter-battery efforts were hampered by the lousy weather making air observation extremely difficult so much of the effort was wasted by inaccurate fire and an inability to see German artillery shifting position (among three or four alternative emplacements per battery). The state of the ground, German artillery fire and British artillery losses foreshadowed the situation in late October opposite Passchendaele Ridge.[108] 8th and 30th Divisions were relieved by 25th and 18th by 4 August but this meant that they were exhausted by the 10th. The advance succeeded but German artillery fire and infantry counter-attacks isolated the British infantry of 18th Division which had captured Glencorse Wood and about 7 p.m. German infantry behind a smokescreen recaptured all but the north-west corner of the Wood.
- The British drum fire began suddenly at 5.30 a.m., landing fifty metres to our rear. The attack in dense columns followed immediately. We fired our rifles at the rapid rate and threw grenades, once the British got close enough, causing them bloody casualties.... Suddenly we realised we were outflanked from the right, so we had to pull back again.... They forced their way into the pill box and took everyone prisoner, then they continued to advance.... British aircraft were flying down below fifty metres, shooting at our men with machine guns.... our artillery fired very successfully at the British.... We were freed by the counter-stroke and were very pleased to be back in German lines.[109]
Only 25th Division's gains on Westhoek Ridge were held.[110]
Battle of Hill 70 15–25 August
The Battle of Hill 70 was a small operation of World War I between the Canadian Corps and five divisions of the German Sixth Army. The battle took place along the Western Front on the outskirts of Lens in the Nord-Pas-de-Calais region of France between 15 August 1917 and 25 August 1917. The effect of the British operation here was felt in Flanders
- The fighting at Lens cost us, once again, the expenditure of considerable numbers of troops who had to be replaced. The whole previously worked-out plan for relieving the fought-out troops in Flanders had been wrecked.[111]
Battle of Langemarck: 16 August and subsidiary operations to 26 August
Ground conditions during the whole Ypres-Passchendaele action were bad because the ground was already fought-over and was partially flooded. Continuous shelling had destroyed drainage canals in the area and unseasonable heavy rain in August turned areas into a sea of mud and water-filled shell-craters. The troops walked up to the front on duckboards laid across the mud, often carrying up to one hundred pounds (45 kg) of equipment. It was possible for them to slip off the path into the craters and drown before they could be rescued. The trees were reduced to blunted trunks, the branches and leaves torn away and the bodies of men buried after previous actions were often uncovered by the rain and shelling.
Fifth army headquarters was influenced by the effect that delay would have on the coastal operation, which needed the high tides at the end of August or it would have to be postponed for a month.[112] Gough delayed the general offensive for a day but then a thunderstorm on the 14th forced another 24 hour postponement. In the II Corps area the disappointment of 10 August were repeated with the infantry managing a modest advance, being isolated by German artillery and then forced back to their start line by German infantry counter-attacks, after they had run out of ammunition. Attempts by the German infantry to advance further were stopped by British artillery fire inflicting heavy losses.[113]
The advance further north in the XVIII Corps area retook and held St Julien and the area south east of Langemarck while XIV Corps captured Langemarck and the Wilhelm Line (IIIrd Line) north of the Ypres-Staden railway near the Kortebeek. The French First Army conformed, pushing up to the Kortebeek and St Jansbeck stream west of the northern stretch of the Wilhelm Line (IIIrd Line) where it crossed to the east side of the Kortebeek.[114]
- German Fourth Army headquarters still based its defence on holding the bastions of Gheluvelt Plateau and Houthoulst Forest. They considered that so long as these were held a British advance in between was of small consequence. (Rupprecht ii., p. 267 in the British Official History.)[115]
Exploiting observation from higher ground to the east, the Germans were able to inflict heavy losses on the British divisions holding the new line beyond Langemarck. After two fine dry days on 17 and 18 August, XIX and XVIII Corps began pushing closer to the German IIIrd (Wilhelm) Line. On 20 August an operation by British tanks, artillery and infantry captured strongpoints along the St Julien – Poelkappelle road and on 22 August larger gains were made (despite the tank support mostly ditching behind the British front line) by XVIII and XIX Corps, which still left them overlooked by the Germans in the uncaptured part of their IIIrd Line, from east of Langemarck south to the Ypres – Zonnebeke road.[116]
II Corps resumed operations to capture Nonne Bosschen and Glencorse Woods and Inverness Copse around the Menin Road on 22 August, the Copse and Herenthage Park being the first objective. The German outpost line was on the western edge of the Copse about 600 yards west of the Albrecht Line (IInd Line). The 14th (Light) Division with some tanks forced the German defenders back to the Albrecht line at the Herenthage Chateau, with heavy losses to both sides. The 90 British troops not casualties were forced back by a German counter-attack to the western edge of the Copse. Next morning the German 34th Division made a second counter-attack which collided with the two British tanks still operational of five sent to attack German strong points in Inverness Copse. The counter-attack melted away. At 6.00 a.m. on the 23rd, after a German hurricane bombardment fell on them in the Copse, the German infantry advanced, reached the western edge of the Copse then fell back, still under fire from German artillery. Another attempt in the afternoon, under a hail of fire from both artilleries, pushed the British out of the Copse and eventually a British counter-attack was cancelled due to uncertainty about the position of the front line. The British general offensive intended for 27 August was changed because of this failure to hold ground, then postponed due to more bad weather.[117]
British casualties for 31 July to 28 August are given as 68,010 by the British Official Historian; 10,266 being killed,[118] with a claim that 37 German divisions had been exhausted and withdrawn.
Verdun 20 August – October
The French attacked at Verdun on 20 August and by 9 September had taken 10,000 prisoners. Fighting continued sporadically into October, adding to the German army's difficulties on the Western Front and elsewhere.
- "On the left bank, close to the Meuse, one division had failed, nor had we been fortunate on the right bank; and yet both here and in Flanders everything possible had been done to avoid failure.... The French army was once more capable of the offensive. It had quickly overcome its depression." (Ludendorff, memoirs).[119]
Second phase
In view of the failure of the British Fifth Army to advance very far during August (which might be better described as German success in holding their positions), Haig decided to transfer the weight of the offensive towards the south-east along the southern half of Passchendaele Ridge.[120] Principal authority for the offensive switched to the British Second Army under command of General Herbert Plumer. Plumer abandoned attempts to exploit opportunities created by the 'bite' part of the operation and instead intended to launch several attacks, each with even more limited geographical objectives, to ensure that the infantry were organised on tactically advantageous ground and in contact with their artillery when they received German counter-attacks.[120]
- In 1917 the difference between a 'thruster' like Gough, and a 'methodical' general like Plumer, satisfied with smaller gains, is difficult to discern in actual plans or orders. It was nevertheless there....[121]
Plumer’s initial intention was to capture Gheluvelt Plateau in four steps, with an interval of six days between each to allow time to bring forward artillery and supplies.[122]
Up to this point, the Germans were employing defence in depth, whereby the front line was lightly held and reserve troops deployed outside British artillery range.[123] The previous British attacks had exhausted themselves without significantly affecting the fighting capacity of the main German troop body.[123] The German reserves had then repelled some of the exhausted British advanced troops by counter-strokes, albeit with heavy losses.[123]
- From 31st July 1917 till well into September was a period of tremendous anxiety.... The fighting on the Western Front became more serious than any the German army had yet experienced.... and the costly August battles imposed a great strain on the Western troops. Our wastage had been so high as to cause grave misgivings, and exceeded all our expectations (Ludendorff, memoirs).[124]
Plumer's tactical refinements sought to undermine the German defence in depth by limiting objectives to a shallow penetration and fighting the principal battle against German counter-attacks rather than against the local defenders. By reorganising the infantry's reserves, Plumer ensured that the echelons in depth of the attacking divisions roughly corresponded to the echelons in depth of the local German counter-attack units and their arriving Eingreif divisions. This meant that support was provided for the attack and then defence against German counter-attacks. The assaults would take place on a smaller portion of the front and troops would advance no more than 1,500 yards (1,400 m) into the German lines to overrun much of the German front line and forward defence zone, before consolidating their position.[123] When the Germans counter-attacked they would find a well defended lines still heavily protected by artillery like the Green Line on 31 July and consequently suffer heavy casualties to little effect.
Battle of the Menin Road Ridge: 20–25 September
 Wounded men at the side of a road after the Battle of Menin Road
The plan of attack included special emphasis on the need for heavy and medium artillery.[125] This was not only to destroy the German concrete shelters and machine gun nests (more numerous in the battle zones being attacked since German outpost zones had been captured), during the preparatory bombardment but also to engage in counter-battery fire before and during the assault.[125] 1,295 pieces of artillery (575 heavy and medium and 720 field guns and howitzers) were allocated to Plumer for the battle.[126] This was equivalent to one artillery piece for every five yards of the attack front, more than double the proportion used at the Battle of Pilckem Ridge.[126][127] The ammunition requirements for the seven days bombardment prior to assault was estimated at 3.5 million rounds.[126] This allotment provided a density of fire four times as great as the attack made on 31 July.[126] Heavy and medium howitzers were to make two 200 yards deep layers of the creeping bombardment ahead of two field artillery belts equally deep and a machine-gun barrage. Beyond the 'creeper', four heavy artillery counter-battery double groups with 222 guns and howitzers covered a 7,000-yard front, ready to engage any German guns which opened fire with gas and high explisive shell.[128]
The British began a 'desultory bombardment' on 31st August[129] and also sought to neutralize the German batteries with poison gas in the days before the attack, including gas attacks on each of the three preceding evenings before the assault.[130]
On 20 September, after a massive bombardment, the Allies attacked on a 14,500 yard front and captured most their objectives to a depth of about 1,500 yards (1,400 m) by mid-morning.[131] The Germans made many counter-attacks, beginning around 3.00pm until early evening, all of which failed to gain ground or were able to make only a temporary penetration of the new British positions on the Second Army front. A small area on the Fifth Army front attacked by 51st Division was recaptured by German counter-attacks.
- On the V Corps front they launched no less than six counter-attacks.... Their losses were very heavy and we captured over 1,300 prisoners.(Gough)[132]
The Germans by this time had a semi-permanent front line, with very deep dugouts and concrete pillboxes, supported by artillery ranged on no man's land. The attack was a great success and caused no small panic to German commanders; proving quite clearly to them that well-prepared defences could no longer fend off a well-prepared attack under good conditions.
- The German Eingreif divisions [16th Bavarian Division at Gheluwe, 236th Division at Moorslede and 234th Division at Oostniewkerke in Flandern III][133] were at 8am assembled at their stations in readiness to move at any moment. In spite of this the counter-attacks did not take effect until the late afternoon; for the tremendous British barrage fire caused most serious loss of time and crippled the thrust power of the reserves. (Der Weltkrieg)[134]
The British Official History records that the counter-attack divisions had been held back waiting for another British advance which never came.[135]
Six divisions of the Second Army attacked; 1st and 2nd Australian, 19th, 23rd, 39th and 41st. The German 9th Reserve, 3rd Bavarian Ersatz and 121st divisions held the Gheluvelt Plateau from Lower Star Post (near the Zandvoorde road) north to Zonnebeke (about four miles). Each German division had all three regiments in the line, with one battalion in the outpost zone, one in support in and behind the Wilhem (Third) Line and one in reserve behind Flandern I. The 3rd Bavarian Ersatz and 121st Divisions had 106 heavy and 160 field guns and howitzers plus a Corps artillery group to hold their portion of the front. All but 41st Division reached all their objectives according to plan. The 41st Division failed to capture Tower Hamlets on Bassevillebeke spur, after struggling over the mud in Bassevillebeek valley, losing the creeping barrage and suffering heavy losses. Part of the division reached the third objective and the rest advanced just beyond the second. Despite the failure to capture Tower Hamlets the Division defeated all German counter-attacks during the day.[136]
Five Fifth Army divisions attacked to the north of Second Army. 9th and 58th Divisions reached all their objectives and 20th Light, 51st and 55th fell somewhat short.[137] Overnight rain muddied the ground like that affecting 41st Division; tank support fell behind in the bad going and German strong points like Schuler Farm in the 55th Division area held out for much of the day. 51st Division eventually reached its third objective but was pushed back by German counter-attacks in the north of its area to the Wilhem Line ('Pheasant Trench') and eventually counter-attacked and reached the first objective there.[138]
Minor attacks took place after the 20th September as both sides jockeyed for position and reorganised their defences.[139] A larger attack by the Germans on 25 September recaptured pill boxes at the south western end of Polygon Wood at the cost of heavy casualties.
Having confided his anxieties in his diary for 23 and 24 September
- We cannot tolerate the idea of the enemy firmly in control of the Zonnebeke Heights or the Gheluvelt. They are now so close to achieving this that the fear must be that they will achieve it with their next attack. We must ensure that our counter-strokes during the next enemy assaults are driven right up to their planned objectives.
and
- It appears as though fresh attacks against Groups Ypres and Wytschaete are about to take place. It is to be hoped that they do not take place soon because we currently lack reserves behind the main battle front[140]
Crown Prince Rupprecht was relieved by the partial success of the attack
- An operation... was completed satisfactorily. The next major attack will probably not take place for a few days.[141]
Not long after, the German positions near Polygon Wood were swept away by Plumer's attack of 26 September (the Battle of Polygon Wood).
British casualties 20 – 25 September are given by the British Official Historian as 20,255; 3,148 being killed. 3,243 prisoners were taken with 'very heavy' losses of killed or wounded inflicted on the German defenders.[142]
German defensive changes
After the Battle of Menin Road Ridge the German defensive deployment was changed. In August German front-line divisions had two regiments (of three battalions) forward with the third regiment in reserve. The front battalions had needed to be relieved much more quickly than expected due to the British bombardments, attacks and the weather which had caused units to become mixed up. The reserve regiments had not been able to intervene early enough and so the front battalions had been unsupported until the Eingreif divisions arrived some hours after the commencement of the attack.[143]
The deployment was changed to increase the number of troops on the front line. By 26 September all three regiments of the front line division were forward, each holding an area 1,000 yards wide and 3,000 yards deep. One battalion was forward with the second in support and the third in close reserve. These battalions were to move forward successively to engage the fresh enemy battalions advancing through those that had delivered the first attack. The Eingreif divisions were to deliver a staged attack with artillery support later in the day but before the British could consolidate their new line.[144] This change was intended to remedy the neutralization of the front division's reserve by the British artillery so that it could intervene before the Eingreif divisions arrived.
On 22 September new requirements were given,
1) More artillery counter-fire was to be used between British attacks, half to be counter-battery and half against infantry.
2) More raiding to compel the British to hold the line in greater strength, thus giving the artillery a denser target.
3) Better artillery observation in the battle zone to increase the accuracy of German artillery fire when British troops advanced into it.
4) Quicker counter-attacks.[145]
Battle of Polygon Wood: 26 September
Main article: Battle of Polygon WoodOn 21 September Haig instructed the Fifth and Second Armies to make the next step across the Gheluvelt Plateau on a front of 8,500 yards. I ANZAC Corps would conduct the main advance of about 1,200 yards to complete the occupation of Polygon Wood and the south of Zonnebeke. X Corps to the south was to attack either side of the Menin Road and Fifth Army in the north was to advance to occupy a line from Zonnebeke to Kansas Cross plus Hill 40, near Zonnebeke station.[146] Second Army altered its Corps frontages soon after the attack of 20 September so that each attacking division could be concentrated on a 1,000 yard front. Roads and light railways were built behind the new front line to allow artillery and ammunition to be moved forward, beginning on 20 September. In fine weather this was finished in four days. As before Menin Road, bombardment and counter-battery fire began immediately, with practice barrages fired daily as a minimum. Artillery from VIII and IX Corps in the south acted to threaten attacks on Zandvoorde and Warneton.
39th Division took over from 41st ready to attack Tower Hamlets, 33rd Division replaced 23rd Division beyond the Menin Road and 5th and 4th Australian Divisions replaced 1st and 2nd Australian Divisions in Polygon Wood.[147] The German attack on 25 September between Menin Road and Polygon Wood occurred as 33rd Division was taking over from 23rd Division and for a time threatened to delay preparations here for the British operation due next day. Some ground was captured by the Germans and part of it was then recaptured by 33rd Division. Plumer ordered that the flank guard protecting the I ANZAC Corps on 26 September was to be formed by 98th Brigade of 33rd Division while 100th Brigade recaptured the lost ground.[148]
At 5.50 a.m. on 26 September the five layers of barrage fired by the British artillery and machine-guns landed in front of the attacking divisions. Dust and smoke added to the morning mist so the infantry advanced on compass bearings and rushed the German outposts of 3rd Reserve Division and part of 50th Reserve Division; most fell immediately.[149] The Australian divisions attacked with two brigades each with one in reserve. A battalion in each advanced 800 yards to the first objective, then two more passed through to the final objective about 400 yards beyond and dug in.
- Under this screen my 4th and 5th divisions, in conjunction with British formations, swept forward, and after much hard fighting captured the prearranged objectives round Polygon Wood and Zonnebeke. Our loses were again heavy – over 4,000. The German casualties were later found to have been about the same. (Lieut Gen Birdwood, I ANZAC Corps)[150]
The German defences in the wood disintegrated quickly (Major Hethey, KTK (Kampftruppenkommandeur) in the southern portion of the wood being killed at 6.30 a.m. but mopping up took until midday.[151]
The difficulties of 33rd Division further south meant that the 5th Australian Division had to swing back on its right to cover the area not retaken by the 33rd Division, which at first only managed an advance to Black Watch Corner. The rest of 5th Australian consolidated in the German Flandern I defences just east of Polygon Wood. Another battalion from 33rd Division was sent through the Australian area to attack south-east together with an advance from the Corner and this recaptured the ground lost the previous day by 2.00 p.m. The ground lost near Menin road was regained by the other 33rd Division brigade, also in the afternoon.[152] 4th Australian Division advanced 1,200 yards to Tokio Spur without serious difficulty.
39th Division captured Tower Hamlets from the German 50th Reserve Division and 'The Quadrilateral' further down the spur from the 25th Division but this was recaptured by the Germans after being occupied by 118th Brigade, 39th Division. It had been caught in the boggy ground of the Bassevillebeek, its two tanks in support got stuck near Dumbarton Lakes and soon after arriving in The Quadrilateral, was counter-attacked by part of the German 25th Division and pushed back 200 yards.[153]
North of the I ANZAC Corps, three divisions of V Corps from Fifth Army provided the other flank. 3rd Division advanced to the west end of Zonnebeke against part of 3rd Reserve Division but further north got caught in mud, lost the barrage and was stopped short of Hill 40.
- Suddenly I heard shouts of 'Englander' from in front. I called the men out and we took up a position in the mass of shell-holes on either side. Almost at once figures appeared moving towards us through the fog. They were coming on at a steady pace bunched together in groups between the water-logged shell-holes. We opened fire and threw hand-grenades into the midst of them and they at once took cover in the shell-holes, I could see two of them fixing up a light machine-gun which opened on us hitting several of my men before we could silence it. For a moment the attack here was held, but looking round I could see more English advancing past us to right and left, and realized that our only hope was to run for it. (Officer, 3rd Battalion, 34th Fusilier Regiment)[154]
A second attack later in the day on Hill 40 collided with a German counter-attack leaving both sides where they started. 59th Division advanced swiftly between Waterend House and Schuler Farm against parts of 3rd Reserve Division and 23rd Reserve Division. 58th Division's 175th Brigade attacked up the Hanebeek valley but mist and disorganisation left it 400 yards short of its objective. [155]
The RFC began operations on the night of 25–26 September when 100 and 101 Sqns attacked German billets and railway stations. The mist (which affected visibilty for the infantry later on) rose before dawn, ending night flying early. Low cloud at 5.50 a.m. when the infantry advanced, made observation difficult but contact-patrol and artillery observers managed to observe progress on the ground and reported 193 German artillery batteries to British artillery. Fighters flying at about 300 feet attacked German infantry and artillery; German aircraft tried this against British troops with some success, although ground fire shot five of them down. Six German aircraft were shot down by RFC and RNAS pilots over the battlefield[156] Operations further afield were reduced due to the low cloud but three German airfields were attacked and an offensive patrol over the front line intercepted German bombers and escorts and drove them off.[157]
At midday the mist cleared, giving a hot clear day. British observation aircraft began to send wireless messages warning of German infantry advancing towards all of the front attacked. Similar reports from the ground began in the early afternoon; German infantry from 17th, 236th and 4th Bavarian Divisions were advancing north of Becelaere, south of Broodseinde and massing on the Broodseinde-Passchendaele Ridge. British artillery immediately bombarded these areas, disrupting the German deployment and leading to the German attacks being uncoordinated.
- Towards 10.30 a.m. information arrived that the enemy, attacking the inner flanks of Groups Ypres and Wijtschaete had forced their way into Polygon Wood.... the British were bringing down ever heavier fire throughout the area.... In the face of this brutal reality and bowed under the weight of our battle loads, we could only pick our way forward tortuously and painfully. Again and again we had to take cover to avoid the attentions of aircraft. (Hauptmann Caspari)[158]
A counter-attack either side of Molenaarelsthoek was stopped dead at 3.25 p.m. At 4.00 p.m. Germans advancing near Reutel and to its north were bombarded as were German artillery postions in Holle Bosch and the counter-attack was dispersed. Soon after a German attack developed near Polderhoek whose survivors managed to reach the British infantry and were seen off in bayonet fighting. Reports later on revealed German troops massing against Tower Hamlets but artillery and machine-gun barrages stopped the German attack. At 6.50 p.m. the Germans managed to coordinate an attack from Tower Hamlets to north of Polygon Wood. Infantry which got through the barrages was 'annhilated' by the British infantry.
- At about 4.00 p.m. on 26 September the company advanced as part of the second wave against Polygon Wood. It was not long before it came under tremendous artillery fire. Nevertheless progress continued to be made. A short time later a great concentration of high explosive shells mixed with gas shells, came down, forcing the company to mask up. Soon it was enveloped in a very dense cloud of gas, which meant that contact within the company was lost and orientation became impossible.(Reserve Leutnant Schutt)[159]
Apart from Hill 40 near Zonnebeke, where the German counter-attack met 3rd Division's renewed attack and stopped it short of the hill, the German counter-attacks could only reach the new front line.[160] The German attacks stopped at 8.30 p.m. and after a quiet night, British and ANZAC troops south of Polygon Wood occupied 'Cameron House' and the head of the Reutelbeek valley near Cameron Covert.
- The Eingreif divisions for the most part again struck against an already well dug in (eingenistete) enemy, in some places against new enemy attacks.... In the face of the British barrages they took 1 1/2 to 2 hours to advance one kilometre, their formation broken and their attack power lamed. (Der Weltkrieg)[161]
Each of the three German ground holding divisions attacked the 26 September had an Eingreif division in support, twice the ratio of 20 September. No ground captured by the British had been regained and the counter-attacks had managed only to reach ground that the survivors of the ground holding divisions had retired to. Second Army estimated that ten divisional artilleries had supported the German troops defending the Gheluvelt Plateau, doubling the Royal Artillery casualties compared to the previous week. British losses were 15,375; 1,215 being killed. Der Weltkrieg gives 38,500 casualties between 11 September and 30 September to which the British Official Historian added 30% for lightly wounded.[162]
More German defensive changes
After the bloody defeats of 20 and 26 September the German commanders led by Ludendorff made more changes to the defensive deployment of their troops and altered the counter-attack tactics that had been negated by Plumer's more conservative version of Bite-and-Hold. Previously their counter-attack (Eingreif) divisions had engaged in a manner analogous to 'an advance to contact during mobile operations';[163] before September this practice had given the Germans several (albeit costly) defensive successes. The defensive counter-attacks in September had been 'assaults on reinforced field positions', due to the restrained nature of British infantry advances and were defeated with heavy casualties, after arriving too late to take advantage of the attackers' confusion, which had been replaced by a defence in depth behind standing barrages in dry clear weather and increased air support for observation of German troop movements, contact patrolling and ground attack operations by the Royal Flying Corps. Systematic artillery support was forfeited by German uncertainty over the position of their infantry just when the British infantry benefitted from the opposite. The Eingreif divisions were to be held back until the day after the British attack for a systematic counter-attack.[164]
- After each attack I discussed the tactical experiences with General von Kuhl and Colonel von Lossberg.... Our defensive tactics had to be developed further, somehow or other. We were all agreed on that. The only thing was, it was so infinitely difficult to hit on the right remedy. (Ludendorff, Memoirs.)[165]
Ludendorff ordered a strengthening of forward garrisons and the reinforcement of the front garrisons of the ground holding divisions, supporting the front divisions with a reserve division behind each one to launch counter-attacks while the British were consolidating and the holding back of the Eingreif divisions which were to be used instead for forestalling attacks and counter-attacks between British offensives.[166]
The result of these discussions was reflected in a Fourth Army operation order of 30 September, which pointed out that the German postion in Flanders was restricted by the topography, the coast and the Dutch frontier making local withdrawals impossible. Efforts were to continue be made to increase British infantry losses in line with the instructions of 22 September, with more bombardment by feld artillery and by using at least half of the heavy artillery's ammunition for observed fire on infantry positions like captured pill-boxes, command posts, machine-gun nests, duckboard tracks and field railways. Gas bombardment was to be increased on forward positions and artillery emplacements whenever the winds allowed. Every effort was to be made to induce the British to reinforce their forward positions where the German artillery could engage them, by making spoiling attacks to recapture pill-boxes, improve defensive positions and harass the British with patrols and diversionary bombardments.[167] Between 26 September and 3 October the Germans attacked and counter-attacked at least 24 times.[168]
The British had not been complacent and these changes were predicted in an intelligence summary of 1 October.[169]
Battle of Broodseinde: 4 October
Main article: Battle of Broodseinde British soldiers moving forward during the Battle of Broodseinde. Photo by Ernest Brooks.
The Battle of Broodseinde was the last assault launched by Plumer in good weather.[170] The operation aimed to complete the capture of the Gheluvelt Plateau and the occupation of Broodseinde Ridge. This would protect the southern flank of the British line and permit attacks on the Passchendaele Ridge to the east.[171] The attack was originally planned for 6 October to permit II Anzac Corps time to prepare.[172] Haig was anxious about the possibility of deteriorating weather so he pushed to have the assault advanced by two days.[173] The Germans were equally concerned about the amount of ridge-line the British held near Zonnebeke and sought to recapture as much as possible in a local attack on 4 October.[174]
In response to the British tactic of using a shallow advance to trigger German counter-attacks and then deluging them with artillery fire employed in the two previous battles, the Germans reinforced their front line to prevent the British from capturing their forward positions.[123][170] This change failed as it left an increased number of German troops vulnerable to British artillery fire.[175] On 4 October, 12 divisions from the British Fifth and Second Armies attacked German positions along a 14,000 yards (13,000 m) front.[171] By coincidence, Australian troops from I ANZAC Corps met troops from the German 45th Reserve Division in no man's land when the assaults commenced simultaneously.[176] The success of the British advance varied but the losses inflicted on the Germans were devastating. The southern most corps achieved limited success while attacks between Menin Road and Polygon generated moderate gains. Further north 'The main objectives had been gained and the number of prisoners was exceptionally large, the Second army alone having taken over four thousand.' [177]. The British assault advanced an average 1,000 yards (910 m), the Australian 3rd Division advancing up to 1,900 yards (1,700 m).[178][179]
After the British attacking units reached their final positions, their artillery fired a standing barrage for an additional two and a half hours, allowing the troops to consolidate.[180] The British captured 5,000 prisoners during the battle.[181] The British high command concluded that the number of enemy casualties meant that resistance was faltering and resolved to make another attack immediately, although suggestions for a further advance that day were rejected. In his memoirs, Ludendorff wrote, 'The battle on the 4 October was extraordinarily severe and again we only came through it with enormous losses.[182] Foot Guard Regt No. 5 described it as the worst day yet experienced in the war. [183]
Third phase
Battle of Poelcappelle: 9 October
Main article: Battle of PoelcappelleAfter the calamity on 4 October, all of the German divisions holding front zones were relieved and an extra division brought forward. Ludendorff ordered an end to the new defensive deployment and a return to thinly held outposts whose garrisons were to retreat when attacked and call on artillery fire to bombard the area between the abandoned outposts and the main line of resistance, so that British infantry would not be able to evade German artillery fire by vacating their front line quickly. Ludendorff also ordered more counter-battery fire.[184] Without the forces necessary for a counter-offensive south of the ridges towards Kemmel Hill, Rupprecht began to plan for a slow withdrawal from Passchendaele even at the risk of uncovering German positions further north and on the coast.
The attack on 9 October on a 13,500 yards frontage from south of Broodseinde to St Jansbeek, including 650 yards to the 'red line' and 600 – 850 yards to the 'blue line' by the 66th Division to the edge of Passchendaele, on its first operation and over 10 divisions of the French First Army and British 2nd and 5th Armies at Poelkapelle (or Poelcappelle to the British) led to heavy casualties on both sides, with minor advances in the north of the attack by exhausted troops.[185] Birdwood later wrote,
- ... there is little doubt that if the weather had held, and if we had been able to prepare and rehearse our advance as carefully as in the first three stages, we would have been able to take Passchendaele. But the weather defeated us. (Lt-Gen Birdwood, commander I ANZAC Corps, Memoirs.)[186]
while Von Kuhl concluded that,
- 4 and 9 October were also days of severe fighting which stretched the German forces to their limit. The enemy succeeded in mounting repeated attacks and gradually forced the German front at Ypres back on a stretch about 33 km wide. The penetrations at their deepest were from five to seven kilometres. But the British had made no breakthrough.... On the German side it became even more difficult to procure the reserves to continue the defence.(Von Kuhl, Der Weltkrieg)[187]
showing the great strain imposed on the defence even in conditions resembling August.
First Battle of Passchendaele: 12 October
Main article: First Battle of Passchendaele Aerial view of Passchendaele village before and after the battle.
The First Battle of Passchendaele, on 12 October 1917 began with a further Allied attempt by 5 British and 3 ANZAC divisions (the New Zealand Division and the Australian 3rd and 4th Divisions) to gain ground around Passchendaele. The heavy rain again made movement difficult and artillery could not be brought closer to the front owing to the mud. The Allied troops were fought-out and morale was suffering. After a modest advance the Germans counter-attacked, recovering most of the ground lost; the British gains were minimal and there were 13,000 Allied casualties.
On this day there were more than 2,700 New Zealand casualties, of which 45 officers and 800 men were either dead or lying mortally wounded between the lines. In terms of lives lost in a day, this remains the blackest day in New Zealand’s recorded history.
Second Battle of Passchendaele: 26 October – 10 November
Main article: Second Battle of PasschendaeleThe four divisions of the Canadian Corps were transferred to the Ypres Salient and to make additional advances on Passchendaele.[188] The Canadian Corps relieved II Anzac Corps on 18 October from their positions along the valley between Gravenstafel Ridge and the heights at Passchendaele.[189] The front line was mostly the same as the one occupied by the 1st Canadian Division in April 1915.[189] The Canadian Corps operation was to be executed in a series of three attacks each with limited objectives, delivered at intervals of three or more days. As the Canadian Corps position was directly south of the inter-army boundary between the British Fifth and Second Armies, the British Fifth Army would mount subsidiary operations on the Canadian Corps' left flank while the I Anzac Corps would advance to protect the right flank.[190] The execution dates of the phases were tentatively given as 26 October, 30 October and 6 November.[190]
The British Fifth Army undertook two minor operations on 22 October, one with the French First Army at Houthulst Forest, the other east of Poelcappelle.[191] The objective of the attack was to maintain pressure on the Germans while the Canadians Corps prepared for their assault, as well as supporting the French attack on Malmaison.[188][192][Note 5] The attack commenced at 5:35 am, with the French 1st Division and the British 35th Division attacking towards the Houthulst Forest and the British 34th and 18th Divisions attacking from Poelcappelle.[194] The French 1st Division covered the left flank of the attack towards the Houthulst Forest, while the British 35th Division initially managed to seize its first objectives but was forced back to its starting line by German counter-attacks.[195] The left flank of the attack by the British 34th Division was unsuccessful, while the right flank managed to keep up with the attacking forces of the British 18th Division.[195]
 Terrain through which the Canadian Corps advanced at Passchendaele in late 1917
The first stage began on the morning of 26 October.[196] The 3rd Canadian Division was assigned the northern flank which included the sharply rising ground of the Bellevue spur. South of the Ravebeek creek, the 4th Canadian Division would take the Decline Copse which straddled the Ypres-Roulers railway.[197] The 3rd Canadian Division captured the Wolf Copse and secured its objective line but was ultimately forced to drop a defensive flank to link up with the flanking division of the British Fifth Army. The 4th Canadian Division initially captured all its objectives but gradually retreated from the Decline Copse due to German counter-attacks and mis-communications between the Canadian and Australian units to the south.[198]
The second stage began on 30 October and was intended to capture the position not captured during the previous stage and gain a base for the final assault on Passchendaele.[198] The southern flank was to capture the strongly held Crest Farm while the northern flank was to capture the hamlet of Meetcheele as well as the Goudberg area near the Canadian Corps' northern boundary.[199] The southern flank quickly captured Crest Farm and sent patrols beyond its objective line and into Passchendaele. The northern flank was again met with exceptional German resistance. The 3rd Canadian Division captured Vapour Farm at the corps' boundary, Furst Farm to the west of Meetcheele and the crossroads at Meetcheele but remained short of its objective line.[199]
To permit time for inter-divisional relief, there was a seven day pause between the second and third stages. The British Second Army was ordered to take over a section of the British Fifth Army front adjoining the Canadian Corps so that the central portion of the assault could proceed under a single command.[200] Three consecutive rainless days between 3 and 5 November aided logistical preparations and reorganization of the troops for the next stage.[201] The third stage began on the morning of 6 November with the 1st and 2nd Canadian Divisions having taken over the front, relieving the 3rd and 4th Canadian Divisions respectively. Less than three hours after the start of the assault, many units had reached their final objectives and the village of Passchendaele had been captured. The Canadian Corps launched a final action on 10 November to gain control of the remaining high ground north of the village, in the vicinity of Hill 52.[202] This attack on 10 November brought to an end the long drawn-out battle.[203]
Hindenburg later wrote: "It was with a feeling of absolute longing that we waited for the beginning of the wet season. As previous experience had taught us, great stretches of the Flemish flats would then become impassable.... This battle, too, must finally stick in the mud, even though English stubbornness kept it up longer than otherwise."[204]
Aftermath
On 23–26 October, the Battle of La Malmaison (Bataille de la Malmaison) under Pétain was fought while the Germans were busy in Flanders leading to the capture the town of La Malmaison and control of the Chemin des Dames ridge. The French artillery preparation was massive and well coordinated. When troops from the 11th, 14th and 21st Army Corps attacked on a front of 7 1/2 miles protected by a creeping barrage, the German defenders were swiftly defeated, losing 11,157 prisoners and 180 guns. Tanks were used but this time they were lighter, faster and their attack was coordinated with the infantry. This forced the Germans to withdraw from the plateau of the Chemin des Dames 1–2 November and move to the north of the Ailette Valley; the French had 14,000 casualties.[205] On 24 October, The Austro-German 14th Army, under General der Infanterie Otto von Below, achieved a significant victory against the Italian Army at the Battle of Caporetto. In fear that Italy might be put out of the war, the French and British Governments each promised to send six divisions to the Italian Front.[206] British and French troops were swiftly moved between 10 November and 12 December, due to good administrative preparations made by Ferdinand Foch, who had been sent to Italy in April 1917 to plan for just such an emergency and who was now French Chief of Staff.[207] The parallel diversion of resources from the BEF forced Haig to conclude the offensive, much to his dissatisfaction, just short of Westrozebeke.[208] To the south, the British Third Army had massed the means to permit the execution of a surprise attack near Cambrai.[209] The Battle of Cambrai began on 20 November and the British breached the first two parts of the Hindenburg Line in the first successful mass use of tanks in a combined arms operation.[210]The experience of the failure to contain the British attacks at Ypres and the drastic reduction in areas of the western front which could be considered 'quiet', after the tank and artillery surprise at Cambrai[211] left the German OHL with little choice but to stake all on ofensive action early in 1918. The German Operation Michael began on 21 March 1918 and the supporting Battle of the Lys on 9 April. In the space of three days, the Germans reoccupied almost all of the ground taken by the Allies during the Battle of Passchendaele, after the British shortened the line there to economise on troops. The Germans were easily pushed away from Ypres once more in the Fifth Battle of Ypres on 28 September 1918.
Casualties
Various casualty figures have been published, although the highest estimates for both British and German casualties appear to be discredited.
In the British Official History, Brigadier-General James E. Edmonds put British losses at 244,897 but claimed that German figures were not available. He estimated German losses at 400,000. C.R.M.F Cruttwell in A History of the Great War, 1914–1918 assessed British casualties at 300,000 and German losses at 400,000. Historian A. J. P. Taylor wrote that the Official History had performed a "conjuring trick" on these figures and that no one believed these "farcical calculations." Taylor put British losses at 300,000 and German losses at a much lower 200,000.[212] More recently, Jack Sheldon also rejected Edmonds's figures, suggesting that although the German figures (just under 220,000) were available (in Volume III of their history) Edmonds may not have included them as they did not fit his case. Sheldon stated that a figure of 400,000 could only be obtained by including all lightly wounded men, even those fit for immediate return to duty, (which was the British method of counting casualties, hence the basis for the British Official Historian's case, that 30% must be added to German figures to make them comparable).[213][214]
Cyril Falls in The Great War 1914-1918, estimated 240,000 British, 8,525 French and 260,000 German casualties.[215] In his book Haig, the Educated Soldier, John Terraine put British losses at a similar level but also did not accept that German losses were as high as 400,000. In Road to Paschendaele, Terraine argued that 20% needed to be added to the German figures to include some lightly wounded men who would have been included under British definitions of casualties, bringing estimated German casualties to 260,400.[216] Leon Wolff, a critic of Haig, claimed German casualties were 270,710 and British 448,614 but the latter figure was refuted by Terraine, who pointed out that despite stating that this was the total figure for the second half of 1917, Wolff had neglected either to deduct the 75,681 British casualties for Cambrai given in the Official Statistics from which he was quoting or to make any deduction for "normal wastage", casualties averaging 35,000 per month suffered in periods when there was no major offensive, e.g., the first thirty days of July or the latter part of December.[216] Prior and Wilson in Passchendaele (1997) give British losses as 275,000 (with soldiers permanently lost to death or severe wounds equivalent to 10–12 divisions) and German casualties just under 200,000.[217] In Forgotten Victory (2002) Gary Sheffield wrote that Richard Holmes's 260,000 apiece seemed about right.[218] In his biography of Haig (2011) he did not offer figures for either side,[219] leaving the verdict to Von Kuhl, 'The sacrifices that the British made for the Entente were fully justified', noted by Sheldon (2007).[220]
Two poets, Irishman Francis Ledwidge, 25, of 1st Battalion, Royal Inniskilling Fusiliers, in 29th Division, and Hedd Wyn, a Welsh-language poet serving with the Royal Welsh Fusiliers at Pilckem Ridge, were both killed in action on 31 July. Adolf Hitler fought in the Battle of Passchendaele as a member of the 6th Bavarian Reserve Division and was injured on the night of 13 October 1917, when he was caught in a British gas attack on a hill south of Werwick.[221]
Commemoration
 Tyne Cot Commonwealth War Graves Cemetery and Memorial to the Missing.
The Menin Gate Memorial to the Missing commemorates those of all Commonwealth nations, except New Zealand, who died in the Ypres Salient and have no known grave. In the case of the United Kingdom only casualties before 16 August 1917 are commemorated on the memorial. United Kingdom and New Zealand servicemen who died after that date are named on the memorial at Tyne Cot Cemetery. There are numerous tributes and memorials all over Australia and New Zealand to ANZAC soldiers who died in the battle, including plaques at the Christchurch and Dunedin railway stations.[222] The Canadian Corps' participation in the Second Battle of Passchendaele is commemorated with the Passchendaele Memorial located at the former site of the Crest Farm on the southwest fringe of Passchendaele village.[223]
One of the newest monuments to be dedicated to the fighting contribution of a group is the Celtic Cross memorial commemorating the Scottish contributions and efforts in the fighting in Flanders during the Great War. This memorial is located on the Frezenberg Ridge where the Scottish 9th and 15th Divisions, as part of the British Army, fought during the Battle of Passchendaele. The monument was dedicated by the Scottish Parliament's Minister for Europe Linda Fabiani during the late summer of 2007, the 90th anniversary of the battle.
Notes
- ^ Battle of Passchendaele is perhaps the most common name for the campaign in English, but is not universally used. Third Battle of Ypres was the name adopted by the British Official History of the First World War. The German history uses the term Third Flanders Battle (German: Dritte Flandernschlacht), while the French term is Second Battle of Flanders (French: 2ème Bataille des Flandres)
- ^ Entente forces included British, Canadian, South African, French and ANZAC units
- ^ 'High ground' is a relative term. Passchendaele is on a ridge about 70ft (25m) above the surrounding plains. The Gheluvelt Plateau is about 100ft (35m) above surrounding area. Wytschaete is about 150ft (50m) above the ground before it; these terrain features were vital for artillery observation.[29]
- ^ Haig's biographer Brigadier General John Charteris, Chief of British Army Intelligence in France, wrote that "Careful investigation of the records of 80 years showed that in Flanders the weather broke early with the regularity of the Indian monsoon".... The rest of the sentence is quoted less frequently, "... : once the autumn rains set in difficulties would be greatly enhanced.", "Unfortunately there now set in the wettest August recorded for thirty years." hardly ever.[43] Lt Col Ernest Gold, the BEF's meteorological expert at the time, contradicted the first part of Charteris's quoted sentence, "It is quite contrary to the evidence of the records which show that the weather in August 1917 was exceptionally bad...". Historians nonetheless differ as to whether the weather of Flanders in 1917 was typical; Winter takes the view that Haig had conclusive evidence that should have led him to expect heavy rainfall and hence mud. Steel and Hart by contrast take the view that Haig was unlucky.[44][45][46]
- ^ The attack consisted of units from XVIII Corps (18th Division) and XIV Corps (34th and 35th Divisions), as well as units from the French I Corp (1st Division).[193]
Footnotes
- ^ Sheffield G. The Chief, p. 227, 2011
- ^ Edmonds, J. OH 1917 II, p. 366
- ^ Frankreichs Schwerste Stunde. Die Meuterei der armee 1917 p. 177 in Edmonds, J. OH 1917 II p. 366.
- ^ Hart & Steel pp. 211–212.
- ^ Forstner: History RIR 15, p. 116 in Sheldon op.cit. p 84.
- ^ Sheldon op.cit., pp. x–xi.
- ^ Travers, The Killing Ground pp. 215–7.
- ^ Green, A. Writing the Great War (2004)
- ^ Sheldon pp. vi.
- ^ Hindenburg, Out of My Life, pp. 288–289 (1920) in Terraine, J. The Road to Passchendaele, pp. 332–333 (1977)
- ^ Terraine pp. 336–342.
- ^ Travers, The Killing Ground, p. xxi.
- ^ Terraine pp. 342–347.
- ^ "WWI veteran Patch dies aged 111". BBC News. 25 July 2009. http://news.bbc.co.uk/1/hi/uk/8168691.stm.
- ^ Terraine p. 14.
- ^ Terraine p. 15.
- ^ Powell, G. Plumer The Soldiers' General, p. 169 (1990, 2004 edn).
- ^ Sheffield, G. The Chief, Douglas Haig and the British Army (2011) p. 231.
- ^ Winter, Haig's Command, p. 78.
- ^ Hart & Steel p. 28.
- ^ Hart & Steel p. 30.
- ^ Terraine pp. 28–29.
- ^ Hart & Steel pp. 31–32.
- ^ Winter, Haig's Command, p. 73.
- ^ Terraine p. 29.
- ^ Terraine pp. 24–25.
- ^ Prior & Wilson, pp. 29, 3 (paperback edition).
- ^ Hart & Steel pp. 18–19.
- ^ Terraine p. 2.
- ^ Hart & Steel p. 42.
- ^ a b c d Hart & Steel p. 29.
- ^ Terraine pp. 3, 17–24.
- ^ Terraine p. 32.
- ^ Winter, Haig's Command, p. 88.
- ^ Terraine p. 336.
- ^ Sheldon p. xi.
- ^ Edmonds, ibid, p. 125
- ^ Sheldon p. x.
- ^ Edmonds, ibid, p. 125.
- ^ Terraine p. 21.
- ^ Winter, Haig's Command, p. 92.
- ^ Terraine p. 206.
- ^ Charteris, J. Field Marshal Earl Haig, pp. 272-273.(1929)
- ^ Winter, pp. 91–2.
- ^ Hart & Steel pp. 140–141.
- ^ Terraine pp. 205–206.
- ^ Sheffield, G. The Chief (2011) P. 233. Endnote 43 p. 437, Hussey, p. 151, 'The Flanders Battleground and the Weather in 1917' in Liddle (1997) Passchendaele in Perspective: The Third Battle of Ypres.
- ^ Prior and Wilson, p. 45–7.
- ^ Keegan pp. 348–349.
- ^ Terraine pp. 87–89.
- ^ Hart & Steel p. 36.
- ^ Sheffield, op.cit. p. 227
- ^ Sheffield, ibid p. 227 and endnote 15, p. 436.
- ^ Edmonds,J. OH 1917 II, p. 424.
- ^ Sheldon J. The German Army at Passchendaele, p.36 (2007) quoting H. von Kuhl, Der Weltkrieg 1914–1918 Band II p. 115
- ^ Edmonds, J. op. cit. p. 142.
- ^ Samuels,M. Command or Control? Command, Training and Tactics in the British and German Armies, 1888–1918, p. 193. (1995, 2003 edition)
- ^ a b Sheldon p. 1.
- ^ Terraine p. 118
- ^ a b Hart & Steel pp. 42–43.
- ^ Hart & Steel pp. 41–42.
- ^ a b Hart & Steel p. 44.
- ^ Hart & Steel pp. 41, 44.
- ^ Sheldon p. 23.
- ^ Hart & Steel pp. 50–54.
- ^ a b Terraine p. 120.
- ^ a b Hart & Steel p. 55.
- ^ Sheldon p. 28.
- ^ Hart & Steel p. 56.
- ^ Sheldon pp. 28–29.
- ^ Prior and Wilson, pp. 70–1 (pb edition).
- ^ Jones, H.A. The War in the Air, Volume IV (1934), reprinted Naval & Military Press [2002], p. 141.
- ^ Jones, H.A., p. 145 op.cit.
- ^ Jones, H.A. ibid p.156.
- ^ Jones, H.A. ibid p. 158.
- ^ Jones,ibid p.162.
- ^ Edmonds,OH1917II, p.124
- ^ Prior and wilson, pp. 74–5 (pb edition).
- ^ Edmonds OH 1917 II, app XIII, p. 432 (Battery Press reprint 1991).
- ^ Prior and Wilson, pp. 72, 75 (pb edition).
- ^ Haig Master of the Field, Davidson, Sir J. p. 29. (1953, reprinted 2010).
- ^ Edmonds OH1917II app XV, p. 440.
- ^ Edmonds OH1917II app XV, p. 441.
- ^ Davidson, p. 32 (2010 reprint).
- ^ Prior and Wilson, pp. 76–7 (pb edition).
- ^ Prior and Wilson, pp. 79–82 (pb edition).
- ^ Prior and Wilson, p. 83 (pb edition).
- ^ Prior and Wilson, p. 80 (pb edition).
- ^ Edmonds, op.cit. p. 132.
- ^ Prior and Wilson, p. 86 (pb edition).
- ^ Edmonds, op.cit. p133.
- ^ Kuhl in Sheldon ibid, Der Weltkrieg, pp121-122.
- ^ Prior and Wilson, p. 89.
- ^ a b Prior and Wilson, p. 90.
- ^ Prior & Wilson, p. 92.
- ^ Prior and Wilson, pp. 90–1.
- ^ Lennartz: History of Reserve Infantry Regiment 239, p. 123 in Sheldon ibid.
- ^ Maj-Gen Heneker, O.C. 8th Div in message to the division quoted in The Eighth Division 1914–1918 by Boraston, J.H. & Bax, C.E.O., p. 136. (1999 reprint of 1926 edition)
- ^ Prior and Wilson, pp. 92–3.
- ^ The Eighth Division, pp.133–134.
- ^ Edmonds, OH1917II, p.153.
- ^ Lennartz, op. cit. pp. 295–296, in Sheldon p. 57, ibid
- ^ Edmonds OH1917II pp. 154–156.
- ^ Prior and Wilson, pp. 94–5.
- ^ Edmonds,J. 1917 vol II, p. 178. (1948)
- ^ Der Weltkrieg vol xiii, 1942 in Edmonds, J. ibid.
- ^ Sheldon, p. 108 op.cit.
- ^ Edmonds, OH1917II, p. 184.
- ^ Musketier Furst 8th Company RIR 90 in Pries, History of RIR 90 p. 222 in Sheldon, op.cit. p. 111
- ^ Edmonds, OH1917II, pp. 185–187.
- ^ Von Kuhl, Der Weltkrieg, in Terraine, J. The Road to Passchendaele, p. 234 (1977)
- ^ Edmonds, OH1917II, p. 190.
- ^ Edmonds ibid, p. 194
- ^ Edmonds, ibid, p. 201
- ^ Edmonds, ibid p.201.
- ^ Edmonds, ibid, p. 203 and sketch 20.
- ^ Wynne, G.C. Army Quarterly (Jan 1935), reprinted in Landrecies to Cambrai, Case Studies of German Offensive and Defensive Operations on the Western Front 1914–17 (ed Rodgers, D. 2011.) pp. 162–167.
- ^ Edmonds, J. 1917 vol ii p. 209 ibid.
- ^ Ludendorff, ii, p. 479 in Terraine,J. The Road to Passchendaele p. 235 (1977)
- ^ a b Nicholson p. 308.
- ^ Terraine, J. op. cit. 'Passchendaele' p. 224
- ^ Edmonds p. 237.
- ^ a b c d e Malkasian p. 41.
- ^ Ludendorff in Edmonds, OH1917II, p. 210.
- ^ a b Edmonds p. 238.
- ^ a b c d Edmonds p. 239.
- ^ Leach p. 76.
- ^ Edmonds, J. op. cit. pp. 253–254.
- ^ Edmonds, ibid p. 247.
- ^ Cook p. 149.
- ^ Birdwood, Khaki and Gown, pp. 314–315 in Terraine, J. Passchendaele, op. cit. p. 261.
- ^ The Fifth Army, p. 208 in Terraine, ibid, p. 262.
- ^ Edmonds,Ibid, p. 273, fn 3.
- ^ Der Weltkrieg 1914 bis 1918, vol xiii, p. 75 in Terraine ibid, p. 262.
- ^ Edmonds. op. cit. p. 273, fn 3.
- ^ Lee, J. Command and Control in Battle: British Divisions on the Menin Road Ridge, 20 September 1917, in (Eds) Sheffield, G. and Todman, D. Command and Control on the Western Front, The British Army's Experience 1914–1918, pp. 119–139. (2004)
- ^ Command and.... op.cit. p. 135.
- ^ Edmonds, J. ibid pp. 269–270 & p. 276.
- ^ Sheldon, J. The German Army at Passchendaele, p. 165.(2007)
- ^ Rupprecht, Diary in Sheldon, J. Ibid p. 166
- ^ Sheldon, J. ibid p. 168.
- ^ Edmonds, J. pp. 278–279, ibid
- ^ Rogers, D. (Ed.) Landrecies to Cambrai, (Essays by G. C. Wynne from Army Quarterly 1924–1939) p. 168. (2010)
- ^ Rogers, ibid, p. 170
- ^ Der Weltkrieg, xiii, p. 75 quoted in Edmonds, OH 1917II, p. 295.
- ^ Edmonds, J. OH 1917 II, p. 280.
- ^ Edmonds, ibid, p. 282
- ^ Edmonds, ibid, p. 284.
- ^ Edmonds, ibid, p. 284, fn2
- ^ Birdwood, op. cit. in Terraine, J. The Road.... p. 272
- ^ Sheldon, J. op. cit. p. 169.
- ^ Edmonds, ibid, p. 287.
- ^ Edmonds, ibid, p. 288.
- ^ Rogers, D. (Ed), Landrecies to Cambrai, pp. 170–171(2011)
- ^ Edmonds, ibid, p. 289.
- ^ Jones, H.A. The War in the Air, vol 4, pp. 191–192.(1934) (N&M reprint 2002).
- ^ Jones, H.A. ibid, pp. 193–194.
- ^ Sheldon, op. cit. pp. 167–168.
- ^ Sheldon, ibid, p. 173.
- ^ Edmonds, ibid, pp. 291–292.
- ^ Edmonds, ibid, p. 292, fn 1.
- ^ Edmonds, p. 293.
- ^ Sheldon, J. The German army at.... p. 184
- ^ Edmonds, J. OH 1917 II, pp. 294–295
- ^ Ludendorff, Memoirs, vol ii, p. 489 in Terraine, J. Op. Cit. pp. 278–279.
- ^ Sheldon, Op. Cit. pp. 190–191.
- ^ Sheldon, ibid, pp. 184–186.
- ^ Terraine, ibid, p. 278.
- ^ Edmonds, J. ibid, p. 318, fn 2.
- ^ a b Robbins p. 128.
- ^ a b Bean p. 837.
- ^ Prior & Wilson p. 133.
- ^ Groom p. 207.
- ^ Prior & Wilson p. 135.
- ^ Malkasian p. 42.
- ^ Bean p. 847.
- ^ Edmonds, OH 1917II op. cit. pp. 316–317
- ^ Carlyon p. 485.
- ^ Pedersen p. 257.
- ^ Bean p. 866.
- ^ Groom p. 208.
- ^ My War Memories 1914–1918, p. 490.
- ^ OH 1917II p. 316, fn 1.
- ^ Bean. AOH iv, p. 881.
- ^ Bean, AOH, vol iv, p. 887
- ^ Khaki and Gown, p. 316 in Terraine, J. The Road op. cit. pp. 287–288
- ^ Kuhl in Terraine, J. op. cit. p. 288.
- ^ a b Bean 929
- ^ a b Nicholson p. 312.
- ^ a b Nicholson p. 314
- ^ Bean p. 930.
- ^ Edmonds p. 347.
- ^ Edmonds p. 348.
- ^ Evans p. 133.
- ^ a b Evans p. 134.
- ^ Wolff p. 246.
- ^ Nicholson p. 318.
- ^ a b Nicholson p. 320.
- ^ a b Nicholson p. 321.
- ^ Nicholson p. 323.
- ^ "The Ypres Salient". Second Passchendaele. Commonwealth War Graves Commission. n.d.. http://www.cwgc.org/ypres/content.asp?id=252&menu=subsub. Retrieved 8 February 2009.
- ^ Nicholson p. 325.
- ^ "Canada and the Battle of Passchendaele". Canadian Department of Foreign Affairs and International Trade. 19 October 2007. Archived from the original on 15 November 2007. http://www.dfait-maeci.gc.ca/canada-europa/brussels/passchendaele/battle-en.asp.
- ^ Hindenburg,P. The Great War, p. 156 (1920) Ed, Messenger, C. 2006
- ^ Terraine, J. The Road.... op. cit. p. 307.
- ^ Bean pp. 935–936.
- ^ Nicholson p. 331.
- ^ Bean p. 936.
- ^ Harris pp. 107, 111.
- ^ Harris pp. 124–125.
- ^ Sheldon, J The German Army at Cambrai, p. 312 (2009)
- ^ Taylor 1972.
- ^ Edmonds, J. OH 1916 I & OH 1917 II
- ^ Sheldon pp. 312–5.
- ^ Falls, C. ibid, p. 303. (1959,1961 edn)
- ^ a b Terraine pp. 344–5.
- ^ Prior & Wilson p. 195.
- ^ Sheffield, G. Forgotten Victory, The First World War: myths and realities, p. 216, (2002).
- ^ Shefield, G. The Chief, Douglas Haig and the British Army, (2011).
- ^ Sheffield, ibid, p. 248 and fn 101, p. 439.
- ^ William L. Shirer, The Rise and Fall of the Third Reich, (Simon & Schuster, 1960), p. 30.
- ^ New Zealand History.
- ^ Vance p. 66.
References
- Bean, C.E.W. (1941). The Official History of Australia in the War of 1914–1918: Volume IV: The A.I.F. in France 1917 (11th ed.). Sydney: Halstead Press Pty Limited.
- Boraston, J.H.; Bax, Cyril E.O. (1999) [1926]. Eighth Division in War 1914–1918. The Naval & Military Press. ISBN 1897632673.
- Carlyon. MISSING CITATION.
- Cook, Tim (2000). No Place to Run: The Canadian Corps and Gas Warfare in the First World War. Vancouver: University of British Columbia Press. ISBN 0774807407. http://books.google.ca/books?id=RCMXjVpj9xYC&lpg=PP1&dq=No%20Place%20to%20Run%3A%20The%20Canadian%20Corps%20and%20Gas%20Warfare%20in%20the%20First%20World%20War&pg=PP1#v=onepage&q&f=true.
- Edmonds, James (1948). France and Belgium 1917. Vol II. 7 June – 10 November. Messines and Third Ypres (Passchendaele). London: Imperial War Museum and Battery Press.
- Evans, Martin Marix (2005). Passchendaele: The Hollow Victory. London: Pen and Sword Books. ISBN 1844153681.
- Groom, Winston (2002). A Storm in Flanders: The Ypres Salient, 1914–1918 Tragedy and Triumph on the Western Front. New York: Atlantic Monthly Press. ISBN 0-87113-842-5. http://books.google.ca/books?id=kSAT6W2nPZgC&lpg=PP1&dq=A%20Storm%20in%20Flanders%3A%20The%20Ypres%20Salient%2C%201914-1918&pg=PP1#v=onepage&q&f=true.
- Harris, J. P. (1995). Men, ideas, and tanks: British military thought and armoured forces, 1903–1939. Manchester: Manchester University Press. ISBN 0-790-3762-1. http://books.google.ca/books?id=00myJhLVIUUC&lpg=PP1&dq=Men%2C%20ideas%2C%20and%20tanks%3A%20British%20military%20thought%20and%20armoured%20forces%2C%201903-1939&pg=PP1#v=onepage&q&f=true.
- Hart, Peter; Steel, Nigel (2001). Passchendaele: the Sacrificial Ground. London: Cassell & Co. ISBN 0304359750.
- Keegan, John (1998). The First World War. London: Pimlico. ISBN 0-7126-6645-1.
- Leach, Norman (2009). "'Passchendaele – Canada's Other Vimy Ridge". Canadian Military Journal (Department of National Defence) 9 (2): 73–82. http://www.journal.forces.gc.ca/vo9/no2/09-leach-eng.asp.
- Malkasian, Carter (2002). A history of modern wars of attrition. Westport: Praeger. ISBN 0275973794. http://books.google.ca/books?id=Xxu2iEEKi-IC&lpg=PP1&dq=A%20history%20of%20modern%20wars%20of%20attrition&pg=PP1#v=onepage&q&f=true.
- Nicholson, Gerald W. L. (1962). Official History of the Canadian Army in the First World War: Canadian Expeditionary Force 1914–1919. Ottawa: Queen's Printer and Controller of Stationary. http://www.cmp-cpm.forces.gc.ca/dhh-dhp/his/docs/CEF_e.pdf.
- Pedersen. MISSING CITATION.
- Prior, Robin; Wilson, Trevor (1998). Passchendaele: The Untold Story. Cumberland: Yale University Press. ISBN 0300072279.
- Robbins, Simon (2005). British generalship on the Western Front 1914–18: Defeat into Victory. Abingdon: Frank Cass. ISBN 0415350069. http://books.google.com/?id=qgO2rDvdOq4C&lpg=PP1&dq=British%20generalship%20on%20the%20Western%20Front%201914-18%3A&pg=PP1#v=onepage&q&f=true.
- Sheldon, Jack (2007). The German Army at Passchendaele. London: Pen and Sword Books. ISBN 1844155641.
- Taylor, A.J.P. (1972). The First World War. An Illustrated History. New York: Perigee Trade.
- Terraine, John (1984). The Road to Passchendaele: The Flanders Offensive 1917, A Study in Inevitability. London: Leo Cooper. ISBN 0-436-51732-9.
- Travers, Tim (2003). The Killing Ground: The British Army, the Western Front & the Emergence of Modern War 1900–1918. London: Pen and Sword Books. ISBN 0-85052-964-9.
- Wolff, Leon (1958). In Flanders Fields: The 1917 Campaign. New York: Viking. ISBN 9780140146622. http://books.google.ca/books?id=Tezy3pRhdzYC&lpg=PP1&dq=In%20Flanders%20Fields%3A%20The%201917%20Campaign&pg=PP1#v=onepage&q&f=true.
External links
- [1] Passchendaele – The Final Call – Poem and biography of Captain James Willard
- Passchendaele Original reports from The Times
- Battles: The Third Battle of Ypres, 1917
- Westhoek The great war in Flanders Fields – A war and peace experience.
- Second Lieutenant Robert Riddel, Military Cross, 10th Battalion Argyll & Sutherland Highlanders, Passchendaele, 12 October 1917
- Guernsey students re-trace a soldier's journey to Passchendaele for Radiowaves (2007)
- Robert Hall "Uncovering the secrets of Ypres" 23 February 2007. BBC News, Belgium
- The Battle of Passchendaele Day by day detailed description of battle (with maps).
Categories:- Conflicts in 1917
- 1917 in Belgium
- Battles of World War I involving Australia
- Battles of World War I involving Canada
- Battles of World War I involving France
- Battles of World War I involving Germany
- Battles of World War I involving New Zealand
- Battles of World War I involving South Africa
- Battles of World War I involving the United Kingdom
- Battles of the Western Front (World War I)
- Ypres
- Passchendaele
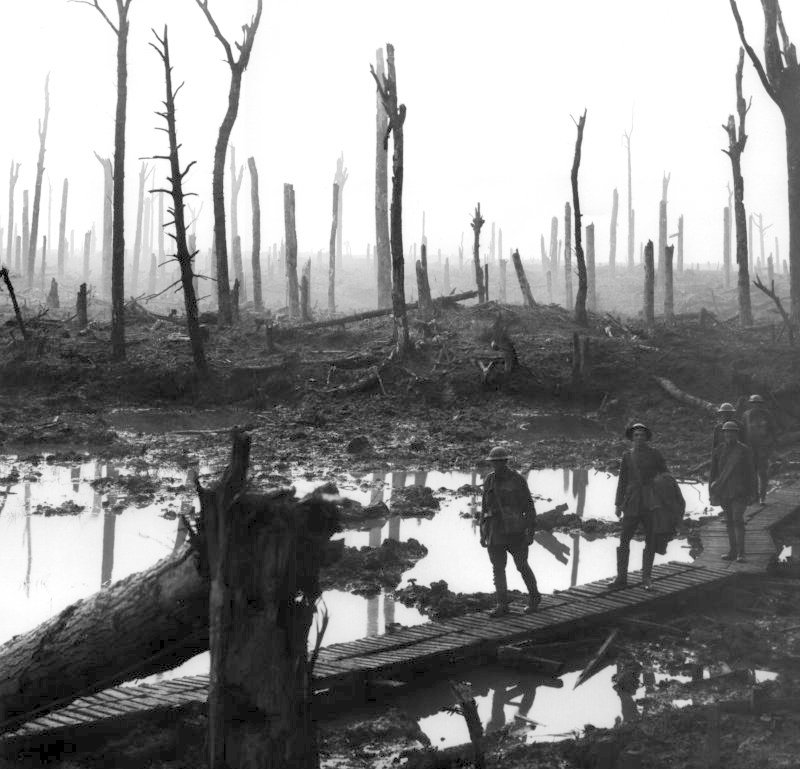

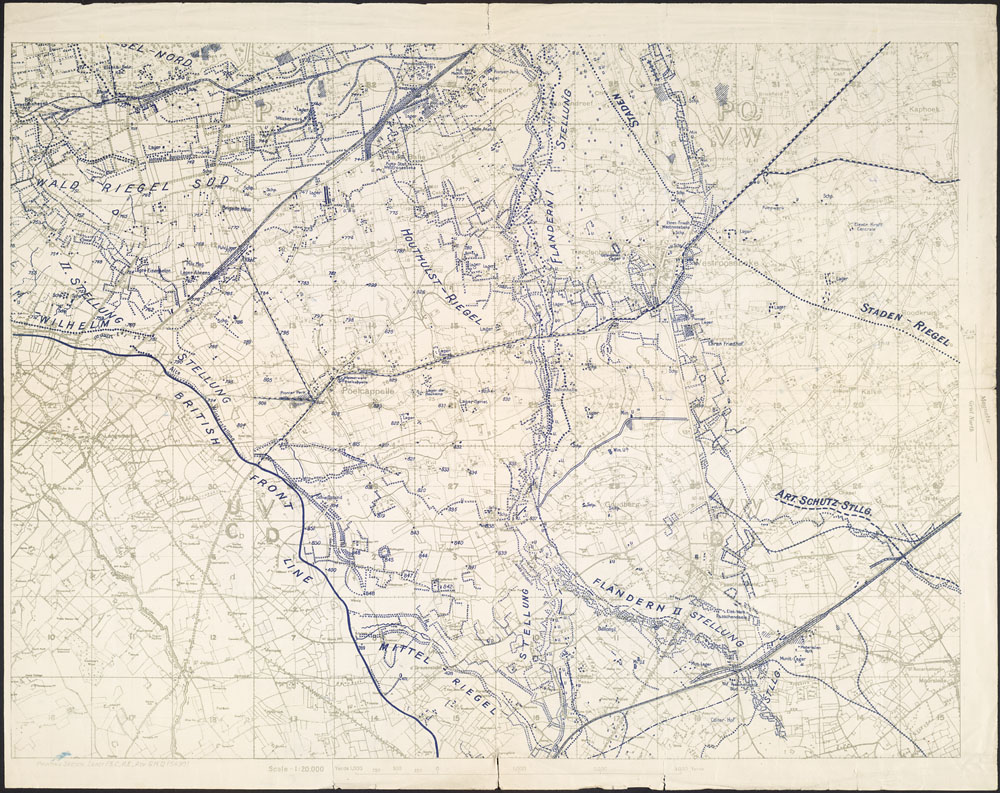


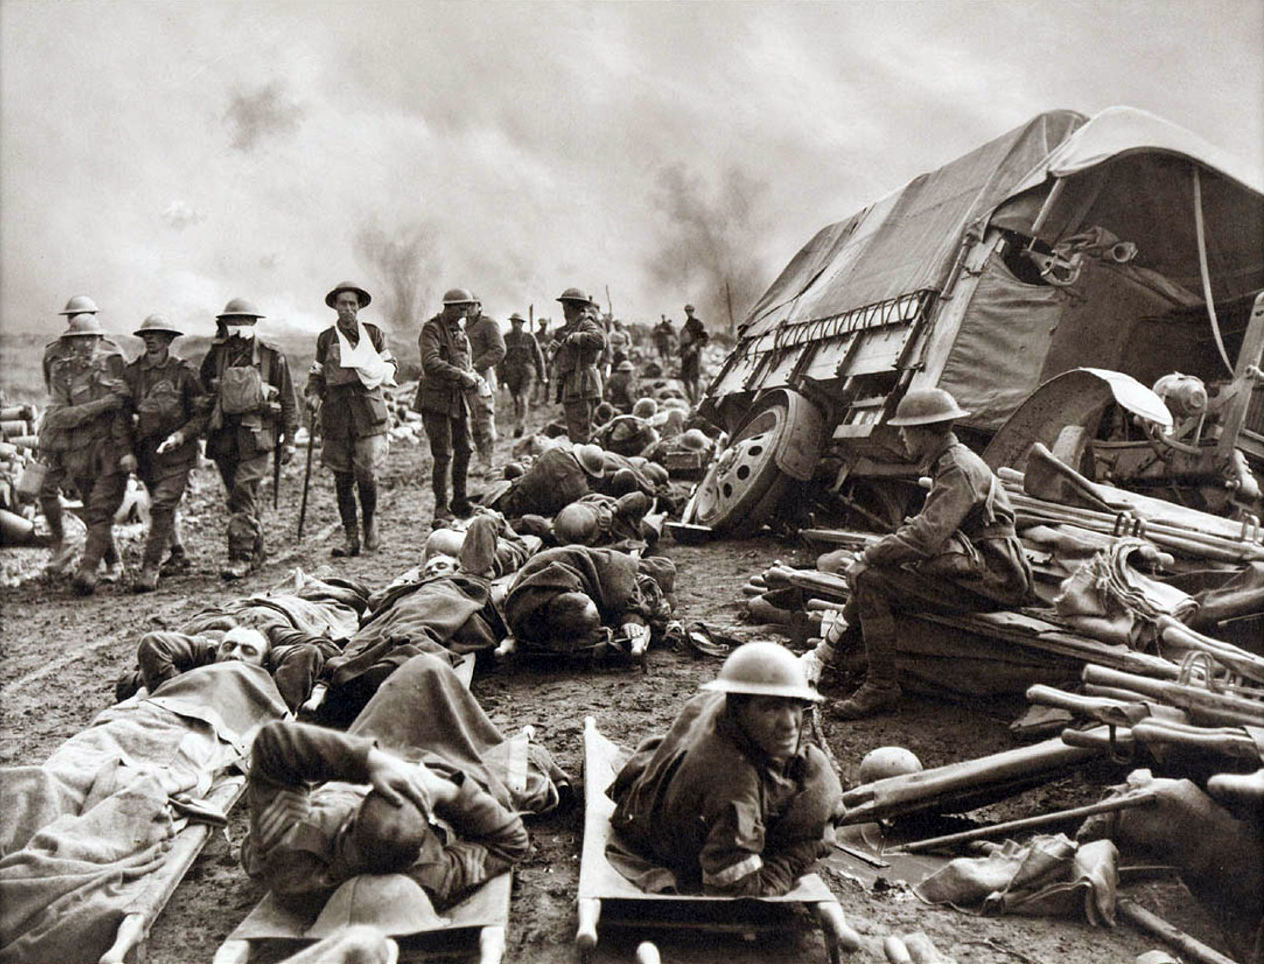
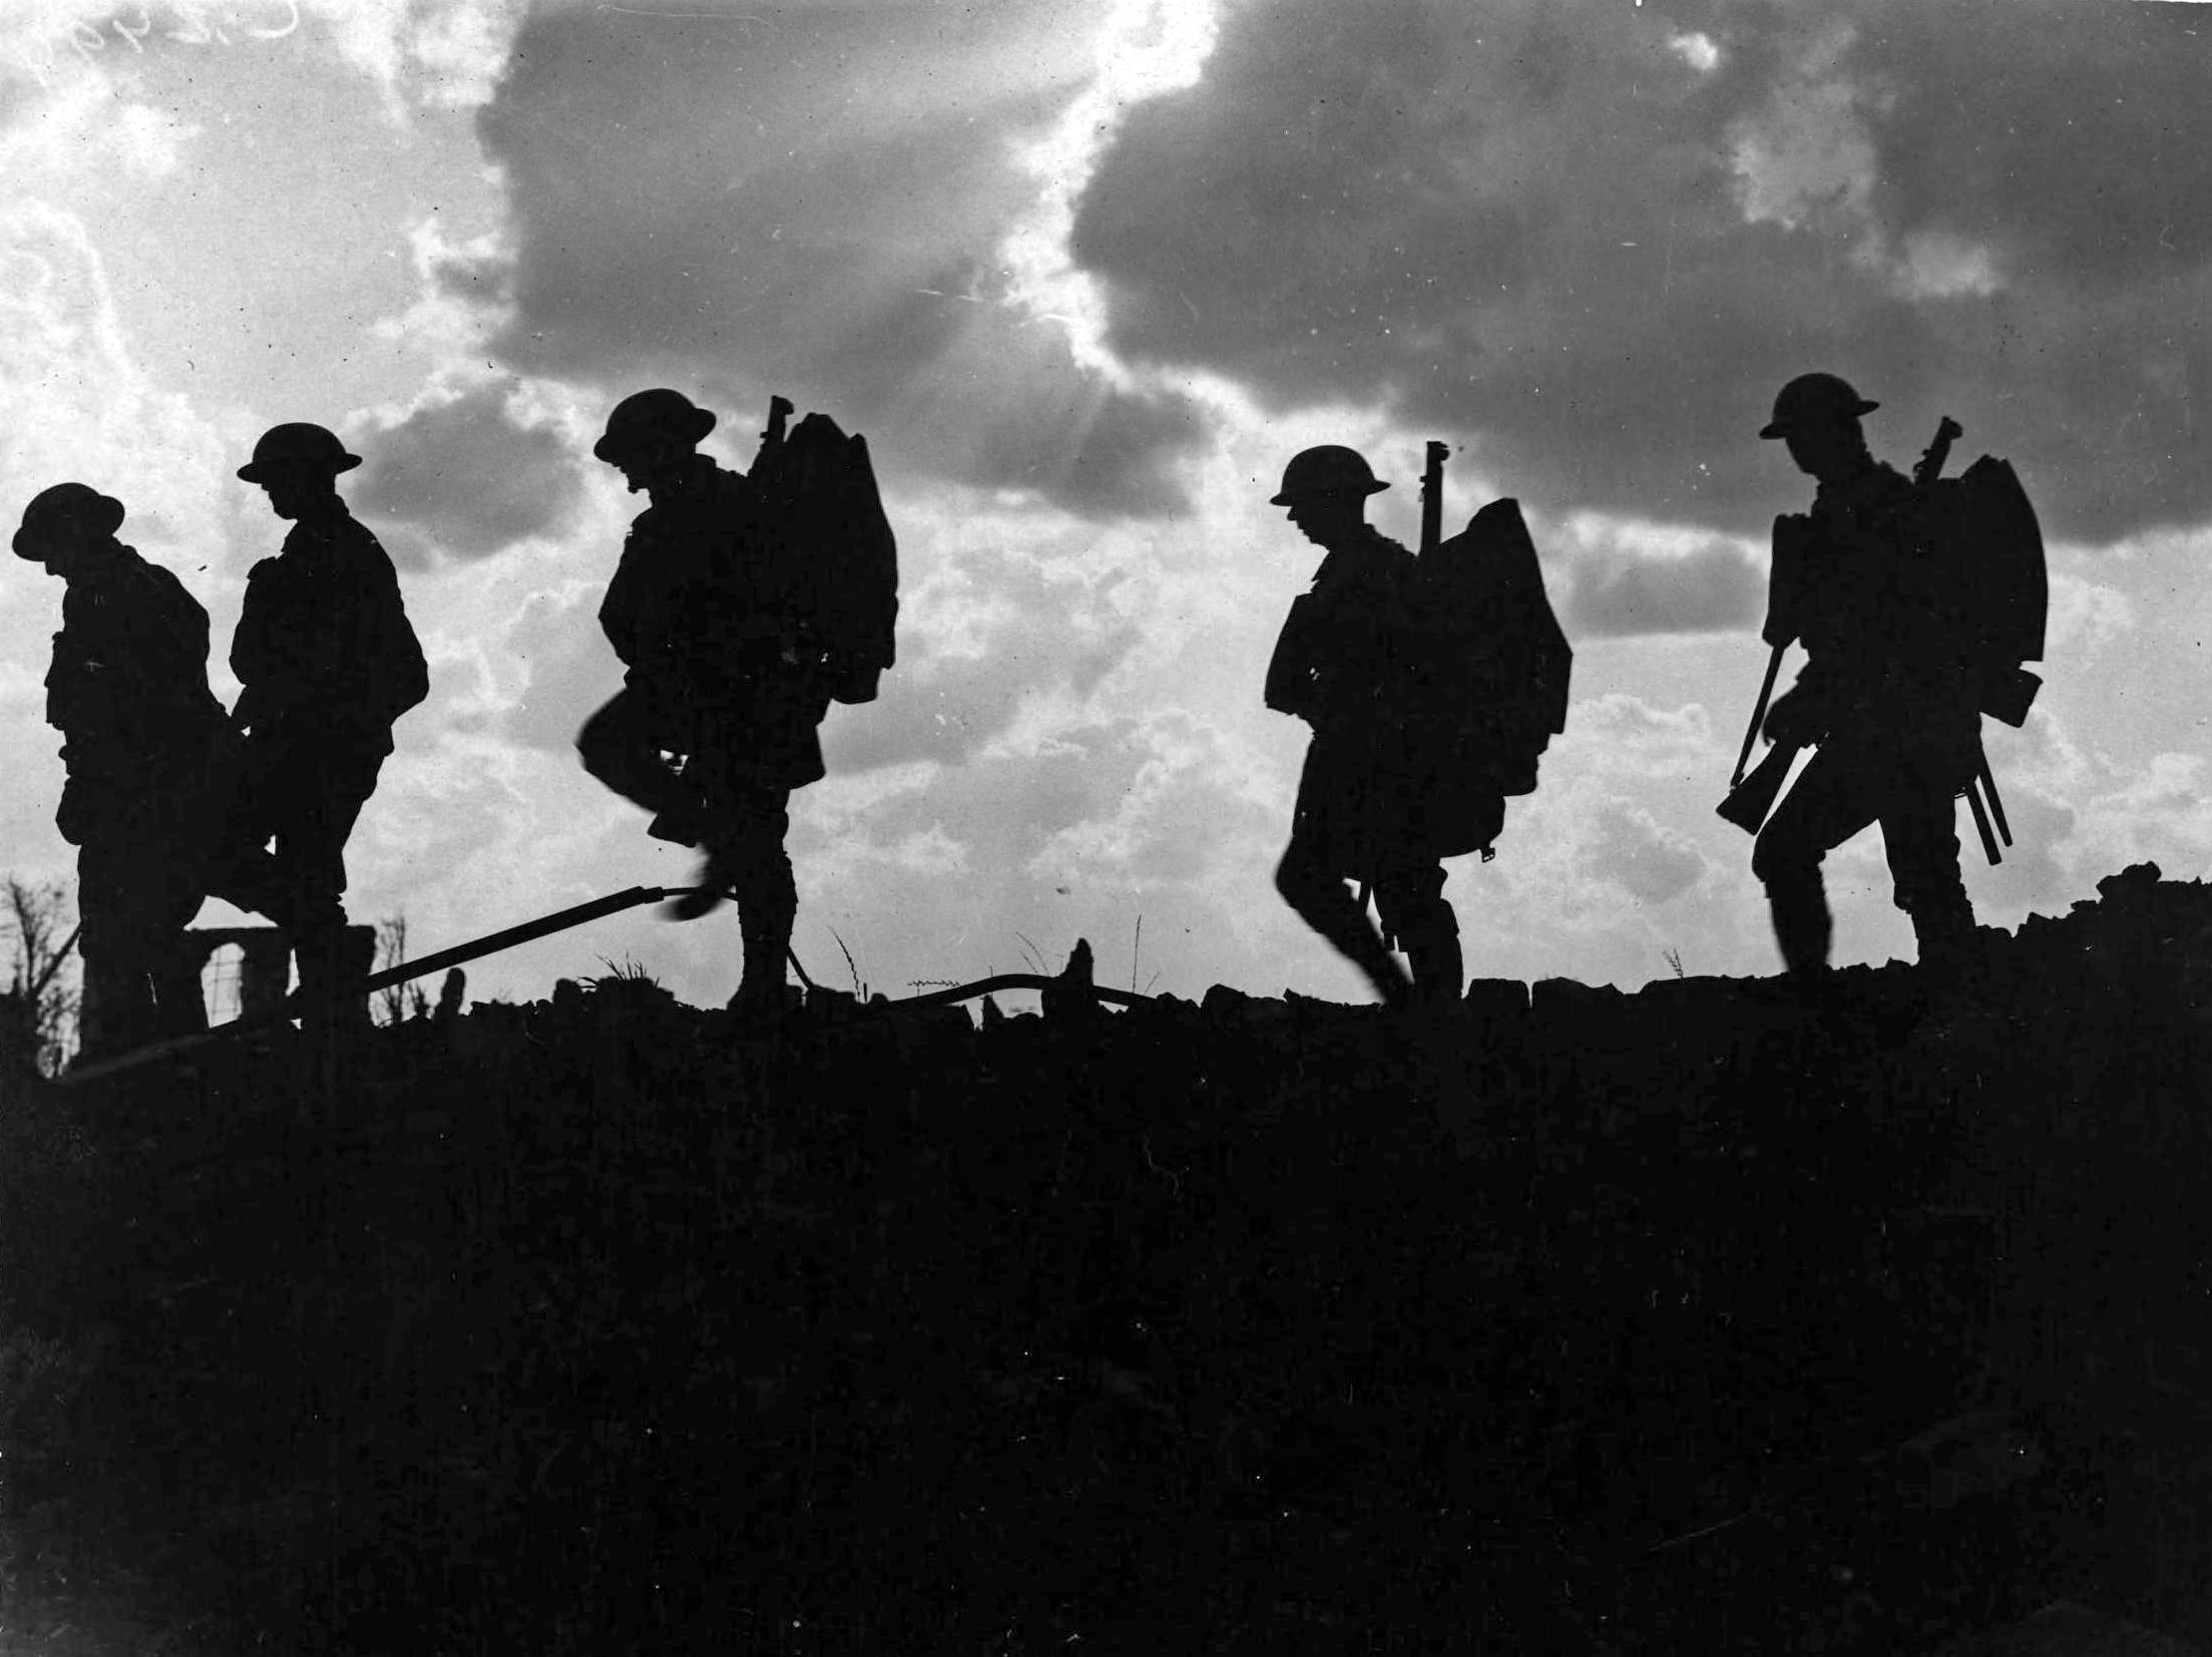
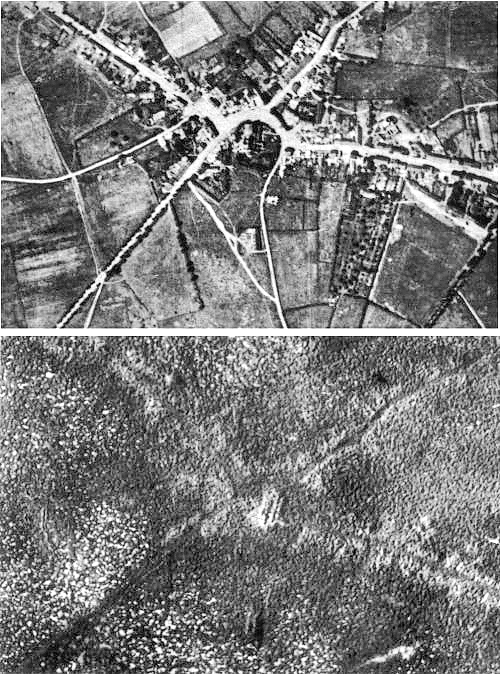
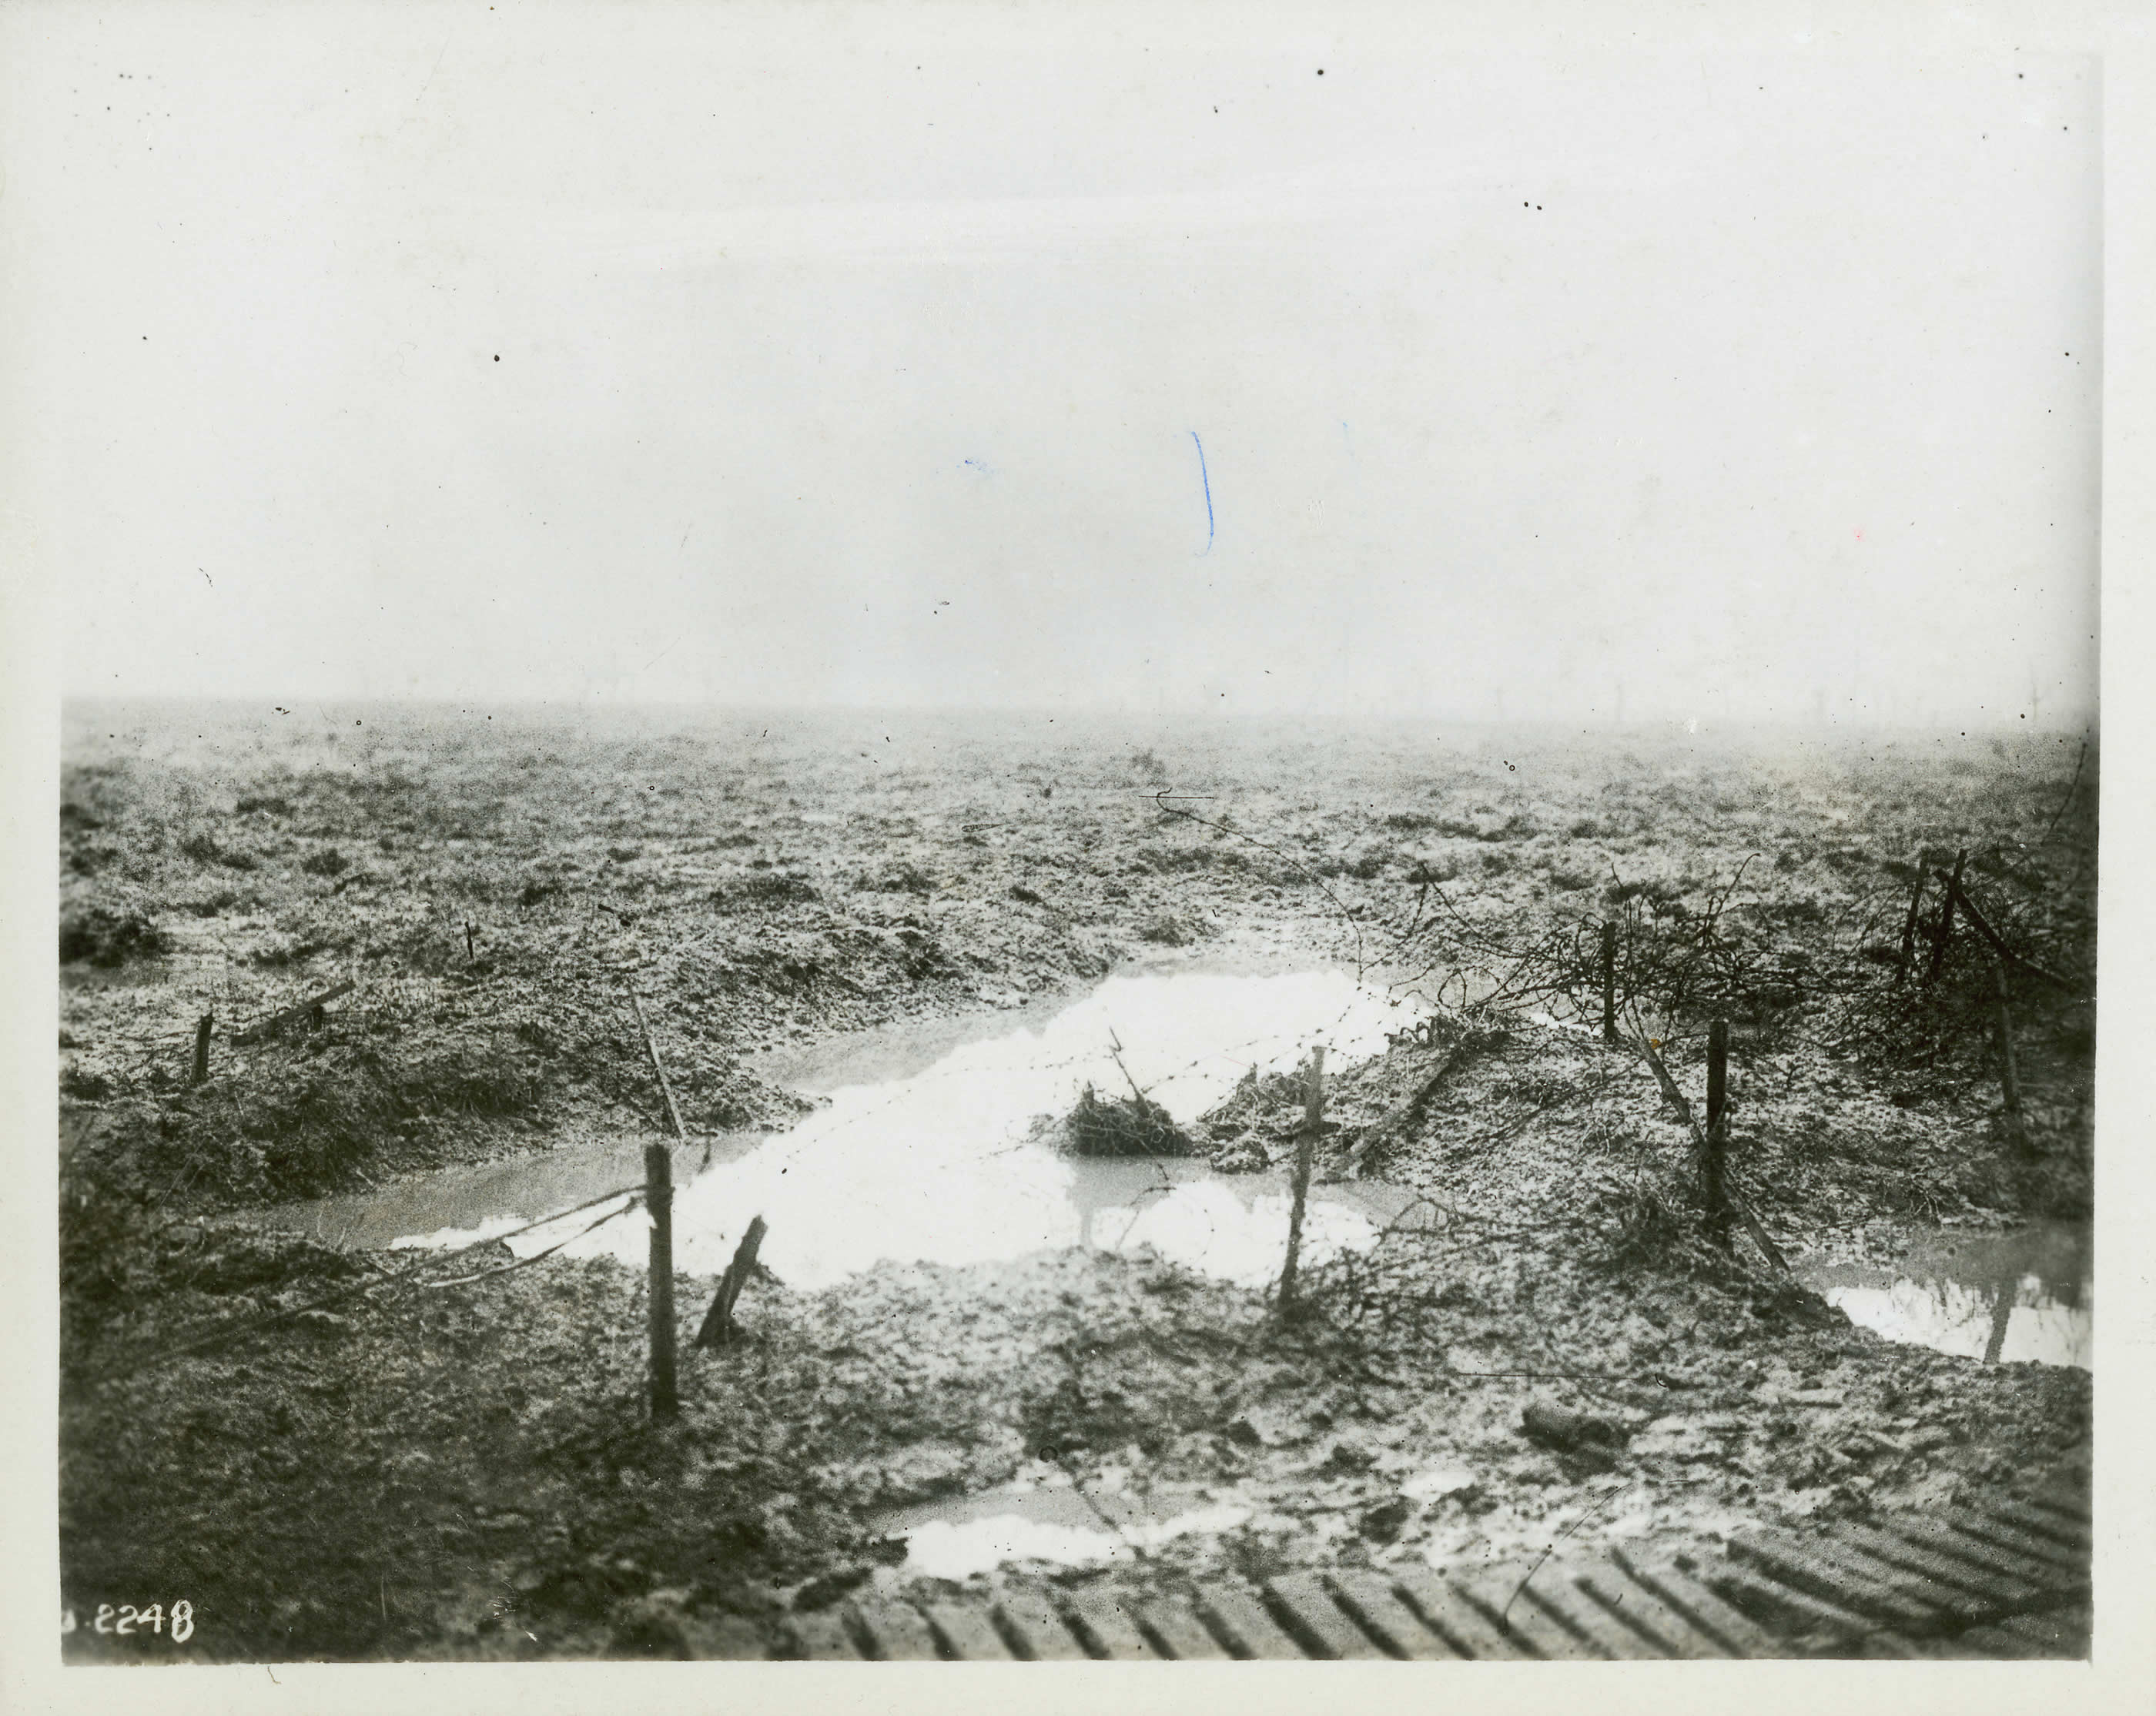
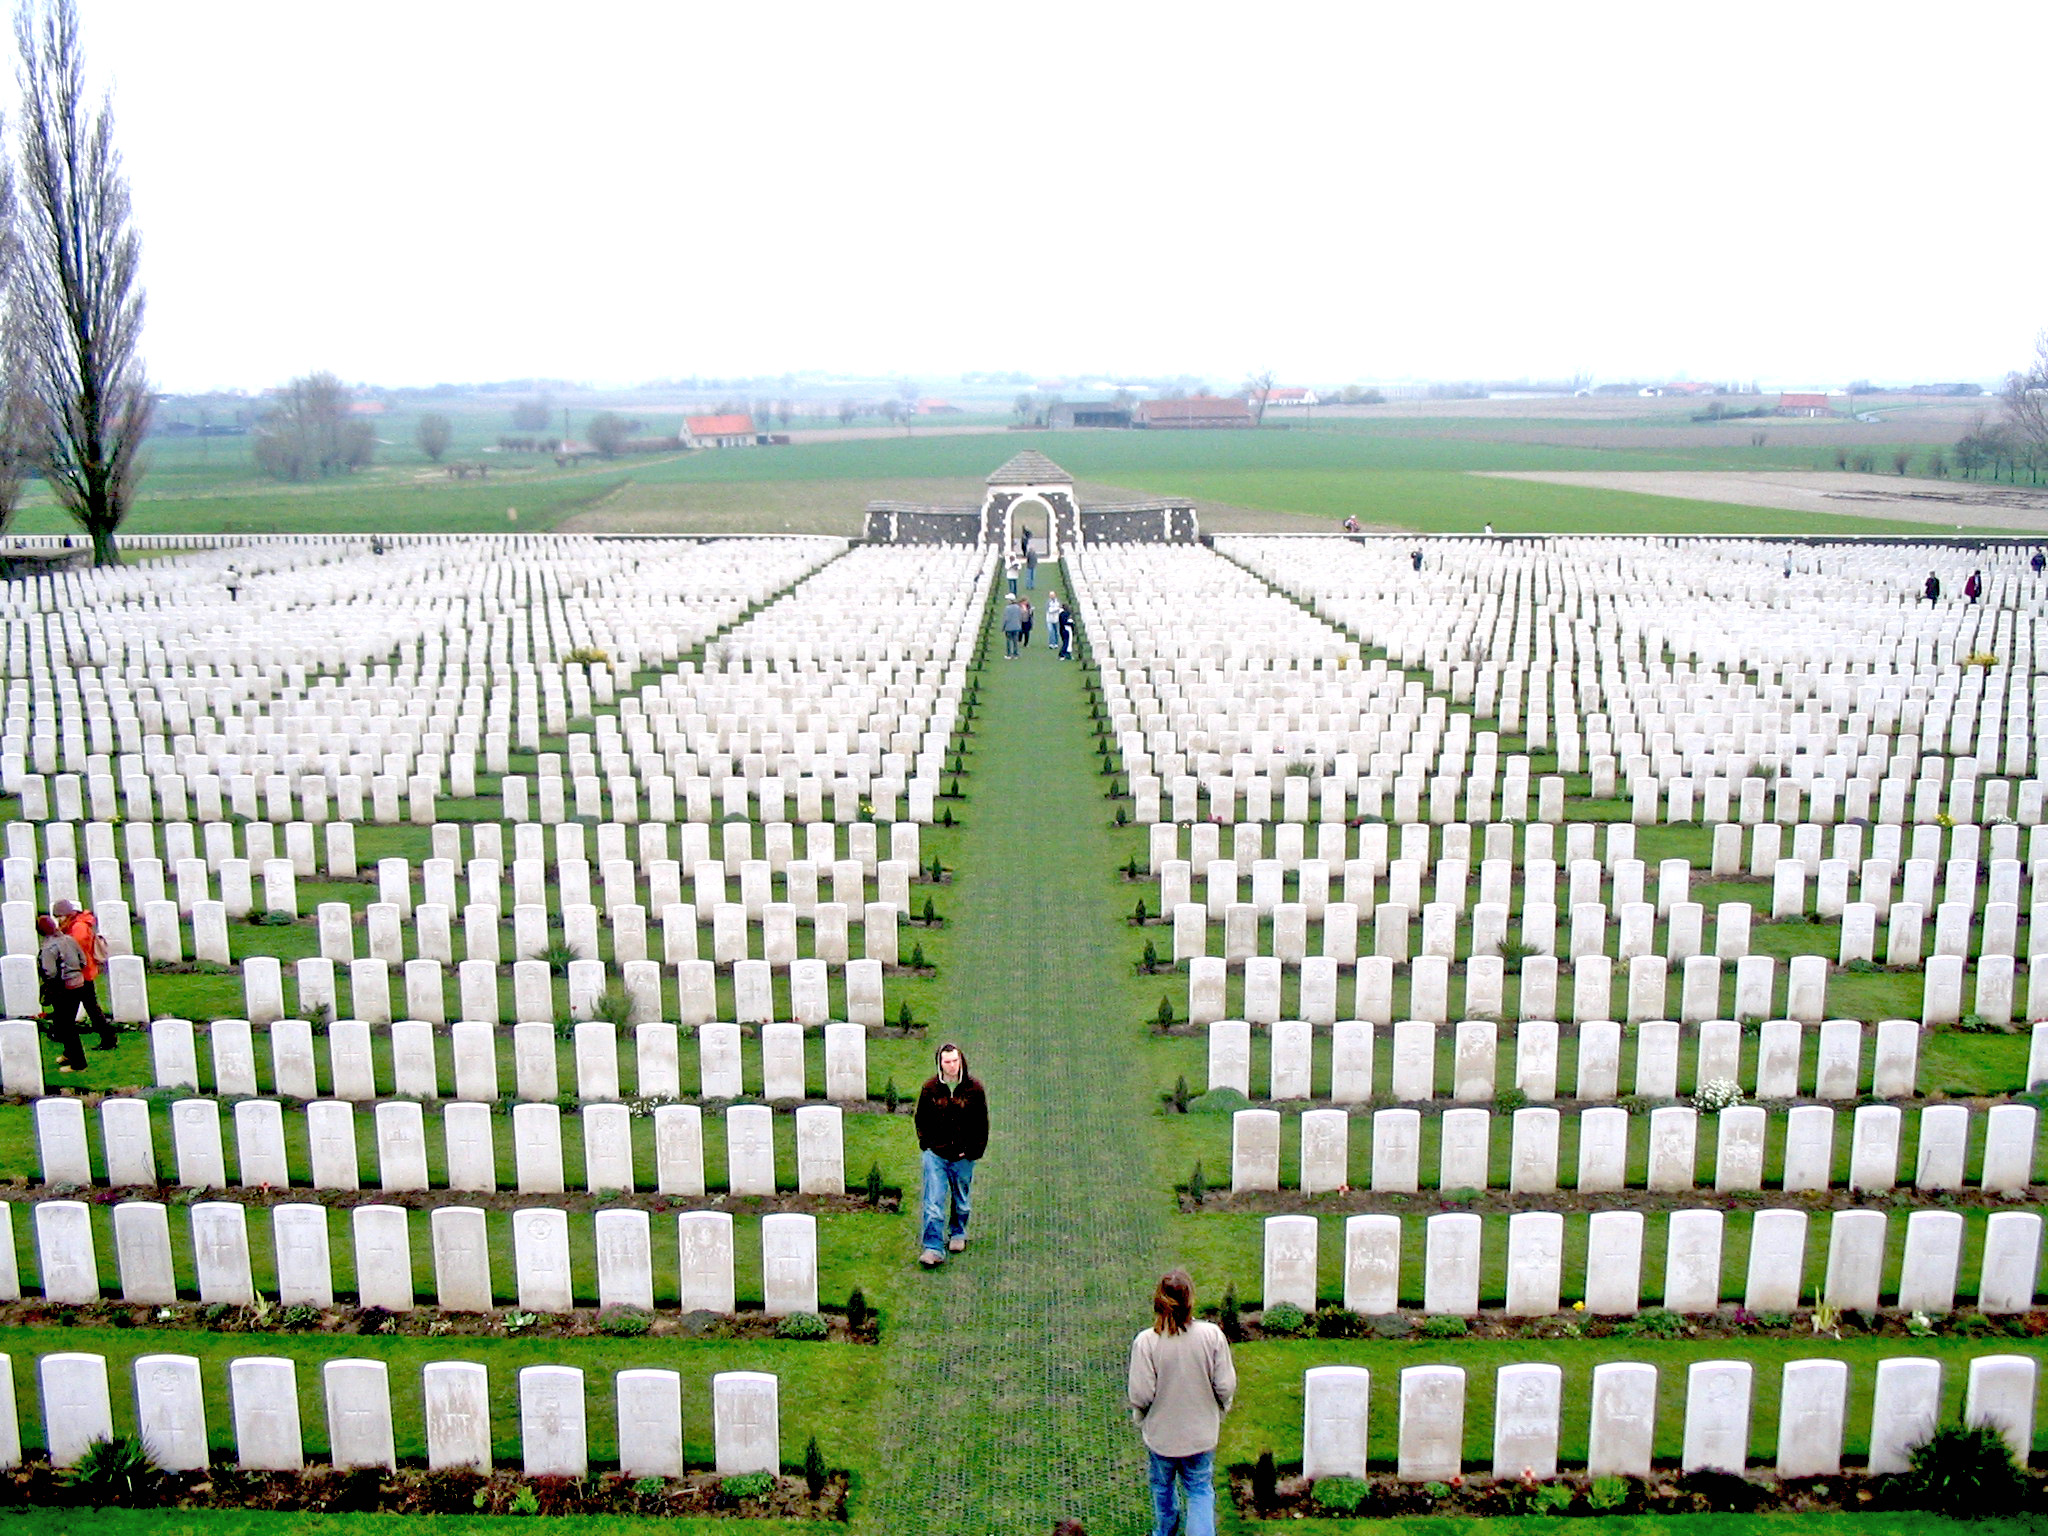
Wikimedia Foundation. 2010.